Graphics Programs Reference
In-Depth Information
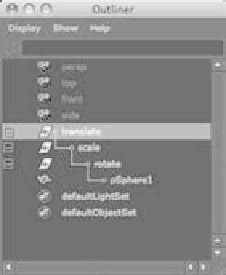
Setting Up the Hierarchy
To make life easier, you'll set up the ball with three null nodes above it, listed here from
the top parent node down: translate, scale, rotate. All the animation will be placed on
these three nodes, and not the sphere itself. This will allow you to easily animate the ball
bouncing, squashing, and stretching, and moving forward in space.
1. Select the sphere and press Ctrl+G to create the first
group. In the Outliner, call this new group
rotate
.
2. With the rotate node selected, press Ctrl+G to create
the scale group, and name it accordingly.
3. With the scale group selected, press Ctrl+G one last
time to create the translate group and name it accord-
ingly. Figure 8.2 shows the hierarchy.
As you animate, you'll quickly see why you've set up a
hierarchy for the ball, instead of just putting keys on the
sphere itself.
Figure 8.2
The ball's hierarchy
Animating the Ball
Your next step is to keyframe the positions of the ball using the nodes above the sphere.
As introduced in Chapter 1,
keyframing
is the process of setting positions and values at
particular frames of the animation.
You'll start with the
gross animation
, which is the overall movement scheme, a.k.a.
blocking
. First, you'll move the ball up and down to begin its choreography in these steps:
1. Press W to open the Translate tool, select the translate node, and move it up to the
top of the frame, say about 10 units up in the
Y
-axis and 8 units back in
X
-axis at
(-8,10,0). Place the camera so that you'll have some room to work in the frame.
2. Instead of selecting the Translate attributes in the Channel Box and pressing S as you
did in Chapter 2, “Jumping in Headfirst, with Both Feet,” to set keyframes on the
planets, you'll set keyframes for translation in an easier way.
Press Shift+W to set keyframes on Translate X, Translate Y, and Translate Z at frame 1
for the top node of the ball (named translate). To make sure your scene is set up
properly, set your animation speed to 30fps by choosing Window
➔
Settings/Prefer-
ences
➔
Preferences to open the Preferences window or by clicking the Animation
Preferences button ( ) next to the Auto-Key button. In the Settings category of
the Preferences window, set Time to NTSC (30fps). A frame range of 1 to 120 is
good for now. Figure 8.3 shows the ball's start position.