Game Development Reference
In-Depth Information
Now you can see a large list of appropriately named Event Commands. There are three pages full of many useful
commands for your eventing needs. The first command we need is called
Show Text
. Show Text will allow you to write
in some text that will be displayed in a box when the event is triggered; see Figure
2-7
.
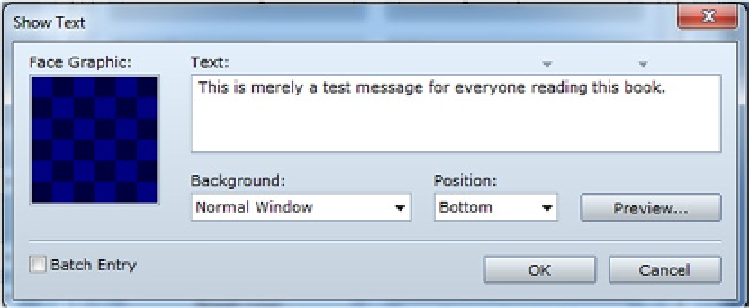
Figure 2-7.
The Show Text event window
As you can see in Figure
2-7
, there are a few things you can do with this command.
•
You can add a character portrait to the text box. Keep in mind that doing so reduces the
amount of text that you can fit in each line.
•
On that note, you may have already noticed the pair of arrows on top of the text box. The left
arrow marks the limit of text that can be displayed in a line if you have a character portrait,
while the right arrow marks the limit if you do not have a portrait in the box. If you had a
character portrait, the preceding line would read roughly as follows in-game: “This is merely
a test message for everyone re.” Otherwise, it would read, “This is merely a test message for
everyone reading this bo.” You can use Enter to break up your lines, so that they don't hit that
limit. A text box can fit up to four lines of text.
•
The
Batch Entry
option can be toggled to allow you to write more than four lines of text.
(It adds a scrollbar to the right of the text box). Additional Show Text commands will
automatically be created after every fourth line of text that you have, once you select OK.
•
Background
affects the appearance of the text box itself. The default is Normal Window, which
will display the text box in the color set within RMVXA. The default is -34 Red/0 Green/68 Blue
and can be changed with the use of the
Change Window Color
event command. You can also
set the text box to Dim Background and Transparent. Transparent can be quite useful if you
have a scene in which you have blacked out the screen and just want to show the text, without
the accompanying text box.
•
Position
is fairly self-explanatory. You can set the position of the text box on the screen when it
is displayed. It defaults to Bottom and can also be set to Middle or Top, as desired.
Let's write “You stepped on the switch!” and then click OK.
•
The next step is not strictly required but adds a little atmosphere to the event. By using the
Play SE
command (available on the second page of the Event Command list), you can set
a sound effect to be played after you step on the switch. I chose the Jump1 SE and left it at
default volume and pitch. You can play around with one or the other, to see how they affect the
sound effect in question.
•
Last, we toggle the switch! The
Control Switches
event command is on the first page of the
Event Commands list.