Game Development Reference
In-Depth Information
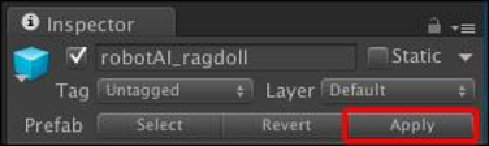
14. Next, we will click on the
robotAI_ragdoll
game object in the
Hierarchy
view
and go to the
Inspector
view. Then, click on the
Apply
button to update the pre-
fab, as shown in the following screenshot:
15. As we have already updated the
robotAI_ragdoll
prefab in the
Project
view, we
don't need to keep the
robotAI_ragdoll
game object in the
Hierarchy
view any-
more. So, we just delete this by right-clicking on it and choosing
Delete
.
16. Now, we need to go to the
Chapter7/Scripts/C#/Actor
(for C# users) or
Chapter7/Scripts/Javascript/Actor
(for Unity JavaScript users)
folder, and open the
AI
script, which will be used to replace the
ro-
botAI_ragdoll
game object when the AI is dead. Let's open the
AI
script and
go to the
UpdateHitPoint()
function and add the highlighted code as fol-
lows:
// Unity JavaScript user:
protected override function UpdateHitPoint (collision
: Collision) {
if (IS_GAMEOVER == false) {
if (collision.transform.tag == "Rocket") {
HitPoint.CURRENT_AI_INDEX = index;
var rocket : Rocket =
collision.gameObject.GetComponent.<Rocket>();
HP = Mathf.Clamp(HP-rocket.damage, 0, _maxHP);
if (HP == 0) {
var myRagdoll : GameObject =
Instantiate(ragdoll,transform.position,transform.rotation);
var rigids : Rigidbody[] =
myRagdoll.GetComponentsInChildren.<Rigidbody>();
var rocketForce : Vector3 =
rocket.transform.forward *