Graphics Reference
In-Depth Information
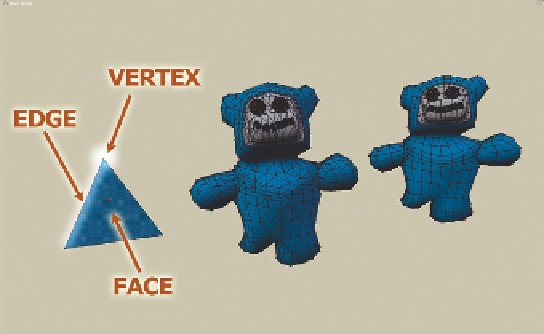
Take a look now at the object on the
right of
Figure 4.1
. It has the same shape
as the one in the center, but it appears
to be made up of squarish objects instead
of triangles. If you were a geometry whiz
in high school, you're probably thinking,
“Moron—quadrangles are just two tri-
angles that share an edge,” and you'd be
correct. Generically, quadrangles and tri-
angles together are referred to as poly-
gons. Many modelers find it more
convenient to work with quadrangles,
using triangles only when necessary.
Figure 4.1
Mesh objects in Edit mode: Vertices, Edges, Faces.
The hardest part about modeling, though,
is not whether to use quadrangles or triangles. The real trick is in thinking about the object you are trying
to create and deciding from the different methods. Really, there are millions of ways to model an object,
beyond the initial aesthetic considerations such as how stylized it should be or how much detail to give
it. Your first job as a modeler is to decide which approach you will take, and that approach will have a
major effect on the amount of effort you have to put into the model.
Unfortunately, until you're more familiar with the tools and approaches, you won't be able to make an
informed decision on how to go about things. So, let's jump in with the most “nuts and bolts” method:
free modeling, or building an object polygon by polygon.
Free Modeling: Polygon by Polygon
Figure 4.2
shows a flower, modeled with a variety of techniques, but started with polygon-by-polygon
modeling. Also in the figure is a good configuration for mesh modeling in Blender on a widescreen monitor
or laptop. Along the right of the screen is a Properties window, which will be useful for some more
advanced techniques when we directly access object data and modifiers that are discussed in later sections
and chapters. The rest of the screen is dedicated to a large 3D view that provides you with maximum
screen real estate for modeling. The T key toggles the tool shelf, which will appear on the left. The tool
shelf gives you quick access to the various mesh modeling tools that are available, lets you search for and
add new tools that might not be a part of the default configuration, and lets you tweak previous modeling
actions that you've performed. The N key toggles a Properties panel (no, not the Properties window—I
guess we still don't have our act completely together in Amsterdam) that gives access to transform informa-
tion. The nice thing about both the tool shelf and Properties panel are that they quickly pop into and out
of existence as you need them with the appropriate toggle key, letting you grant the largest possible area
to your modeling activity.
In this modeling view, note how the 3D cursor lies at the origin (0,0,0) in 3D space. When you create a
new object, it appears at the location of the 3D cursor, just like new words appear at the location of the
cursor in a word processor. The flower in
Figure 4.2
is what we are shooting for in this exercise.
Search WWH ::

Custom Search