Graphics Reference
In-Depth Information
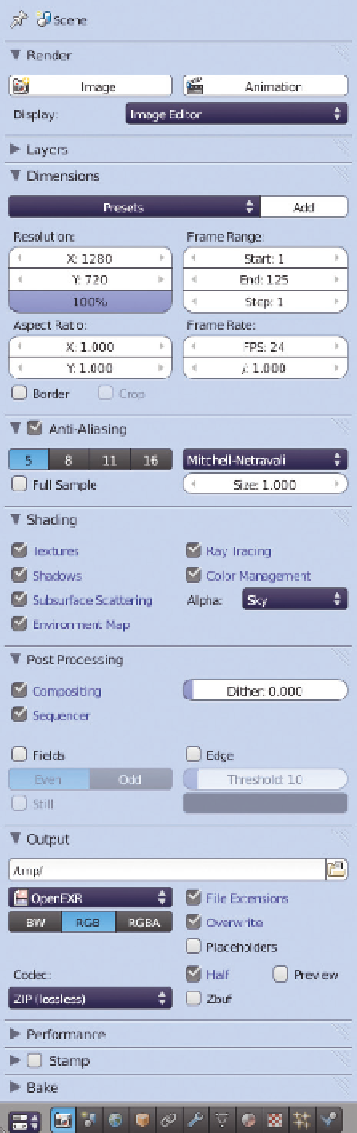
Ray Tracing or Subsurface Scattering to increase speed. For
your final render though, it should all be turned back on. Also,
if you have any materials that require
Full Oversampling
,
but for which you turned it off earlier, look them up and re-
enable it. If you have a node network created in the composi-
tor, and you want to use it, make sure that
Compositing
is
enabled in the
Post Processing
panel.
Let's look at the
Output
panel. The main image formats to
consider when rendering your animation out to stills are
PNG
and
OpenEXR
. If storage space is a concern, you'll probably
want to stick with PNG. It provides a nice file size without
compression artifacts. Also, most external imaging and video
applications can easily deal with PNG files. You can even view
them in your web browser. The OpenEXR format preserves
more of the original color data from renders. Internally, Blender
renders values as floating-point numbers, meaning that the red
component of an RGB pixel is represented by decimal values
between 0 and 1, capable of a high degree of precision. The
PNG and most other RGB formats represent each color
channel as an integer between 0 and 255, meaning that there
are only 256 possible values for each channel on any given
pixel. OpenEXR uses the decimal method, maintaining the
actual render values. Under normal circumstances, you're not
going to see the difference. When creating animation from still
frames though, it's best to give the compression algorithms the
most precise information possible, as long as you can afford the
hard drive space.
A frame rendered in 720p resolution (1280 × 720 pixels) and
saved as a PNG file is 0.25 MB, while it grows to 0.48 MB
when saved as an OpenEXR with the
Half
option enabled.
That's not a lot of hard drive space, but when multiplied by
the number of frames you'll have in your animation, it's cer-
tainly something to consider.
Once you've made the decision about the rendering format
and specified an output folder just like you do with still images,
it's time to render. Press the
Animation
button on the
Render
panel to start the process. Depending on the single-
frame render time and how long your actual animation is, it
might take quite awhile to finish. This is another advantage to
rendering a series of stills. Rendering seriously bogs down your
Figure 14.1
The Render properties for animation.
Search WWH ::

Custom Search