Graphics Reference
In-Depth Information
Editor. To make it happen, you'll have to LMB click at the 0,0 point, setting the green crosshairs there
that function as the Graph Editor's 2D version of the 3D cursor. Now, select the first curve point with
the RMB, and use the Shift-S to snap the point to both the cursor's value and frame. This is a massively
annoying workflow, but you don't have to do it that often.
Here's the math. Well, it's not technically math, its measurement, but using that in conjunction with
coordinates seems mathish enough to have warned you. Bring up a 3D view and move the chin control
bone downward as far as you think you would prefer to pull it for the control. Note the transform
z
value
on the header as you do it. This will be the
y
value for the second curve point. The
y
axis for a driver
represents the driven value, in this case the “Value (open jaw)” property. When the bone hits the specified
value, we want the
y
axis to be at 1.0. So, the second curve point should be set at 1.0
y
(up) and whatever
the noted value from playing with the bone turned out to be for the
x
(across) axis.
There's one problem with that: The
x
axis normally represents time, so you can't select a fraction or
decimal frame. Whole numbers only. Unfortunately, that means real math. The simplest solution is to just
multiply both the
x
and
y
values by 100, then set them. So, if the
y
value was supposed to be 1.0, it's
now 100. If the
x
value is supposed to be −0.034 (which it is in the sample file), it becomes −3 after
rounding. Your actual
x
,
y
pair for the second point in the curve becomes (−3, 100). That's as rough as it
gets. Use the shenanigans with the 2D cursor again to set the second curve point to
x
= −3 and
y
= 100.
Now, when you pull the bone down, the jaw moves fairly closely with it.
Once again, why would you possibly want to jump through those kinds of hoops just for something you
did much more easily with the Custom Properties controllers? The first reason is that you can attach as
many custom-mapped drivers to that bone as you like. You
could add a driver for the “lips closed” shape and map it
to execute as the bone moves between 0.0 and 0.015. That
would mean that moving the bone down opened the jaw,
while moving it upward fully closed the mouth. It's a
gigantic pain to set up, but from the animator's standpoint
it's an intuitive, effective control.
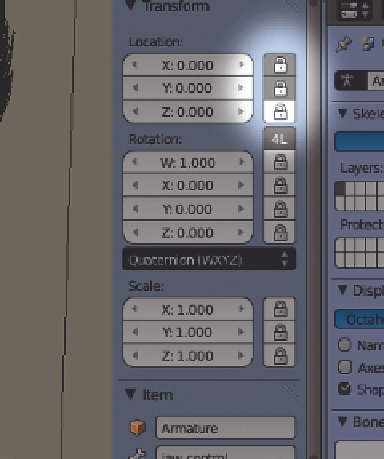
To really finalize such a control, you can lock the bone's
transform on the
x
and
y
axes by LMB clicking the lock
icon in the 3D view N-key properties panel for the bone.
Shown in
Figure 10.11
, this will prevent the bone from
moving along anything but the
z
axis during transform,
meaning that when you grab and move it, it will move
only the axis that's bound to the drivers.
The other advantage is that you can use bone parenting to
achieve additional levels of control that are not capable with
Custom Properties sliders.
Figure 10.12
shows the character
with an “eye closed” control bone placed beside each eye.
Figure 10.11
Locking transform.
Search WWH ::

Custom Search