Graphics Reference
In-Depth Information
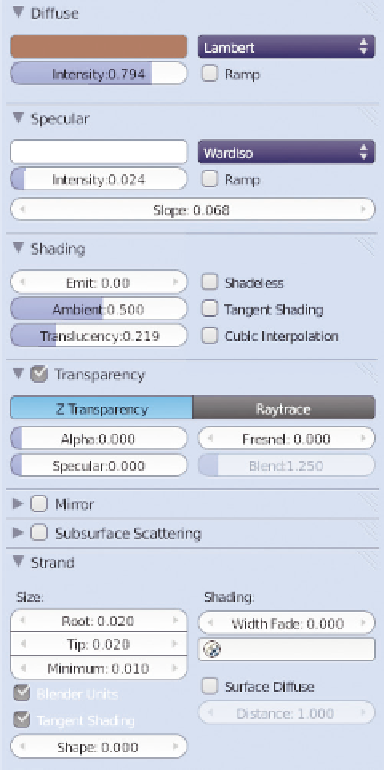
Transparency
is enabled and set to
Ztransp
, with
Alpha
down to 0.0. We'll be using Alpha in the texture, so we
remove it from the main material setting. Finally, reduce
the
Specular
control on the Transparency panel to 0.0.
Transparent objects like glass can still show a full specular
highlight, and this field determines whether or not that
happens. We're going to make the tips of the strands fade
to Alpha 0.0 (no opacity), and we don't want a crazy high-
light showing up there, so it goes to 0.0.
Figure 7.46
shows the texture that will do all the work. It
is a simple Blend style texture with four control points on
its color ramp. It begins on the left as a very dark brown
with an Alpha of 0.350, making it almost two-thirds trans-
parent. Next, it changes to a similar brown, with much
higher Alpha: 0.856. Then, just before the end, it begins
to lighten a bit, though the Alpha stays the same. Finally,
the color brightens to a light tan, and Alpha drops to 0.0,
completely transparent.
The real key is the
Coordinates
setting in the
Mapping
panel:
Strand
. This maps the Blend texture along the
length of the strand, meaning that all hair strands begin as
semi-transparent dark brown at their root, becoming less
transparent along their length, ending with complete trans-
parency as they lighten. To make use of this transparency,
be sure to enable the
Alpha
influence slider in the texture
properties. When rendered, it looks like
Figure 7.47
.
We're not going to do it with our example, but here's a
neat property of strands: Their base diffuse color is taken
from the base color of the mesh at the location of their
emission. You could use the strand-mapped blend texture
to simply vary the Alpha and let the strands take their color from the underlying material. This is how
you would generate the spots in a leopard's fur, or the salt-and-pepper beard of a middle-aged man.
Figure 7.45
The Strand properties, and a suggested
starting point for shaders.
Materials for Clothes
Creating materials for clothes (and other elements) will follow the procedure we've used so far: observe,
estimate, and test. Putting our sample character into a red cotton shirt and blue jeans shouldn't seem like
such a daunting task now. We'll do the shirt here and leave the jeans up to you.
First, set your overall material properties. Your default shader is Oren-Nayer for Diffuse and Blinn for
Specular, and a cotton shirt gives no compelling reason to deviate from that. Diffuse Intensity starts at
Search WWH ::

Custom Search