Information Technology Reference
In-Depth Information
12. Click the
Security
tab. Printers don't have share permissions; they have permissions only in
the Security tab, and they work similarly to NTFS permissions. Click the ACEs in the Group
or user names list box, and review the permissions for each one. Click
Cancel
, and close any
open windows.
Printer Permissions
Access to printers is controlled much like access to folders and files.
However, there's no need to be concerned with permission inheritance on printers. Printers have
three standard permissions and six special permissions:
•
Print
—Allows users to connect to a printer and send print jobs to it. By default, the
Everyone special identity is assigned the Print permission.
•
Manage printers
—Includes everything in the Print permission plus administering all
aspects of the printer: pause and restart the printer, share the printer, change permissions,
and change printer properties. By default, the Administrators, Server Operators, and Print
Operators groups are assigned this permission along with the Print and Manage docu-
ments permissions.
•
Manage documents
—Allows users to manage all jobs in the print queue. By default, the
Administrators, Server Operators, and Print Operators groups and the Creator Owner
special identity are assigned this permission. Because Creator Owner is assigned this
permission, users can manage their own print jobs (pause, cancel, restart, and change
properties).
The special permissions include the three standard permissions as well as Read, Change, and
Take ownership permissions.
Activity 6-19: Connecting to a Shared Printer
Time Required:
10 minutes
Objective:
Connect to a shared printer from a client workstation.
Description:
After installing the printer and configuring sharing, you need to set up client work-
stations to connect to the shared printer.
1. Log on to the domain from your Vista computer as
salesperson1
with
Password02
.
2. Click
Start
, type
\\serverXX
in the Start Search text box, and then press
Enter
. Right-click
SharedPrinter1
and click
Connect
. Windows displays a message that it's connecting to the
printer.
3. Click
Start
, type
printers
in the Start Search text box, and then press
Enter
. The printer you
installed should be in the Printers folder you opened. Right-click the printer and click
Print
Test Page
. Each student's test page can be identified by the computer name (your domain
controller's name) printed on the test page. Click
Close
.
4. On your server, open the
Printers
folder in Control Panel, and double-click the printer you
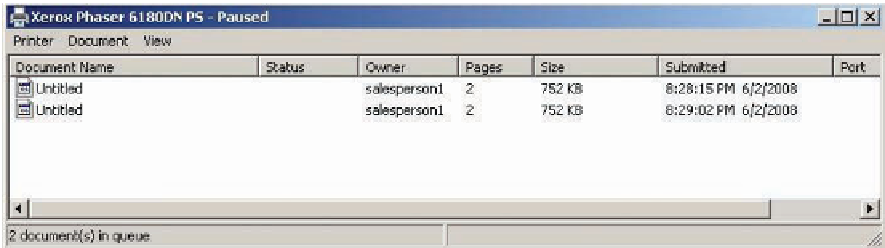
installed. The print queue shows any jobs awaiting printing. (At this point, there aren't any.)
Figure 6-28 shows a print queue with two jobs awaiting printing.
Figure 6-28
A print queue


Search WWH ::

Custom Search