Graphics Programs Reference
In-Depth Information
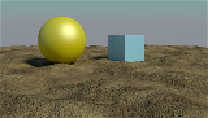
We are now ready to create this:
How to do it...
1. Select the plane and click on
New
in the
Material
window under the
Properties
panel, or in the
Node Editor
window's header.
2. In the
Node Editor
window, add a
Texture Coordinate
node (press
Shift
+
A
and go to
Input
|
Texture Coordinate
), a
Mapping
node (press
Shift
+
A
and go to
Vector
|
Mapping
), and a
Musgrave Texture
node (press
Shift
+
A
and go to
Texture
|
Musgrave Texture
).
3. Connect the
Object
output of the
Texture Coordinate
node to the
Vector
input of the
Mapping
node and the
Vector
output of the latter to the
Vect-
or
input of the
Musgrave Texture
node.
4. Connect the
Color
output of the
Musgrave Texture
node to the
Color
in-
put of the
Diffuse
shader. Set the
Scale
value of the
Musgrave Texture
node to
0.500
.
5. Add a
Wave Texture
node (press
Shift
+
A
and go to
Texture
|
Wave
Texture
) and a
Mix
node (press
Shift
+
A
and go to
Color
|
Mix
). Connect
the
Wave
color output to the
Color2
input of the
Mix
node, and then con-
nect the
Color
output of the
Musgrave
node to the
Color1
input.
6. Connect the
Mix
node output to the
Color
input of the
Diffuse
shader.
Set the
Mix
node's
Blend Type
to
Subtract
. Connect the
Mapping
out-
put to the
Wave
texture's
Vector
input.
7. Set the
Wave
node's
Scale
value to
0.200
,
Distortion
to
20.000
,
De-
tail
to
16.000
, and
Detail Scale
to
5.000
.
8. Add a
ColorRamp
node (press
Shift
+
A
and go to
Convertor
|
Color-
Ramp
) and drag it to the link connecting the
Wave
node to the
Mix
node
to paste it in between. Change the interpolation mode to
B-Spline
and
move the black marker nearly one-fourth of the slider length to the right.
9. Add two
Noise
texture nodes (press
Shift
+
A
and go to
Texture
|
Noise
Texture
and then press
Shift
+
D
) and connect them to the
Mapping
node. Select the
Subtract
node and press
Shift
+
D
to duplicate it twice.