Graphics Programs Reference
In-Depth Information
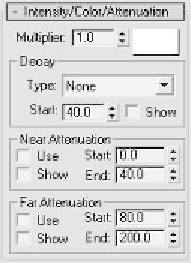
Intensity/Color/Attenuation
Figure 6-5: Intensity/
Color/Attenuation rollout
The Intensity/Color/Attenuation rollout lets you change light
intensity, light color, and light attenuation, or “falloff.” At the
top you have the Multiplier setting. The multiplier is the
light's power, or brightness. You can change the Multiplier
setting to a negative number to actually remove light from an
area (not many people are aware of that). You can also raise
the Multiplier setting into the thousands, although after about
5.0 it basically just shoots a completely solid white light that
floods anything it hits.
Next to the Multiplier setting is a color swatch. This color
swatch represents the light color. Double-clicking on that
color swatch will bring up a color selector, from which you can
choose any color you want for the light.
Let's drop down a bit now to the Near Attenuation and Far
Attenuation areas.
Light attenuation
is the simulation of the
light scattering farther apart so it appears dimmer than it
would from up close. For example, if you take a flashlight and
shine it onto the ground and away from you, you'll notice that
the light fades off into the distance. Max gives you Near
Attenuation and Far Attenuation settings to manually adjust
your light's “fade.” By default, your Max lights have attenua-
tion turned off. Like the Shadows setting, this is for faster
render times. To use light attenuation, you need to make sure