Graphics Programs Reference
In-Depth Information
Changing the size of a placed image
While you could have adjusted the image size prior to dragging and dropping it into the
barn picture, you can also make adjustments to layers and the objects that reside on the
layers. Here you will adjust the size and position of the placed images.
1
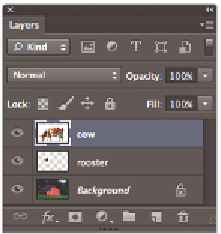
Make sure the Layers panel is visible. If you do not see the Layers panel, choose
Window > Layers.
2
Double-click the words Layer 1, to the right of the image thumbnail of the rooster in
the Layers panel. When the text i eld becomes highlighted, type
rooster
, and then
press Enter (Windows) or Return (Mac OS) to accept the change. Repeat this process
to rename Layer 2, typing the name
cow
.
The layers renamed.
3
With the cow layer selected in the Layers panel, choose Edit > Free Transform, or use
the keyboard shortcut Ctrl+T (Windows) or Command+T (Mac OS). Handles appear
around the edges of the cow. Keep the cow selected. If you do not see handles, press
Ctrl+0 (zero) (Windows) or Command+0 (zero) (Mac OS) to i t the image into the
window.
4
Press and hold Alt+Shift (Windows) or Option+Shift (Mac OS), and then click and
drag any one of the handles on the outside corner edges of the cow toward the center.
The image size is reduced.
Notice that the scale percentages in the Options bar change as you scale the image.
Reduce the size of the cow image to approximately 50 percent of its original size.
Holding the Shift key maintains the proportions as you scale, while the Alt or Option
key scales the image toward its center.
5
In the Options bar, click the Commit Transform button ( ) located on the right side,
or press Enter (Windows) or Return (Mac OS), to accept the changes.
6
If you do not see the Rooster image, use the Move tool to reposition the cow to reveal
it. In the Layers panel, click to activate the rooster layer, and then choose Edit > Free
Transform.