Graphics Programs Reference
In-Depth Information
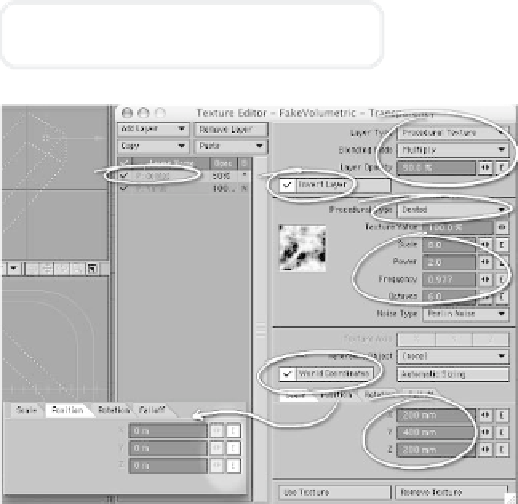
•
Check
Invert Layer
. (This will
flip-flop the effect of this texture,
reversing the lights and darks.)
•
Set Procedural Type to
Dented
(my personal favorite “mathematical
playground” that at the time of
publication produces different results
on Macs and PCs; PC users should be
aware that their shaft-o'-light won't
match the figures in this section).
•
Set Scale to
8
, Power to
2
,Fre-
quency to
0.977
, and Octaves
to
6
. (I've read the manuals,
and I still don't fully under-
stand what effect each of
these settings has on the
exact
result of the texture.
Mostly, I just fool around until
I find something I like, watch-
ing the effect on the “render
ball” on the main surface
window and doing quick ren-
ders using
Rendering |
Render Selected Objects
.)
•
Check
World Coordi-
nates
. (This will “lock” the
texture to the “world,” which
means that when the beam
moves, it will appear to pass
through smoke that is hanging in the
air,
completely independent of the beam
.)
•
On the Scale tab, set X and Z to
200 mm
andYto
400 mm
.
•
Now, on the Position tab, click on
the little
E
button to open the Graph
Editor where we will create an “enve-
lope” that will let this texture
move
through space over time
!
Now, because I pride myself on being an
unabashed smart aleck (and can never leave
anything well enough alone when there's
the possibility of making something
better
),
I want us to go back into our Transparency
Texture channel and add some “niftyness”
that will make it look like our beam is
catching little puffs of moisture.
“A) You can never go too far…” — Ferris
Bueller,
Ferris Bueller's Day Off
Figure 17-15
6.
Going back into the Transparency
channel's Texture Editor window,
select
Add Layer
and set the new
layer's Layer Type to
Procedural
Texture
.
•
Set Blending Mode to
Multiply
(which will
multiply
the values gener-
ated with the
layer(s)
below it in the
Layer list).
•
Set Layer Opacity to
50%
. (It'll
have
half
the effect it would were this
set to 100%.)