Graphics Programs Reference
In-Depth Information
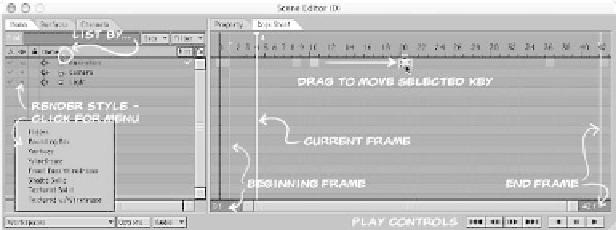
Sheet can be found on the tab at the right
side of the Scene Editor.
The blocks in the Dope Sheet represent
keyframes. By default, the blocks for
objects appear in blue, the blocks for cam-
eras appear in green, and the blocks for
lights appear in magenta. You can click on
any of these blocks to select it, or click and
drag to define a range. Once a keyframe or
range of frames is selected, you can move
and scale it at will.
1.
Moving this keyframe didn't really help
anything. Let's return it to its original
position.
1. Bring up the Scene Editor again. Since
we did not close it, the frame we
moved should still be highlighted.
2. Click and drag the keyframe until it
rests over the gray box at frame 10.
So far, we've been adjusting keyframes for
all channels just as we did in the Dope
Track. But it is possible to adjust the
keyframes for individual channels as well.
The C+ icon to the left of each item allows
you to expand an object to see its individual
channels.
The red, green, and blue blocks here are
simply larger versions of the ones we saw
in the Dope Track. The keyframes for indi-
vidual channels can be moved, cut, copied,
pasted, and scaled.
1.
Click on frame 10 of the animation
object to select it. Yellow borders will
appear around the left, right, and top of
the frame. These denote the bound-
aries of the current selection.
2.
Click and drag to move the key to
frame 20. You'll notice that a gray box
has been left on the key's original
frame. This gray box acts as a marker,
making it easy for you to return the
key to its starting position should you
find the change unsatisfactory.
Left-click on the animation object's
Position X red key at frame 10.
2.
Hold the <
Shift
> key down and click
on the Position Y key at frame 36. This
selects the entire range of frames for
the X and Y channels.
3.
You'll also notice that there are play-
back controls at the bottom right of the
Scene Editor. Press
Play
to preview
your animation. If needed, minimize
the Scene Editor or move it out of the
way, but
do not close it yet
(Figure
15-14).
3.
Note the solid yellow bar on the far left
and right sides of the selection.
Dragging this bar allows you to interac-
tively scale the selection.
Figure 15-14