Graphics Reference
In-Depth Information
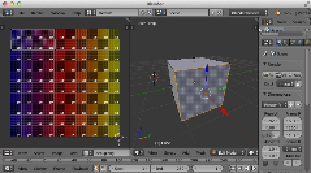
As you can see, we changed the UV mapping for this face from the whole
texture to just the top-left corner.
6. The next step is to export this geometry, load it in Three.js, and see whether
the mapping has really changed for the face we changed. To export the mod-
el, we'll use the
OBJ
format in this recipe. So, navigate to
File
|
Export
|
Wavefront
and save the model.
7. To load the model, we first need to include the
OBJLoader
JavaScript file on
the header of the page:
<script src="../libs/
OBJLoader.js"></script>
8. Now, we can use the loader to load the model and add it to the scene:
var loader = new THREE.OBJLoader();
loader.load("../assets/models/blender/
uvmap.obj", function(model) {
model.children[0].material.map =
THREE.ImageUtils
.loadTexture("../assets/textures/
debug.png");
scene.add(model);
});
In this example, we explicitly set the texture we want to use, as we didn't use
OBJMTLLoader
.
9. As a final step, let's look at the result. We provided an example,
04.14-create-custom-uv-mapping.html
, that shows the result of
these steps.