Graphics Programs Reference
In-Depth Information
Working with the Detailing Process
Now that you have completed the setup of a detail view, we will discuss three different
methodologies with which you can approach the detailing process: stand-alone detailing,
hybrid detailing, and model detailing. These are terms we invented to help you understand
and plan your detailing efforts as your skills improve in the Revit environment.
Stand-alone Detailing (Beginner)
If you are relatively new to the Revit environment, you
might choose to develop your details without any part of the 3D model serving the detail. In
this scenario, you can use either detail views or drafting views; however, you may tend to use
more of the latter. If you use detail views, the Display Model view property will most often be
set to Do Not Display.
With a stand-alone detailing approach, you forfeit some ability to ensure your details accu-
rately reflect the modeled condition. In a detail view, you may temporarily return the Display
Model view property to Normal or Halftone, but you may be able to draft more comfortably
using the blank canvas of an empty view.
Hybrid Detailing (Intermediate)
As you become more experienced with detailing in
Revit, you may start to utilize a more balanced number of detail views and drafting views.
With a hybrid approach you will maintain the model in any detail views and you will add
detail components to embellish the 3D model. This approach tends to yield a more accurate
representation of the intended design, but it will require more time and care to maintain as the
model evolves throughout the design process.
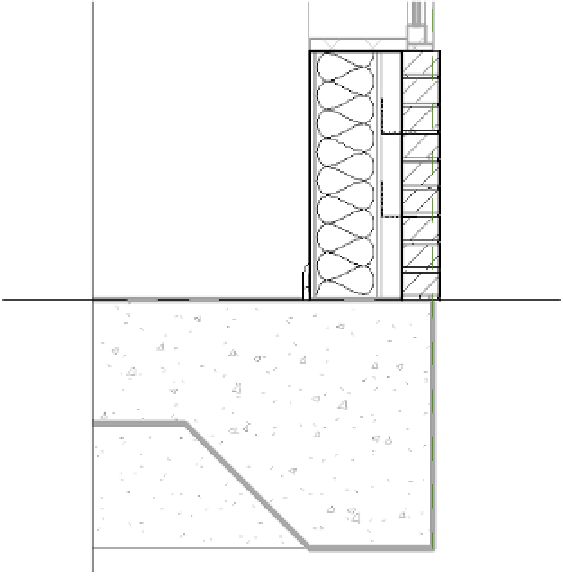
In Figure 16.3, you can see a detail view in which the Display Model view property has been
set to Halftone. This illustrates the difference between what is modeled and what is a detail
component.
Figure 16.3
example of a detail view with
embellished drafting