Civil Engineering Reference
In-Depth Information
Floor joists, often of logs flattened only on top to
carry the flooring, will sometimes be warped too much
for reuse. I will usually replace these with 2≈10 saw-
milled stock when it won't show and if there's to be no
basement. If it is to be visible from below, here's where
I use newly cut beams, often cut down from recycled
old factory or warehouse timbers. Lacking these, you
can use fresh wood if it's been seasoned for at least a
year. Or you can buy kiln-dried heavy beams through
most building supply stores for a price.
The rule of thumb for joists is one inch in height for
every two feet of span. That's misleading, though,
because a 6≈10 can carry more weight than a 2≈10.
And although modern building codes require a basic
16-inch-on-center (o.c.) spacing, you may be replacing
beams set three feet apart, so they'll have to be bigger.
Also, what you're flooring them with affects the size
and spacing. In our house in Virginia, we have three-
inch grooved, splined flooring from an old cotton mill;
this spreads the load considerably, so we have fewer
but larger (6≈10) joists.
Here's where you need that conference with your
building inspector. If your log house had 2≈6 ceiling
joists on 24-inch centers, for a span of 16 feet, it may
have held a century of upstairs living, but he'll want
something more solid. Given the rule of thumb, you
should have 2≈8s that are 16 inches o.c. or heavier, but
you won't want to look up at all that zebra-stripe fram-
ing above. So suggest 4≈10s or 6≈8s, maybe 36 inches
o.c., or more, to fit into mortises in the wall logs where
the originals had been. That'll mean flooring with two-
inch-thick tongue-in-groove (t.i.g.) upstairs, but that's
a good idea anyway. You can then perhaps reuse the
old, one-inch-thick flooring from up there over a sub-
floor, downstairs where it'll be seen and appreciated.
We've gone from roofs to floors here, so let's go up
there again. You may want to keep those pit-sawn 3≈4
rafters, especially if they're mortised and pegged
nicely at the peak. You can use them as a base for your
roof, decking with boards; you may paint between the
rafters to lighten your loft. Then you can do a built-up
roof, using 2≈6s or 2≈8s on edge, toenailed on top of
the decking, with insulation between and the roof cov-
ering on top of that. It's expensive, but it looks nice.
We usually rebuild a roof using 2≈10 rafters for
more insulation and to meet the building code, deck-
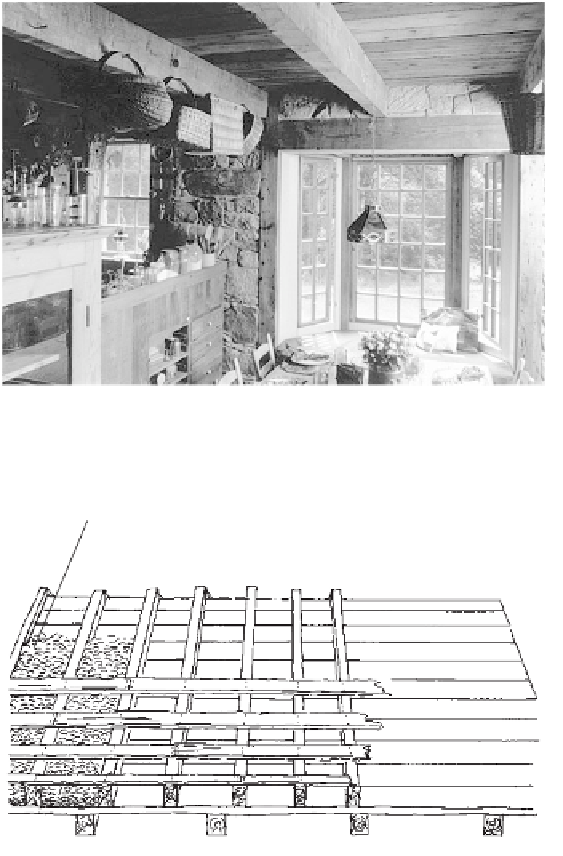
These hewn 6x10 joists in our stone kitchen addition are floored
upstairs with three-inch-thick splined cotton mill flooring.
This drawing shows a double or built-up roof, which lets historic heavy
roof rafter beams show inside while fully insulating the roof itself. These
beams are strong enough to hold up the roof but too shallow to be
seen and still accommodate the thickness of insulation. This compli-
cated roof is a trade-off between the ambience of seeing these vintage
beams and spending the money and time.
ing and covering conventionally with shakes or
standing-seam metal. Then we insulate between
rafters and wall the insides with shiplapped boards or
drywall, often painting off-white to lighten the
upstairs. This gives a flat plane, not as interesting as
the old rafters but a lot cheaper. To add interest we'll
often reuse the old collar ties, or new ones made from
old material, out in the open up above head height.
These can be left with the old saw marks or planed and
oiled for the beauty of the wood grain.