Civil Engineering Reference
In-Depth Information
choose a bit. I've been able to throw out a lot of it
sometimes and still be ahead of the price game. Or get
your local saw miller to cut you some decking. If put
up green, it'll shrink, but cracks here don't matter.
Tongue-in-groove lumber is ideal, but expensive.
The two-inch-thick variety is available most places,
and will span up to six feet easily at a 45-degree pitch.
Most people who buy this think it'll be extra insula-
tion, but again, it doesn't help much.
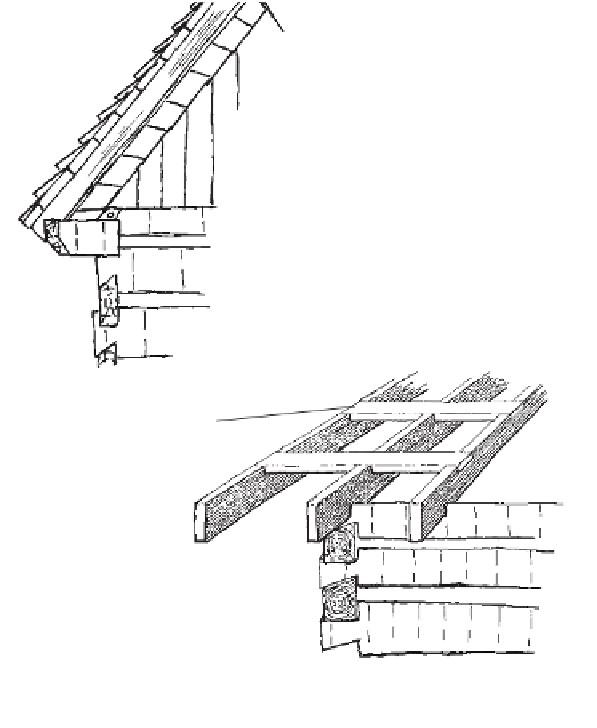
Trim the ends of the decking with an eave rafter of
the same size as the main rafters, carried on the
extended plate or lookout.
If you can, build with the top log plates extended to
support this eave rafter at the bottom. Traditionally,
this bit was avoided because older houses didn't have
much eave. When mud-and-stick (catted) chimneys
were used, the plates and ridge were extended so the
roof could shelter the chimney.
Extending the plate log to carry the
trim rafters is a good idea if you have
logs long enough. Eaves help protect
the logs but were rare in early build-
ing styles, including log cabins.
Insulation
A lookout is a cantilevered set of
braces to carry a trim rafter pair
beyond the house wall. Where
there is no extended plate for sup-
port, the lookout will do the job.
After you've decked with your chosen material, you
can staple down a layer of sheet plastic or tar paper to
seal the roof temporarily against rain while you work
inside. But take this off when you apply the permanent
roof if you insulate — which you should.
Insulation should be of a type that traps lots of tiny
air pockets, as with Styrofoam, mineral wool, or fiber-
glass. You can insulate between the rafters and finish
inside with some kind of wall if you don't want to look
at exposed rafters. Or you can put a nailing strip along
each rafter, insulate between with a layer of Styro-
foam, and cover with a recessed wall to leave part of
the beam showing. Either way, you don't want a solid
barrier, such as plastic or tar paper, outside the insu-
lation because moisture will condense. The insulation
should be at the same temperature and humidity as
the outside air.
You can nail upright beams, say 2≈6s, onto the
decking outside for a built-up or double roof. Insulate
between beams, again with something like Styrofoam,
which does an acceptable job in relatively thin appli-
cations. Next nail slats. And then nail the shakes or
metal roof to the slats. I like the Styrofoam outside
because it's waterproof. The best grade is the dense
blue stuff, which is more expensive but better insula-
tion and lasts longer. Fiber insulation that's wet is no
insulation at all. Also the foam insulates better per
inch thickness, and you don't get particles of it in your
lungs, which stay forever.
Again, the early settlers didn't insulate. If ceiling
boards, with maybe handmade rugs or bearskins over
them upstairs, held heat down in the main rooms, the
kids slept among the elements. Later, everything from
old newspapers to burlap sacks and cheap wallpaper
was applied to inner walls and roofs, but its purpose
was mainly to stop wind, and it did not impede the
flow of heat through solids.
Years ago, I used a couple of layers of Celotex, a
wood-fiber sheeting, as insulation on top of solid
decking. It was fair, but insufficient. Remember, you'll
lose most of your heat at the top, so trap it there. An
insulated ceiling will keep things warm downstairs if
you don't use the loft for anything but storage. But if
you live up there, insulate the roof, one way or another,
and let that heat go up through the ceiling. We use at
least R-19 overhead.