Graphics Programs Reference
In-Depth Information
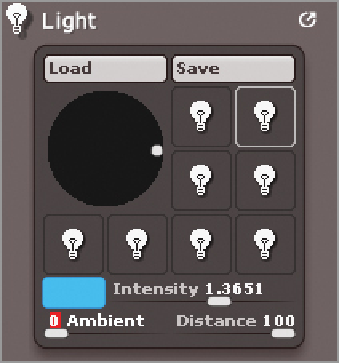
lightbulb icons to turn them off (the icons are orange when they are on and gray when they are off). The
model will turn black, indicating that the lights are off.
9.
Set the Ambient slider below the lightbulb icons in the Light palette to 0; this way you can be sure that
no additional light is affecting what you see on the canvas (
Figure 10-4
).
Figure 10-4:
Turn off the Lightbulbs in the Light palette and set Ambient light to 0.
10.
We're going to work in the LightCap editor, which I think is a much easier and more powerful interface
for designing ZBrush lighting than the classic ZBrush lightbulb interface. Expand the LightCap subpalette
of the Light palette.
LightCap is a term invented by Pixologic to refer to their unique lighting technology; “LightCap” is short
for “light capture.” LightCap creates a texture file that stores the lighting information that you create for
the scene. This texture is mapped to a virtual sphere that surrounds the model. The color, position, and
intensity of the lights are contained in this texture. The Details slider that you adjusted at the start of the
exercise controls the resolution of the texture, so higher setting creates more detailed lighting. You don't
need to work with the texture file directly—instead you'll use the LightCap interface to add, edit, and re-
move lights from the scene. The interface and its controls are found within the LightCap subpalette.
Lights in ZBrush do not appear as 3-D elements like they do in most 3-D packages. You won't see the
light source on the canvas—instead the position of the lights is determined by where you place dots on the
sphere shown in the LightCap interface.
11.
Press the New Light button in the LightCap palette. The new light appears as a red dot surrounded by
a fuzzy gray area (see the left image in
Figure 10-5
). Also the model appears on the canvas dimly lit. The
new light is shining directly at the model.
12.
Drag the red dot in the LightCap interface up to the left. You'll see the lighting update on the model
as well. Increase the Strength slider and the light becomes brighter. This light will be the key light for the
moment.
13.
The Aperture slider sets the overall size of the light as it spreads across the surface, the Falloff adjusts
the softness of the edge of the light (you can create an interesting “graphic novel” style of lighting by set-
ting the Falloff to 10 (see the left image in
Figure 10-6
). Let's start by creating a basic but realistic style
of lighting. Set Strength to 1.5, Aperture to 90, and Falloff to 10 (see the middle image in Figure 10-5).

Search WWH ::

Custom Search