The Brush Menu
ZBrush 4 introduces many new options under the Brush menu. Here you will find some familiar options as well as some new additions. In this section I will briefly describe each submenu.
Curve Curve controls the edit curve for the currently selected brush. We will use this to create a custom brush later this topic. There is no longer a smoothing curve option because this curve becomes the smoothing curve when you press Shift. Changes made while holding Shift will only affect the curve for the Smooth brush.
Depth The Depth menu allows you to control the depth into the surface that your current brush is active. Imagine it as a control for how deep your tool is being pressed into the clay.
Samples Samples control how often the brush samples the surface as it is in use. The ZBrush brushes function by sampling the depth underneath the brush to determine how to affect a rough surface or a surface that is curving toward or away from the viewer. Changes to these values can impact the effect your brushes give. Stabilize Orientation, for example, is useful when you’re using a brush on a rough textured surface. It helps reduce the inflating or artifacting that might occur when points intersect due to your brush strokes.
Surface Surface allows you to add noise to the brush. This menu also has a curve to exercise fine control over the noise options.
Modifiers The Modifiers submenu contains various modifiers to the brush stroke. Tilt gives the effect that the brush is tilted in space as it touches the surface. Auto Smooth automatically smooths the surface after each stroke. The Trails option is a very useful way to even out a brush stroke. It is similar to LazyMouse but without the significant delay to your stroke. Trails will create multiple copies of your stroke and average them together. Try it on a sphere to get a feel for the effect.
|
Brush menu option |
Description |
|
Curve |
Contains the curve controls for the currently selected brush. The curve will automatically become the Smooth curve when Shift is pressed. |
|
Depth |
Contains brush depth and gravity controls. |
|
Samples |
Controls how the brush samples the surface as it sculpts, altering the effect of the strokes. |
|
Elasticity |
Modifies the elasticity settings for brushes. Elasticity alters the way the surface behaves as parts are pulled farther away. |
|
Orientation |
Controls for the orientation of the alpha as the brush is stroked on the surface. The alpha can be spun while stroking. |
|
Surface |
Contains noise controls. |
Table 2.2: Additional brush menu options
|
Brush menu option |
Description |
|
Modifiers |
Provides general brush modifier controls, including the BrushMod slider as well as Smooth, Pressure, Trails, Tilt, and others. |
|
Auto Masking |
Controls the automatic brush masking options. Masking by Polygroup, Direction, Cavity, Backface, Color, and Topology are available here. |
|
Tablet Pressure |
Controls the tablet pressure options. |
|
Alpha And Texture |
Offers alpha options as well as brush blending modes. The Polypaint mode slider will allow you to select from the color blending modes Standard, Colorize, Multiply, Lighten, and Darken. |
|
Smooth Brush Modifiers |
Provides fine-tuning control of the Smooth brush. |
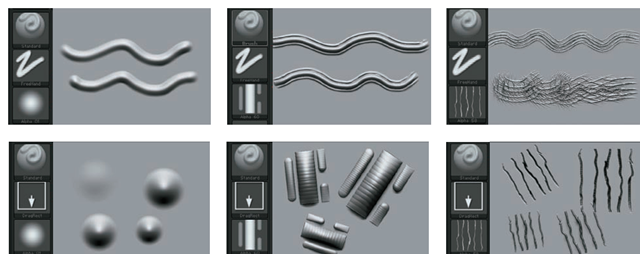
Brushes are further modified by alphas and strokes. Alphas are grayscale images that are imported into ZBrush or selected from the default alpha set. They serve as the shape of the brush itself. Alphas can also serve as stencils or texture stamps.Figure 2.6 illustrates the effect of various alphas combined with different strokes.
Figure 2.6 The effects of various strokes with different alphas
Alphas are grayscale images that control the shape of the brush. Strokes control how the alpha is applied to the surface by the selected brush.
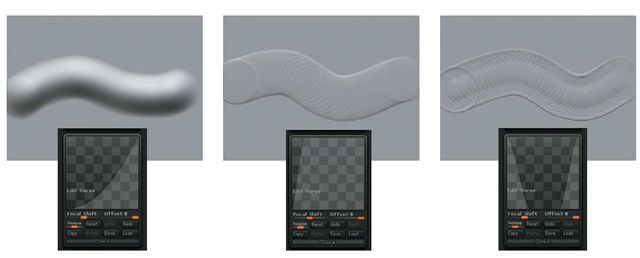
The Edit curve controls the strength of a brush over the course of its center to the outermost falloff ring. The point on the left of the curve represents the brush strength at its outer radius, whereas the point at the right represents the strength of the effect at the brush’s center. Manipulating the Edit curve can create many interesting brush effects, as you can see in Figure 2.7.
Figure 2.7 Examples of various Edit curve settings
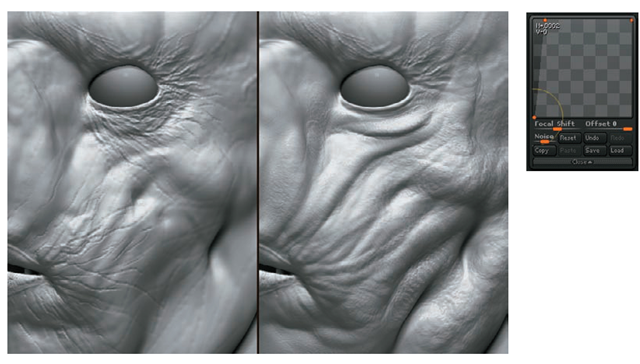
One common edit I make to the Edit curve is what I call creating a “plateau” with the brush curve. By selecting the Inflate brush and changing its Edit curve to that shown in Figure 2.8, I can drastically alter the manner in which the brush adds form to the surface. By giving the brush a more subtle falloff, strokes build in a more gradual fashion, thus making it easier to create changes in the surface that are less pronounced. This is similar to the effect of the Claytubes brush but because it uses no alpha for its effect and is based on the Standard brush type, you will find subtle and valuable differences in how it affects the surface.
Figure 2.8 The effect of the plateau curve
Backface masking is useful when you’re working on thin meshes such as clothes, wings, or other objects where the front and back faces are close together. If you are dragging a stroke on an object where the thickness is less than the size of the brush, often the stroke will carry over to the opposite side. Backface masking eliminates any faces other than the ones on the side on which you are working, thus reducing this problem.
The Gravity modifier is found under the Brush + Depth menu. This modifier helps reproduce the effect of gravity or wind on a surface. Faces are shifted in the direction of the arrow in relation to the model’s current position on screen. To use this modifier, select the Gravity arrow and position it in the direction you want the force to pull. Then, adjust the slider for the correct strength. This works well for folds of skin with the Inflate or Elastic brush; it helps introduce the effect of weight on hanging folds of flesh. The Gravity modifier is also helpful when you’re sculpting drapery—positioning the arrow horizontally can create the impression of wind billowing in a fabric. In Figure 2.9, the Standard brush was used to create the stroke on the top. On the bottom, the same brush was used with the addition of a Gravity modifier. Notice how the weight of the stroke is along the bottom edge as if it is being pulled down. Keep in mind that this effect is relative to the model’s position on the canvas at the moment of the stroke, not its pivot point. You could easily sculpt the effects of wind by simply changing the direction of the Gravity modifier arrow.
Figure 2.9 The Gravity modifier mimics the effect of gravity on the stroke.
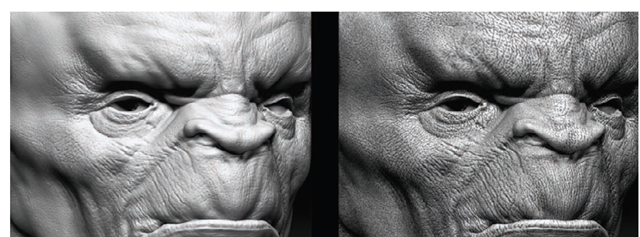
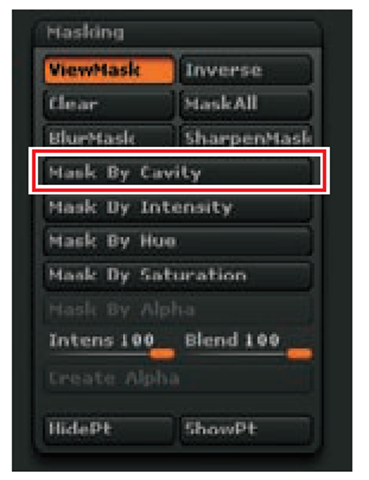
Cavity masking masks out the recessed areas of the sculpture, allowing you to paint and sculpt only on the high points. This effect can be tuned using the options under Brush + Masking + Cavity. This same mask is also available under Tool + Masking + Mask By Cavity. Figure 2.10 illustrates the effect of this button. The difference between the cavity masking in these two areas is that the Cavity Masking command in the Brush menu is controlled by the curve but there is no visual indication of what areas are masked. This brush-based cavity masking is a real-time masking function that updates and changes as you sculpt the mesh. The cavity masking available under Tool + Masking does not change in real time. When using Tool + Masking + Mask By Cavity, you’ll see which areas are masked; however, the mask is set and will not update as the surface is changed. In many cases this may be desirable as it allows you to isolate the high or low points on a sculpture and modify only those areas in the confidence the masked areas will not be affected (Figure 2.11).
Figure 2.10 Cavity masking isolates the high or low points of the surface from editing.
Figure 2.11 A cavity mask from Tool + Masking + Mask By Cavity
