In This Chapter
Seeing XBRL in action
Viewing and creating an XBRL taxonomy and XBRL instance Validating an XBRL taxonomy and XBRL instance Extending an XBRL taxonomy Interacting with your XBRL information
7his chapter focuses exclusively on working with XBRL. We guide you through the process of viewing, creating, validating, extending, and otherwise interacting with XBRL. We work with both XBRL taxonomies and XBRL instances. This chapter won’t turn you into an XBRL expert, but it does provide the first practical steps as you enter the waters of XBRL.
To avoid having to type the long links in this chapter. This takes you to a landing page where you can click the link you need.
Getting Started on Your XBRL Journey
To work with XBRL, you need software. You can actually use any text editor, but text editors don’t understand XBRL as well as an XBRL processor does.
For our journey, we have to pick specific software applications to use. We chose software that meets the following criteria:
It’s free to try. That way, you can download it and walk through the tasks we lead you through.
It can perform the task. Clearly, the software needs to perform the task we want to perform.
It handles key basic tasks. Our goal is to expose you to the basics, such as creating an XBRL taxonomy and XBRL instance.
You don’t have to use the software we use in this chapter: You’re free to choose a different software application. We’ve made the step-by-step instructions as general as possible. After all, we’re not trying to teach you about all the details of using a specific software application: Our goal is to teach you about XBRL.
We start by exploring a few XBRL taxonomies and XBRL instances, which helps you get a general feel for XBRL. Then, our step-by-step exercises eventually walk you through the process of creating a basic “Hello World!” example XBRL taxonomy and XBRL instance. We wanted to show you how easy this task really is, even without an XBRL processor. We show you one commonly used approach to outputting XBRL, which is to create a simple application using macros within a spreadsheet. (We use Microsoft Excel.) We even provide the code examples that you can use as a basis for building your own XBRL generation application. We then build on that basic example and show you more parts of XBRL that help you achieve certain specific objectives. This layered approach helps you understand why XBRL includes each of these components and how to use that component. We use XBRL software applications and the important XBRL processors they contain.
We use the same basic example throughout the exercises, helping to provide continuity between the examples. We want to keep keying to a minimum. The examples include completed versions, so if something doesn’t quite work out, you can still see the end result. If you get lost, don’t worry; just start over or go back to one of the interim starting points that we provide you with.
After working through the examples, you should have a good solid understanding of how XBRL works and how to use some of the basic features of software to work with XBRL. During our journey, you’ll perform common tasks related to XBRL.
The computer we used to create these exercises was running Microsoft Windows Vista, Microsoft Internet Explorer 7.0, and Microsoft Excel 2007. You may need to make slight adjustments for other software versions or other operating systems. Some software may have changed since we created these examples, so you may need to make slight adjustments accordingly. We assume that you know the basics of using these software applications.
Viewing an XBRL Taxonomy
Stick your big toe in the water by taking a look at an XBRL taxonomy with XBRL taxonomy viewing software. We use CoreFiling’s Yeti Explorer to look at an XBRL taxonomy because it’s a free application for viewing specific taxonomies, and you don’t have to install software — it simply works through your browser. Here are the steps for viewing an XBRL taxonomy within this software application:
1. Type this URL within the address box of your browser: http://big foot.corefiling.com/yeti/resources/yeti-gwt/Yeti.jsp.
The Open Taxonomy dialog box, shown in Figure 15-1, appears, listing XBRL taxonomies.
2. From the list, expand the taxonomy labeled US GAAP (2008-03-31) by clicking its icon; select Commercial and Industrial from the list that appears.
You have to scroll down to find this taxonomy.
3. Click the Open button.
Welcome to your first XBRL taxonomy! You can click around and explore the taxonomy. (Chapter 17 walks you through the process of exploring a taxonomy.)
4. Type http://tinyurl.com/cqad9k into your browser’s address box.
You see the concept Income Taxes Receivable within the taxonomy.
5. As an alternate to Step 4, you could start with the Network 104000 -Statement – Statement of Financial Position, Classified and drill into the tree structure of Figure 15-2 until you find the concept Income Taxes Receivable.
Notice the tree of concepts that participate within the relations of the network on the left side of Figure 15-2. On the right, you see three tabs (Details, Relationships, and Tree Locations) that allow you to navigate between the detailed information of the selected concept, the relations the concept participates in, and the tree locations in which the concept exists. You can explore those tabs for various concepts and relations.
6. To search for a specific concept by name, type the concept name, such as Cash, in the text box below the tab labeled Search in Figure 15-2 and click the Search button.
A list of concepts appears below the Search button — in this taxonomy, about 15 concepts have Cash as part of the label.
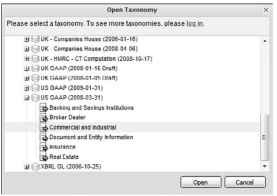
Figure 15-1:
The Open Taxonomy dialog box.
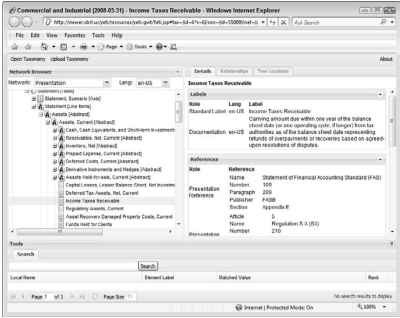
Figure 15-2:
AnXBRL taxonomy viewer application.
If you want, you can continue exploring that XBRL taxonomy or any other XBRL taxonomy provided with that viewer. (We count about 100 taxonomies in the list.) Chapter 17 provides additional insights on how to view an XBRL taxonomies and even points you to some smaller XBRL taxonomies that are easier to grasp as you learn more about taxonomies.
Viewing an XBRL Instance
Anxious to take a look at an XBRL instance? Yeah, we knew you were. We use the Interactive Financial Report Viewer, the U.S. SEC’s prototype XBRL instance-viewing tool.
To view an XBRL instance, follow these steps:
1. Type http://viewerprototype1.com/viewer into your browser.
You see a page titled Test Drive Interactive Data. On the left side is a list of companies. We use 3M Co, the first one, for our exploratory journey.
2. Click 3M Co, which expands the tree and displays a list of financial statement filings 3M made to the SEC, and then select the first report, Quarterly Report (2008-09-30).
You see the consolidated income statement for the period selected within a tab, which is shown in Figure 15-3. Notice that the tab has other financial statements that you can open in the blue bar.
Just below the blue bar are links to additional information about the company, filing summary information, charts, a way to print the report, and a way to export the entire statement into Microsoft Excel.
3. Click the Export to Excel link just below the blue bar.
The SEC filing information for the filing you’re looking at is provided to you in the form of an Excel spreadsheet.

Figure 15-3:
The SEC XBRL instance viewer application.
Using XBRL looks a lot like other financial statements and reports, doesn’t it? One thing to take notice of is that when you export the information to Excel in Step 3, you really didn’t even see XBRL during the entire process of using it or performing that export. Software does all the work using the XBRL in the process.
Creating an XBRL Taxonomy and Instance
In this exercise, you create a basic XBRL taxonomy. You then use the concepts in that XBRL taxonomy to create an XBRL instance by using a Microsoft Excel spreadsheet that contains simple macros that generate the XBRL taxonomy and XBRL instance.
Figure 15-4 shows the information that the XBRL taxonomy and XBRL instance will be expressing within this exercise. This exercise is a simple breakdown of Property, Plant and Equipment.
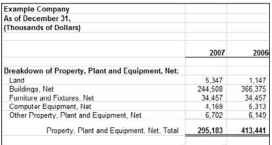
Figure 15-4:
A breakdown of Property, Plant and Equipment, Net.
A quick look at Figure 15-4 shows you the following:
The information is for Example Company and is as of December 31, 2007 and 2006.
The information is expressed in thousands of dollars; we use U.S. dollars for our example.
We have 12 pieces of data, the 12 numbers — 6 for 2007 and another 6 for 2006.
The columns of information have totals. The data breaks down Property, Plant and Equipment, Net into its components: Land, Buildings, Furniture and Fixtures, Computer Equipment, and Other Property, Plant and Equipment. The total, Property, Plant and Equipment, Net is shown at the bottom.
We now create the XBRL taxonomy you need to communicate this business information and the XBRL instance that actually communicates the information based on that XBRL taxonomy. In this example, we generate XBRL from a Microsoft Excel spreadsheet that we created for you. We even keyed in all the data, but you can change that data, if you like. First, we walk through all the steps and then explain the bigger picture.
1. Go to http://xbrl.squarespace.com/storage/xbrlfortopic/ hello world example/Hello World Example-2009-05-23.zip and download the Excel spreadsheet that you’ll use to generate the XBRL taxonomy and XBRL instance.
2. After you download the ZIP file in Step 1, create a subdirectory on your computer somewhere, put the ZIP file in that subdirectory, and extract the contents of the ZIP file into that subdirectory.
The completed XBRL taxonomy (Hello World.xsd) and XBRL instance (Hello World.xml) that you generate are contained in that ZIP file. You can extract and rename them if you want; you’ll overwrite them during the exercise.
3. Open the Excel spreadsheet and go to the spreadsheet tab Hello World Taxonomy.
The spreadsheet looks like Figure 15-5. We prepared everything for you.
4. Click the Create Taxonomy button.
The Excel macro creates a file named Hello World.xsd that is a valid XBRL taxonomy and puts the file in the same directory as the Excel workbook.
5. Open that file in your browser or in a text editor to look at what you generated.
6. Create the XBRL instance and select the workbook tab Hello World Instance.
The spreadsheet looks like Figure 15-6.
7. Click the Create XBRL Instance button.
The Excel macro creates a file named Hello World.xml and places it in the same subdirectory as your Excel workbook.
8. Open that file in your browser or in a text editor to look at what you generated.
That’s it: You’re done! You created your first XBRL taxonomy and XBRL instance.
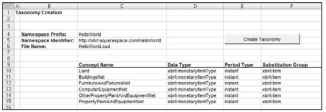
Figure 15-5:
A spreadsheet for creating an XBRL taxonomy.
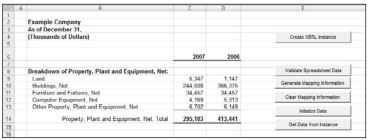
Figure 15-6:
The spreadsheet for creating an XBRL instance.
The URL to the completed version of this XBRL taxonomy at this stage is
http://xbrl.squarespace.com/storage/xbrlfortopic/hello worldexample/HelloWorld.xsd. The URL to the XBRL instance at this stage is http://xbrl.squarespace.com/storage/xbrlfortopic/ helloworldexample/HelloWorld.xml.
The preceding steps describe a common use of XBRL: You generated an XBRL taxonomy and an XBRL instance from information contained within an Excel spreadsheet. Many of you have Excel spreadsheets, and you use them to exchange information with others. The spreadsheet contains several macros (written in Visual Basic for Applications) that generate the XBRL taxonomy and the XBRL instance.
If you look in the subdirectory where you saved the spreadsheet you downloaded, you see two XBRL files. The macro created those two files. The code in the macro is written in a way that’s easy to understand. The code is basic and doesn’t even make use of an XML parser or XBRL processor to generate the XBRL — it simply writes out a text stream into a file. The code to generate the XBRL instance is less than 250 lines. Yes, folks, generating XBRL is that simple.
You can use the macro code from this spreadsheet to help you understand how to create your own macros for outputting XBRL.
We want to dig into a few aspects of XBRL that are critical to understand in order to build XBRL taxonomies and XBRL instances correctly. First of all, you need to figure out what goes into the XBRL taxonomy and what goes into the XBRL instance. Here are the basics:
Taxonomies define concepts. In this case, the concepts are the line items of the business report of our example.
Concepts are reported in two periods, 2007 and 2006. Next year, concepts most likely are reported for 2008. This information is really determined at the time the XBRL instance is created, so you don’t want to define the periods in the XBRL taxonomy. You also don’t want to define specific concepts for specific periods, such as Land for 2007 and Land for 2006. You could, but then you’d have to add concepts to your XBRL taxonomy for each new year. Rather, create concepts for the line items and contexts for the periods.
In our case, the entity preparing this information was Example Company. If you want other entities to be able to use this XBRL taxonomy, you don’t want the specific entity in the XBRL taxonomy either. That information should go into the XBRL instance. You’d use the entity element, which is part of a context.
The fact that the report is in thousands of dollars means that although you see the presented value 5,347 for Land for 2007 in the spreadsheet, the real value is 5,347,000. The creator of this spreadsheet report chose to create the report in thousands of dollars. Different report creators choose to present this information in different units, some in thousands, some in millions, and some maybe even in billions.
The point is that you need to decide how to model the XBRL taxonomy and XBRL instance. There are good and bad practices. These data modeling issues may be a new concern for many business users. Software applications generally help you figure this sort of thing out. But because we’re coding this ourselves in this example rather than relying on software, we have to make these sorts of decisions ourselves. Chapters 17 and 18 talk about these types of details related to creating XBRL taxonomies and XBRL instances.
Although the previous discussion provides a basic understanding of how to get from the Excel spreadsheet to the XBRL taxonomy and XBRL instance, we omit quite a few details. However, if you like, you can go to the VBA in the Excel file and walk through it. You can use the Excel spreadsheet to reverse-engineer how everything works and get insight into the details. Chapter 4 can help you understand the contents of the different output files we’re generating.
Using those other buttons
Refer to Figure 15-6, paying particular attention to the workbook’s last five buttons. These buttons can provide you with a good sense of the work you need to perform when you create an actual XBRL instance.
Validate Spreadsheet Data: Click this button to run a program that tells you whether the components of Property, Plant and Equipment add up to the total for the two periods shown. This validation is coded into the application to make a point: You can’t exchange the validation rules you coded into your application with other software applications (other than Excel) because the other application doesn’t understand your application’s expression of these rules. The rules aren’t in a standard transferable format: They’re unique to the application in which those rules are processed.
What if you expressed those rules in the form of XBRL Formula and could exchange the rules? Yup, that is the point of XBRL Formula. First, you don’t have to write the validator because XBRL provides one, and second, you can exchange those rules with others that use the information you created, helping them both to better understand the information and check whether it actually follows those rules.
Generate Mapping Information: Click this button, and you see that some Excel comments are now in your spreadsheet. Hover your mouse pointer over cells with the comments, and information appears about the mapping to cells that are used to generate facts within your XBRL instance. These comments help you review your work to be sure that the mappings are correct. The actual mapping info is in the spreadsheet tab Mappings.
Clear Mapping Information: This button simply clears the comments that contain the mapping information (see previous bullet).
Initialize Data: This button zeros out all your values. The importance of this button becomes clear when you click the next button.
Get Data from Instance: Generating information, zeroing it out, and then getting it back from the XBRL instance may seem odd, but this button does it to make a specific point. (Remember, the demo is to help you learn about XBRL.) The point is that not only can you generate information, but you can also extract that information from the XBRL instance you created. Extracting information would make more sense if you were pulling in XBRL instance data from some other XBRL instance created by someone whose data you actually wanted to use. For this demo, just realize what is going on. You can publish information; you can use the information. That is the value of XBRL in action! Pretty cool, don’t you think?
Determining your additional needs
We hope the simple example in the preceding section helps you understand the basics of XBRL taxonomies and XBRL instances. We provided a populated spreadsheet because we didn’t want to test your typing skills; after all, we assume that you can type already. If you want, you can change any of the concept names, values, or any other information in the spreadsheet. You just have to be sure that you key everything in correctly because you’re not using an XBRL processor to help you get things right.
We want to point a few things out to help you understand the value of some XBRL components that we didn’t use in our example. You have to admit that our “Hello World” example, described in the section “Creating a ‘Hello World’ XBRL taxonomy and instance,” is fairly straightforward and easy; however, the functionality of what the XBRL can do for you is also limited. This exercise shows you some limitations of using only XML to achieve what you want to achieve. It also shows you what XBRL brings to the party.
You can send that XBRL instance with its supporting XBRL taxonomy to others, but you’re not using the following XBRL characteristics yet when you create the information you’re exchanging. (Refer to Chapter 4 to help understand the terms being discussed.)
Documentation of concepts: We create a number of concepts in our XBRL taxonomy, but what is the meaning of the concepts? The meaning needs to be clear not just to you but to those with whom you exchange the XBRL taxonomy as well. XBRL has the ability to document the concepts you create within the XBRL taxonomy. Alternatively, you can point to documentation using XBRL references to concept definitions external to the taxonomy.
Polarity of fact values: You probably took for granted that the numbers in the example should be entered as positive numbers. But how do you know for sure? In our example, it’s rather clear, but what if you have thousands of concepts, some debits and some credits? XBRL has a means to help make its polarity clear, whether it should be entered as a positive or negative value: It’s called the balance attribute of a concept.
Human-readable labels: Although the element names in our exercise aren’t that difficult to read, the element names aren’t how we normally want to look at things. Rather than using Furniture And Fixtures Net, business users would prefer something like Furniture and Fixtures, Net, which is more readable by humans. In addition, what if you need to provide your XBRL taxonomy to someone who speaks a different language? XBRL allows you to create labels in any number of languages. Each user can pick his own language to the extent labels are provided in that language for an XBRL taxonomy.
Calculations: Our example has two calculations: The details of Property, Plant and Equipment add up to the total. But we didn’t express that relationship in our XBRL taxonomy. Therefore, computer software won’t be able to validate this rule. We can’t send the rule with the XBRL taxonomy because the rule doesn’t exist in the XBRL taxonomy, unless, of course, we write proprietary validation rules in our application (as we did). Alternatively, we could use XBRL Formula or XBRL calculation relations to provide these business rules for these calculations.
Organization of taxonomy: Our XBRL taxonomy has six concepts. But what if it had 6,000 concepts? You’d want to organize that XBRL taxonomy so that the taxonomy users could easily find the concepts they needed. XBRL provides several ways to organize your XBRL taxonomy for different purposes. One way is to use the presentation relations.
So, the simple “Hello World” exercise shows you two things. First, it shows some limitations of traditional XML alone. Now, we’re not saying that you couldn’t create additional functionality using traditional XML. You can. But, you’d have to expend resources, effort, and money duplicating what XBRL already provides. As XBRL already has these additional components, why would you do that? Further, if you did build these additional features on top of XML, the solution would be proprietary. XBRL offers a standard approach to adding the characteristics that business users need.
Creating Resources for XBRL Taxonomy Concepts
In the previous section, we create a basic XBRL taxonomy and then tell you about all those things that we did not create in our “Hello World” basic example XBRL taxonomy. Now we add something you’ll probably want: labels for the concepts created in the “Hello World” XBRL taxonomy. (Resources add information to an XBRL taxonomy concept — see Chapter 4.)
We use Spider Monkey, an XBRL taxonomy-creation application provided by the software vendor Core Filing, to add these labels. Core Filing offers a free single-user version of Spider Monkey at www.corefiling.com/products/ spider monkey.html. Click the Download Spider Monkey link on the top right side of the page and fill in the marketing information requested, and, a day or so later, you’ll receive a link you can click to download the software. (It’s not immediate.)
We use the XBRL taxonomy you generated in the “Hello World” exercise you created. Alternatively, you can use the file Hello World.xsd in the ZIP file you downloaded for that exercise. In this exercise, we load the “Hello World” taxonomy and simply add English labels for each of the existing concepts. When we start, your XBRL taxonomy looks like Figure 15-7.
To add label resources to your XBRL taxonomy:
1. From the menu ribbon in Spider Monkey, open Hello World.xsd.
To do so, choose File Open, navigate to where you saved the file, select it, and then click the Open button.
2. Click the plus button next to Isolated Concepts.
What you see should look like Figure 15-7. The first thing to notice is that your XBRL taxonomy created in Excel opens up in the Spider Monkey XBRL taxonomy-creation application. This interoperability may not seem like much, but it’s truly part of XBRL’s core value.
If the version you created doesn’t open correctly, try the version from
the ZIP file.
3. Just to be safe, validate the XBRL taxonomy by choosing File Validate.
A new tab called Problems opens on the bottom of your application and contains the message No Validation Errors or Warnings. (Click the X on the tab if you want to close the Problems tab.)
4. Select the concept Buildings Net and double-click the concept.
A set of tabs appears on the right-hand side of the application.
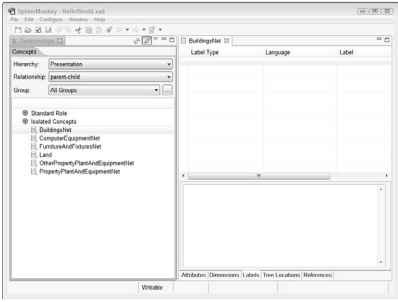
Figure 15-7:
The starting point for creating an XBRL taxonomy in Spider-Monkey.
5. Select the Labels tab (which is to the right of where you selected the concept.)
6. In the Labels tab (with the concept Buildings Net selected), select and enter the following:
a. For Label Type, select Standard Label from the combo box.
b. For Language, select English (United States) from that combo box.
c. For Label, type in Buildings, Net.
7. Select the concept Computer Equipment Net.
The tree view on the left now shows the label you entered.
8. Select each concept, repeating Step 6 and adding labels for Computer Equipment, Net, Furniture and Fixtures, Net, Land, Other Property, Plant and Equipment, Net, and Property, Plant and Equipment, Net.
9. Save your taxonomy by choosing File Save.
Your XBRL taxonomy should now look like Figure 15-8.
The labels make the XBRL taxonomy look a little nicer to the human eye. Also, you can see how handy it is have a way to add labels for other languages. Labels make for better functionality than always having to look at those ugly element names.
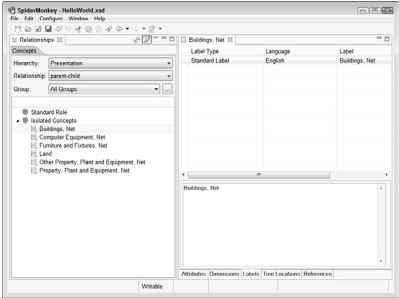
Figure 15-8:
The XBRL taxonomy after you add labels.
Creating Relations Between XBRL Taxonomy Concepts
Creating relations is more or less similar to adding resources. In this section, we add two types of relations:
Presentation relations organize the XBRL taxonomy in a particular order.
Calculation relations express the calculations that exist and help verify that the XBRL instance is created correctly.
After you add labels to your taxonomy (see preceding section), do the following:
1. In the tree view, select the node labeled Standard Role.
Standard Role is the network where we build these relations. All the existing concepts are under the node Isolated Concepts because the XBRL taxonomy doesn’t have any relations yet.
2. To create a concept, right-click over Standard Role, choose Create Child, and then choose Item.
A New Item as Child dialog box appears. The Namespace combo box already contains the correct value.
3. In the Label text box, type Breakdown of Property, Plant and Equipment, Net.
Notice how the Element Name is entered for you.
4. Finish the other portions of the form by entering the following information:
a. For Item Type, select string from the combo box.
b. For Period Type, select instant from the combo box.
c. Select the Abstract check box.
d. Select the Nillable check box.
5. Click the Finish button.
The concept is added in the Standard Role; if you accidently added it under Isolated Concepts, see the next step.
6. (Optional) If your concept doesn’t appear under Standard Role, drag the concept from the Isolated Concepts to the Standard Role node; if your concept appears in the correct spot, skip to Step 7.
7. Next, drag each of the other concepts and add them as children of the concept that you just created in the order shown in Figure 15-9.
Done! Your application should look like Figure 15-9.
Now, isn’t Figure 15-9, which has the concepts organized in the order that you want, easier to read than the flat list of concepts that you couldn’t order? This organization is indispensible in a situation where you’re working with an XBRL taxonomy that contains several hundred concepts.
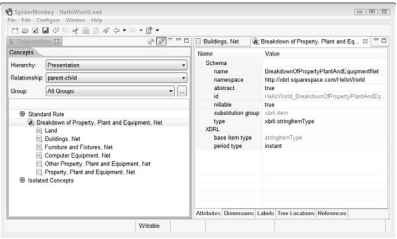
Figure 15-9:
The XBRL taxonomy after creating presentation relations.
You can also express the calculation relationships that exist between the total and the subcomponents of Property, Plant and Equipment, Net:
1. Select the Hierarchy combo box at the upper left of the Relationship Tree and change the value from Presentation to Calculation.
The calculation relationship tree view looks like where you started before you created the presentation relations in the previous set of steps. You create the calculation relations in basically the same way that you create the presentation relations except that you don’t need to create a concept to do it.
2. Drag the concept Property, Plant and Equipment, Net to the Standard
Role.
3. Drag the concept Land as a child of that first concept.
4. Repeat Steps 2 and 3 for all the concepts until your result looks like Figure 15-10.
Notice that a Weight of 1 is added for each concept except the first. The value is the weight value of the concept contributed to the total: 1 is the value added or subtracted (if it’s a -1). The total doesn’t have a weight itself because it’s not added to anything. Finally, note that the one concept used in the presentation relations — Breakdown of Property, Plant and Equipment, Net — isn’t needed, which is why it stays down in the Isolated Concepts node.
You should really do one more thing to tidy up your XBRL taxonomy. To make understanding the value you want used within the XBRL instance easier, indicate that each of the numeric concepts is a debit as opposed to a credit.
5. Select the Attributes tab and, where it says balance, select debit for each of the six numeric concepts involved in the calculation.
6. Validate the taxonomy by choosing File Validate.
You should get a message indicating that you have no errors.
7. Save the XBRL taxonomy by choosing File Save.
Your XBRL taxonomy now contains the labels added earlier and also presentation and calculation relations, which makes the taxonomy a little easier to look at and work with. The calculations also help you make sure that the numbers properly add up in your XBRL instance.
The URL to the completed version of this XBRL taxonomy at this stage is
http://xbrl.squarespace.com/storage/xbrlfortopic/hello worldexample2/HelloWorld2.xsd.
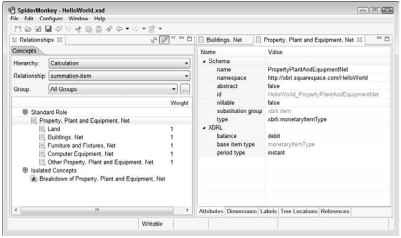
Figure 15-10:
The XBRL taxonomy after creating calculation relations.
Extending Someone Else’s Taxonomy
Suppose that you were running an airline and you wanted to use the XBRL taxonomy from the previous two sections — the one with the labels resources, presentation relations, and calculation relations. (If you didn’t create this taxonomy, don’t worry; we point you to a file you can use.) Your airline has airplanes, and airplanes aren’t a concept in that XBRL taxonomy. But you do use the other concepts in that XBRL taxonomy, so it’s still a good starting point. Well, no problem. You can’t modify that XBRL taxonomy, but you can extend it.
Here’s how you do it: You modify the taxonomy, but you do it virtually by creating another XBRL taxonomy that gets added to the DTS that adds what you need.
How? Good question. First, you need a new concept for airplanes. You also need a new label for that concept. You need to add a relation that adds the concept to the presentation relations of the other taxonomy in the correct spot. Finally, you need to add the calculation relation.
To add all these pieces to your XBRL taxonomy using SpiderMonkey:
1. Create a taxonomy in Spider Monkey by choosing File New Taxonomy.
A dialog box asks you what type of taxonomy you want to create.
2. Click New Extension Taxonomy and then click the Next button.
Another dialog box asks you for the name of the XBRL taxonomy.
3. Type My.xsd in the text box and click Next.
Another dialog box appears asking you for the location of the base taxonomy to use for the extension.
4. Enter the taxonomy location by selecting the Enter Taxonomy Location radio button.
To use the version of the XBRL taxonomy we provide you on the Web, type http://xbrl.squarespace.com/storage/xbrlfortopic/ helloworldexample2/HelloWorld2.xsd into the text box.
5. Click Next.
Another dialog box asks where you’ll physically store the extension taxonomy you’re creating on your local computer.
6. Click the Browse button and, using the view that appears, choose the subdirectory where you’d like to store the extension taxonomy and then click Next.
Another dialog box that relates to Serialization Settings appears.
7. Change the Primary Language to English (with no dialect, the first English in the list of many settings for that language) and then click Next.
8. Another dialog box appears, where you have to enter two things:
a. Taxonomy schema namespace: http://www.example.com/My
b. Namespace prefix: My
9. Click the Finish button.
Your extension taxonomy is created and stored on your computer where you specified.
10. Expand the Standard Role tree and double-click the Land concept.
Within the application, what you see should now look like Figure 15-11.
Your extension XBRL taxonomy looks identical to the HelloWorld2. xsd XBRL taxonomy from the previous section because you referenced that XBRL taxonomy as a base, and you haven’t made any changes yet.
Now you need to add the concept Airplanes.
11. In presentation view, select the concept Computer Equipment, Net, right-click and choose Create Child, and then choose Item from the menu that appears.
You see the Create New Element dialog box again.
12. Enter the following information:
a. Label: Airplanes (this field also auto-generates the Element Name)
b. Item Type: Monetary
c. Period Type: Instant
d. Abstract: Not checked
e. Nillable: Checked
13. Click Finish.
You’ve now added your own concept without modifying the base XBRL taxonomy you’re extending.
You don’t want to forget to modify the calculations to adjust them for the new Airplanes concept you added.
14. For the Hierarchy, select Calculation and drag the Airplanes concept just after Computer Equipment, Net to make it a sibling of that concept in the calculation relations.
You also need to update that balance attribute value on the Attributes tab. Airplanes is also a debit.
15. Click the Airplanes concept, select the Attributes tab, select the balance attribute, and select debit from the drop-down list.
Your extension taxonomy calculation relations should look like Figure 15-12.
16. Validate your extension XBRL taxonomy by choose File Validate.
17. Save your extension XBRL taxonomy by choosing File Save.
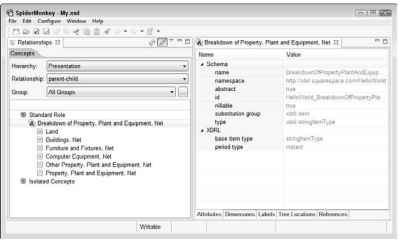
Figure 15-11:
The extension taxonomy starting point.
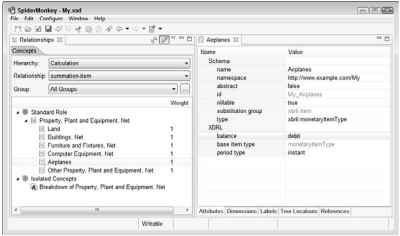
Figure 15-12:
The extension taxonomy calculation relations after adding the Airplanes concept.
We’d like to point out a few things in Figure 15-12. Look on the right where it says Schema and namespace. Notice that the concept you added has the value you entered for your namespace. If you look at all the other concepts, they have the namespace value from the base XBRL taxonomy. Click some of the other concepts to see for yourself that they’re from a different namespace of the HelloWorld2.xsd taxonomy that you extended.
You can see a completed version of the My.xsd extension XBRL taxonomy at www.xbrlsite.com/Examples/Extension/My.xsd. The extension XBRL taxonomy is located on a totally different Web site than the base XBRL taxonomy from the previous section. These two XBRL taxonomies work together to provide the needed set of XBRL taxonomies that include the Airplanes concept and the other components of Property, Plant and Equipment, Net. The base XBRL taxonomy is physically unmodified.
Creating an XBRL Instance that Uses Extension
You can create an XBRL instance using the extension XBRL taxonomy created in the previous section. You create this XBRL instance by modifying the first Excel spreadsheet that you used to create our “Hello World” XBRL taxonomy. You have all the XBRL taxonomies you need to create this XBRL instance. We encourage you to create this XBRL instance using the Excel spreadsheet and then repeat this process using your XBRL instance-creation software of choice. The new business report that you create in this section looks like Figure 15-13.
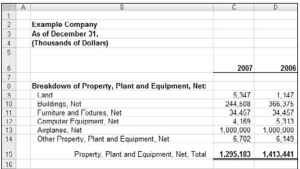
Figure 15-13:
The new business report includes the Airplanes concept.
Notice that you now have a line item for Airplanes. The values are $1,000,000 for both 2007 and 2006; the totals have changed to reflect the new line item.
We need to modify our “Hello World” Excel spreadsheet to work with our new extension XBRL taxonomy, adding the line item for Airplanes. This process gives you a good idea of how extensions work. It also shows you how you can easily modify your application and provides you a better idea of how the Excel macro-based application works.
You need to do the following steps in order to express this new business report:
1. On your local computer, create a new subdirectory named Airplanes.
2. Open your Hello World.xls Excel spreadsheet that you used in the first exercise.
You can create a copy of that spreadsheet by saving it in a different location.
3. Save this spreadsheet as Airplanes.xls, thereby creating a new spreadsheet in the subdirectory you created in Step 1.
4. Go to the spreadsheet named Hello World Instance and insert a new row into your Excel spreadsheet between Computer Equipment, Net and Other Property, Plant and Equipment, Net.
5. In that new row, add the following:
a. In column B, add the label for the line item Airplanes.
b. In column C, add the value 1000000 for the period 2007.
c. In column D, add the value 1000000 for the period 2006.
6. In row 15, adjust the Excel formula to reflect the row you added or simply adjust the numbers to reflect the new total you see in Figure 15-15.
Your spreadsheet should look like Figure 15-15 when you’re finished. You need to adjust the mappings to reflect the new row and the fact that two existing rows have moved.
7. In the Mappings spreadsheet tab, add Airplanes to the mappings by either copying or adding two new rows.
8. For each column in the two new rows, add the following data:
a. Spreadsheet: Use Hello World Instance for both rows.
b. Cell: Use C13 for the first row and D13 for the second row.
c. Concept: My:Airplanes for both rows. Notice that the namespace prefix is pointing to your extension XBRL taxonomy.
d. Context: I-2007 for the first row, I-2006 for the second.
e. Units: U-Monetary for both rows.
f. Decimals: INF for both rows.
g. Scale: 1000 for both rows.
Now, you added the row for Airplanes on the Hello World Instance spreadsheet, so you need to adjust the physical location that the mapping information looks at to reflect that new location.
9. Fix Hello World:Other Property Plant And Equipment and Hello World:Property Plant And Equipment to point to the correct cells.
Basically, add one to the cell number reference increasing that number by one for the one row you added. Figure 15-14 shows you what the last several rows of the Mappings spreadsheet should look like now.
You want to use your XBRL extension taxonomy for your new XBRL instance because it contains the concept Airplanes.
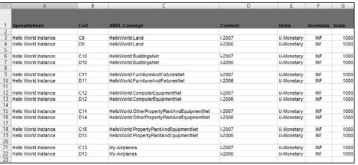
Figure 15-14:
Mappings after adjustments for adding Airplanes.
10. To change your taxonomy, go to the Taxonomy spreadsheet tab.
You need to refer to the My.xsd extension XBRL taxonomy. That taxonomy pulls in the base XBRL taxonomy HelloWorld2.xsd.
You don’t want to directly refer to the HelloWorld2.xsd schema location because it’s being referred to indirectly by our extension.
11. Change the Write Schema Ref value to No.
You still want to put the Hello World.xsd namespace identifier and prefix into the XBRL instance.
12. Add a new row to the Taxonomy spreadsheet, which is how you refer to the extension taxonomy, with the following in that row:
a. Namespace Prefix of taxonomy: Enter My into the cell.
b. Namespace identifier of taxonomy: Enter http://www.example. com/My into the cell.
c. Location and name of file: Enter http://www.xbrlsite.com/ examples/extension/My.xsd to use the copy we put on the Web for you to use.
d. Write Schema Ref: Enter Yes because we do want to write a reference to this schema within the XBRL instance.
e. Write Schema Location: Enter No because we won’t be using schema locations.
What you have should look like Figure 15-15. You need to output a different filename, though.
13. Go to the Setup spreadsheet tab and change the filename to Airplanes.xml.
When you’re done, the spreadsheet should look like Figure 15-16.
![]()
Figure 15-15:
The taxonomy spreadsheet after adjustments.
![]()
Figure 15-16:
The setup spreadsheet after adjustments.
14. To check your work, go back to the Hello World Instance spreadsheet tab and click the Generate Mapping Information button.
Notice the red triangles in the upper-right corner of the cells; they indicate Excel comments that were created. You can hover over the cells and check your work by seeing whether the concepts you see in the comment matches what you expect the line item of your report.
15. When you think everything is ready, click the Create XBRL Instance button to output your XBRL instance.
It puts the XBRL instance file named Airplanes.xml into the same subdirectory as the Excel spreadsheet.
16. Validate your XBRL instance using your favorite validator.
We used UBmatrix Taxonomy Designer to validate our XBRL instance because it has a nice calculation validation report. Your output should look something like our validation report shown in Figure 15-17, which shows that everything is valid and the numbers add up.
Core Filing Spider Monkey doesn’t validate XBRL instances, only XBRL taxonomies. To validate your XBRL instance, you need to get an XBRL instance validator. CoreFiling has an XBRL validator called TrueNorth, which offers a 30-day free trial. You can get that software at www.corefiling.com/ products/truenorth.html. Just follow the instructions, install the software, and then come back and follow these steps to validate your instance:
1. Open the True North validator.
2. Choose File Open and point to your instance document.
A message says that everything is okay. It’s not exciting, we know, but that’s good because it means you got everything correct. Good job!
Notice a couple of things from the validation report:
The calculations add up correctly, which the validation report confirms. You achieve validation by using those calculation relations you created.
You’re not looking at funky-looking element names; rather, you can use the nicer looking labels that you created when you added the label resources.
See lines 9 and 18 in the validation report, which has your concept, Airplanes, defined in your namespace My. You didn’t physically modify the base taxonomy HelloWorld2.xsd to create an extension, but instead imported that XBRL taxonomy as a base and then modified the relations in your extension XBRL taxonomy. The combined DTS reflects both XBRL taxonomies.
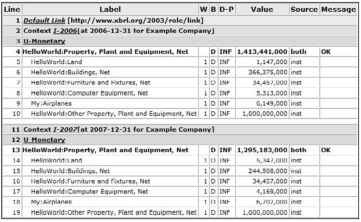
Figure 15-17:
The calculation validation report showing calculations are valid.
Reflecting on Your Creations
In this chapter, you create a base XBRL taxonomy, an extension XBRL taxonomy, and an XBRL instance. You create XBRL taxonomies by writing macros within a spreadsheet or by using specialized XBRL software. You create XBRL using one application and then validate it using another application. The basic step-by-step examples that you walk through illustrate most of what you’ll ever do with XBRL. Your real-life XBRL taxonomies and XBRL instances probably have more concepts and facts in them than do these examples, but the general idea is exactly the same as what we describe in this chapter’s steps.
To really entrench this knowledge of creating XBRL taxonomies and XBRL instances, we encourage you to repeat each exercise using the XBRL software of your choice.
If you haven’t walk through creating this example or, for some reason, creating it didn’t work out for you, you can find the completed XBRL instance at www. xbrlsite.com/Examples/Airplanes/Airplanes.xml. You can get the Excel spreadsheet that correctly generates this XBRL instance at www.xbrl site.com/Examples/Airplanes/Airplanes-2 0 09-0 5-23.zip.
Performing Analysis Using XBRL
For a walkthrough of using the analysis capabilities of XBRL, we utilize one of our favorite software vendors, the U.S. SEC, and its online Test Drive Interactive Data application. In the section “Viewing an XBRL Instance,” we look at one filing for a company. The following steps compare two different filings for the same company, showing you how you can leverage XBRL for analysis.
1. Point your browser to http://viewerprototype1.com/viewer.
The Test Drive Interactive Data page appears.
2. To compare filings, click the Company Comparison Report button.
It’s the second button on the left-hand side of the screen. Look below the View Filings button.
For this exercise, we use United Technologies because it has a lot of filings. The SEC company comparison is separated into three steps, which you can see in red.
3. Find the Search Name or Ticker Symbol text box, type UTX into the box, and then select United Technologies.
The input form helps you limit the list to United Technologies.
4. From the Select Filing (Period) drop-down list box that appears, select the last item on the list, Quarterly report, 2005-03-31.
5. From the Select Filing Report drop-down list box that appears, select Statement of Cash Flows.
6. Type UTX into the Search Name or Ticker Symbol text box and select United Technologies.
7. In the Select Filing (Period) drop-down list box that appears, select the second to the last item on the list, Quarterly report, 2005-06-30.
8. From the Select Filing Report drop-down list box that appears, select Statement of Cash Flows.
9. Click the Display Report button.
You see the statements of cash flow for United Technologies for the two selected periods. This is so easy, and you really don’t see any XBRL: XBRL is hiding in the background, allowing the computer to do all the work. XBRL makes it possible to grab information from two different physical reports and put that information together on this Web page.
Now, this comparison isn’t really that sophisticated, and we admit that we picked a clean comparison. But what is going on is quite a good demo of what XBRL enables. Try to compare two different statements using the EDGAR system. That process involves opening two different documents, finding the statement you want, and then somehow putting the information side by side, usually by cutting and pasting. Imagine doing this comparison for more than two periods (say, five periods) or doing it across several different companies.
