Technology always works, right? I don’t believe that either. Many pieces have to come together correctly to put a Web page on your computer and get your e-mail delivered so that it’s a wonder that it works at all.
Sometimes parts break or just don’t work the way you want them to. You’ve just built a wireless network; it’s quite probable that something needs to be fixed.
In this topic, we look at fixing your network problems, or at least getting far enough that you can point the finger at your service provider.
Before You Begin
Was your wireless network working, then you did something, and then it stopped working? Even if you did something, that shouldn’t have made a difference. Maybe you installed some new software, changed a name, or were rearranging some cables.
If so, undo what you did. If it’s not undoable (such as moving cables around), make sure everything was exactly the way it was before.
Most computer problems happen because something was changed. It’s okay to change things, but when the change makes your computer break, backing out of the change is faster than fiddling around.
Coming Up with a Plan
Successful troubleshooting means following a plan. I’m not talking about a detailed written plan — most often a picture on a scrap of paper can suffice.
Generally, you start at one end of the network and work your way through to the other end until you’ve found the problem.
Defining the problem
Before you start anything, define your problem. Framing this definition in terms of what you are trying to do that’s not working is important. Some good descriptions are
♦ I’m trying to browse to http://example.com, but my Web browser says "Host not found."
♦ I’m trying to get my e-mail, but Outlook tells me "Invalid password."
♦ I’m trying to get the sports scores, but my Web browser just returns a white screen.
Note that in all cases the problem description includes an error message, or at least a description of what you are seeing, along with a description of what you’re trying to do. This information helps guide your troubleshooting and will be essential information if you have to call someone for support.
A few bad problem descriptions are
♦ The Internet is down.
♦ My e-mail is broken.
♦ My site doesn’t work.
These phrases don’t communicate anything to people trying to help, nor do they describe the problem.
If you have multiple computers in your house, then you should check to see if the problem exists on some of those. Doing this helps differentiate a computer problem from a network problem.
Drawing a picture
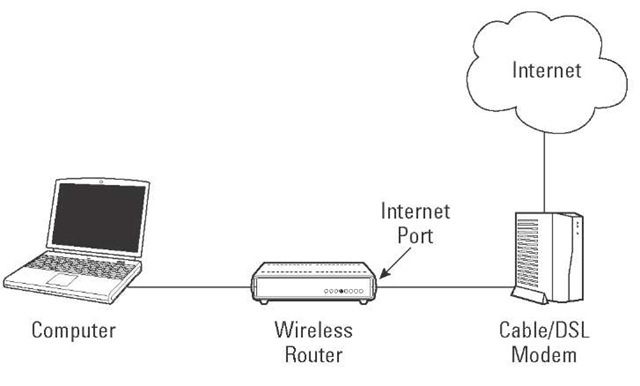
It may sound corny, but drawing a picture can help your troubleshooting considerably. A picture helps you understand how all the parts go together, which guides your problem solving.
You can see a sketch of my network in Figure 8-1:
Figure 8-1:
A sketch of a network.
See? It can be pretty simple. The computer connects over the wireless network to the router, which connects to the Internet, through the cloud known as the Internet to the Web site.
Is the error message trying to tell me something?
Now that the network layout is fresh in your mind, look at the error message that comes up when you try to perform your task. Is it pointing out something?
For example, if your e-mail client tells you that the username and password are wrong, you should jump straight to verifying those items. Sometimes, though, the error message doesn’t make things any clearer for you, which means that you need to continue to troubleshoot.
Is the problem the same for all sites?
If your problem has to do with a Web site, then check another Web site to see if it has the same problem. Sites such as Google.com, yahoo.com, and ebay.com should generally be available, unless the problem is more local.
If you can get to other sites, then chances are your site is having problems, and you’ll just have to wait it out. You could call a friend and ask if they’re having the same problem, just to make sure.
If other sites seem to be down, too, then the problem is probably on your end, and it’s time to fix it.
If Web sites work, but e-mail doesn’t, then there’s little point in following the guidelines in this topic. You’ve shown that the Internet works and that it’s a problem with your ISP. Skip straight to calling your ISP.
Looking at Your PC
Starting at the left of the network diagram, you want to make sure your computer’s working correctly.
Before you start checking your PC’s settings, can you log into the administrative interface of your router while connected to the wireless network? If so, your PC’s probably okay, and you can skip to the next section. If not, it’s time to troubleshoot the PC.
Repairing your network connection
In Windows XP, right-click on the network adapter icon in your system tray and select Repair. Your computer disables the network adapter and then brings it up.
In Vista, right-click on the network adapter icon in the system tray and select Diagnose and Repair.
Rebooting the computer
If resetting the network connection doesn’t work, then reboot your computer. I know it’s a pain, but this is Windows after all, and sometimes it needs the computer equivalent of a swift kick in the behind. Rebooting solves a lot of problems.
After a reboot, Windows gets a fresh chance to do things in its own order and from scratch, which is often enough to fix a problem with the computer.
Checking the wireless association
At this point, you’ve rebooted your computer so you know that it wasn’t some sort of transient thing that most computers experience. Looking back at the network diagram, the problem must either be between you and your router, the router itself, or with the rest of the Internet.
If you can, try plugging your computer into the router using an Ethernet cable instead of using wireless. If things work with a wire, then the problem must be with the wireless connection. If not, you can troubleshoot the router.
Go back to your list of wireless networks and make sure you’re connected to the right one! If your computer loses connection to your original access point, it will try to find another one and associate with that, even if it doesn’t belong to you or work properly. You might not even notice this happening at the time.
If you’re not connected to the right wireless network, or you’re not connected to any network.Try it with both the built-in Windows configuration and your vendor’s configuration tool.
Pay close attention to the signal strength as you configure your network. A low strength is a sign that you need to either move your router to a better spot or add a second access point for more coverage. Put your computer in the same room as the access point while configuring, just to make sure.
Incorrect passwords are often the culprit when dealing with association problems. Review the settings on the wireless router and make sure that they match those on the computer. If Wireless Protected Setup is available to you, then use that method.
If, after all that, you can’t associate with your wireless network, skip ahead to the end of this topic and upgrade your router firmware and your computer’s drivers.
Verifying your IP settings
If you’re able to associate with an access point and you are still having problems connecting to the Internet, then it’s time to make sure you’re getting a proper address.
In Windows XP, right-click on the adapter in the system tray and select Status. Then click on the Support tab and click Details.
In Vista, choose StartOControl PanelONetwork and Sharing Center. Click on the Status link next to your wireless adapter and then click Details.
You are looking for the following information:
♦ IP address (or IPv4 address in Vista)
♦ DHCP Server
♦ Default gateway
♦ DNS Server
Checking the IP address
The IP address identifies your computer on the network. The IP address probably begins with 192.168, though it could also begin with 172 or 10. These are the reserved private network addresses and are used for people behind routers.
If your IP address begins with 169.254, then you aren’t getting an address from your DHCP server. If a computer doesn’t hear from a DHCP server, then it picks one of these addresses. This is okay if you have computers that want to talk to each other, but it will not work with your router.
Pay special attention if your computer roams between networks, such as home and work. Sometimes Windows doesn’t pick up a new address when it changes networks, and it is vital to have a proper address. This is why the first step in troubleshooting is to initiate a repair operation on the adapter or reboot the computer.
DHCP and your gateway
Your DHCP server should be the address of your router. It should also be the same as your default gateway. If you don’t have a DHCP server set, then your computer might be set with a static address. Generally, you want to pick up a dynamic address.
If you have an IP address beginning with 169.254, then it’s possible that your router does not have the DHCP service turned on. If so, it’s best to do a factory reset of your router and start from scratch.
If your DHCP server is different from your gateway, then you might have two DHCP servers running on your network.
You should also have a gateway set. The gateway is the device that your computer uses to send information to the Internet.
Changing to DHCP addressing
If you don’t have a DHCP server set, then your computer is probably hard coded with an address (also called a static address). To work properly on your network, you want to use DHCP addressing.
If your computer was set up with a static address for a reason, such as to work with an office network, then you have to switch your settings every time you change networks. It would be worth your time to find out if you can use DHCP on the other network.
1. In Windows XP, right-click on the adapter icon in your system tray and select Status.
2. From that dialog box, click the Properties button.
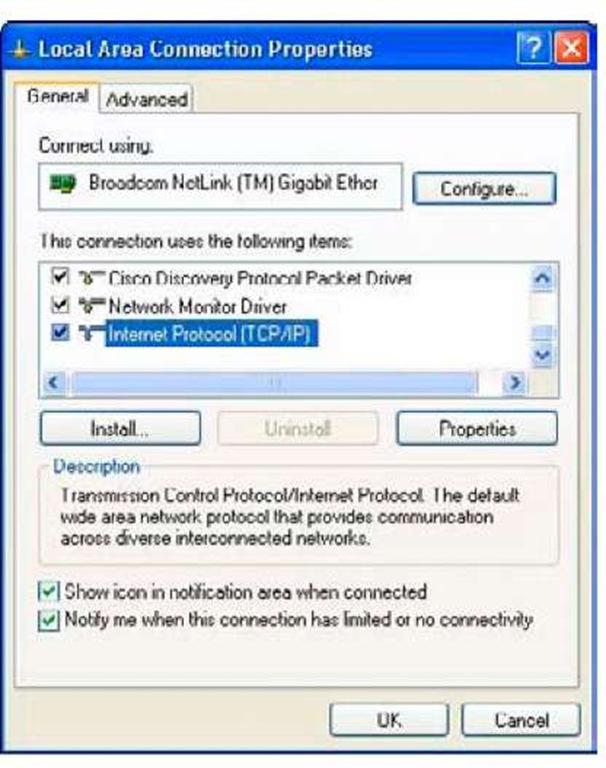
A dialog box like the one shown in Figure 8-2 appears.
Figure 8-2:
Windows XP adapter properties.
3. In the This Connection Uses the Following Items area, scroll down until you see Internet Protocol (TCP/IP). Select that line and click the Properties button.
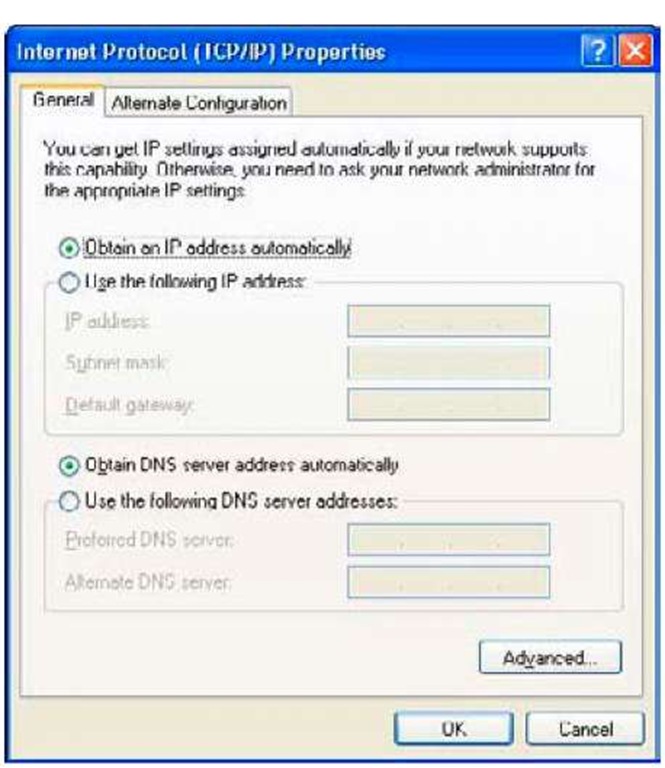
The dialog box in Figure 8-3 appears.
Figure 8-3:
Windows XP TCP/IP properties.
4. The two radio buttons should be on Obtain an IP Address Automatically and Obtain DNS Server Automatically. If the buttons are on a different option, change them.
5. If you had to make changes, then continue clicking the OK button to get out of all the menus. You should be able to obtain an address now.
Vista is slightly different.
1. Go to StartOControl PanelONetwork and Sharing Center.
2. From the Tasks menu, choose Manage Network Connections.
3. Select the adapter and choose Change settings of this connection.
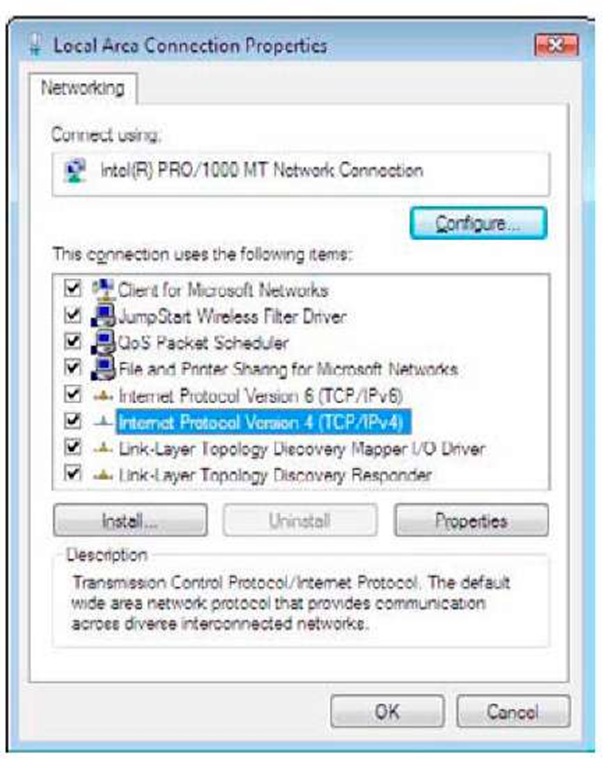
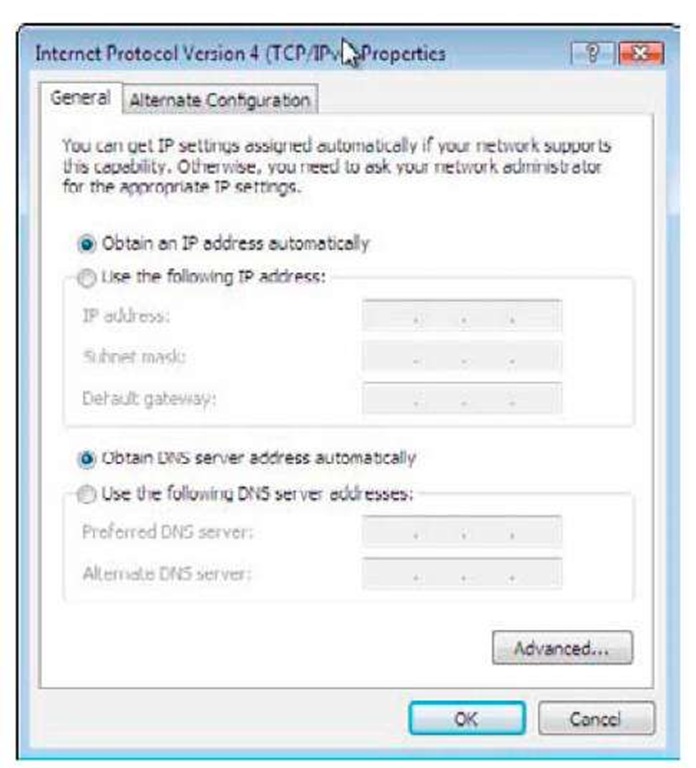
4. Select Internet Protocol Version 4, as shown in Figure 8-4, and click the Properties button.
The dialog box shown in Figure 8-5 appears.
Figure 8-4: Vista adapter properties.
5. Make sure that the automatic options are selected.
Figure 8-5:
Vista IPv4 properties.
