If you’re ready to set up your router, you likely have all the equipment you need. For most of you, this will be the most foreign part of the whole process. Don’t worry! In terms of difficulty, I rank this as easier than setting up a home entertainment system and slightly harder than falling off a log.
In this topic, I discuss the router. If you bought some network adapters, you can set those aside for now. First, you get acquainted with the equipment, and then I explain how to put it together and get it going!
For those of you with foggy memories, or who skipped ahead, the router is the device that connects your home network to the Internet. The router hides all your internal computers and acts as a firewall, which helps to protect you from the bad guys out there. Your router probably has wireless built in, so it’s going to take care of getting your wireless computers connected.
Unpacking the Box
Clear off a table and start unpacking the router box. You should see
♦ A router (if you don’t see this, then pack everything up and take it back to the store)
♦ A power supply
♦ A network cable (3-inch to 6-inch long, with a square plug on each end)
♦ CDs and documentation
♦ Antennae, depending on the router you bought
Your box might come with some other goodies, such as a network card, if you bought a combination package, or some other odds and ends that the manufacturer threw in.
Handle with care
If your cable or DSL modem isn’t in a good spot, then you might consider moving it somewhere better.
Moving a cable modem means that you have to find another cable jack in the house and plug the cable modem into that jack. Be careful, though, especially if you had someone from the cable company come out and set up your equipment. The installers for cable modems optimize your house wiring to give the best signal to the modem, so changing jacks might hurt your Internet speeds. Thankfully, you can just move things back if something goes wrong, or call your provider for a signal check if you’re unsure.
For ADSL setups, you can move your modem to any phone jack. You have to make sure that all the other phones in your house have a filter on them, which prevents noise from the phone from interfering with the Internet signal.
Figuring Out Where to Put the Router
The router needs to be placed close to where your Internet service provider’s equipment (such as a cable modem or an ADSL modem) is located. Ideally, this area is as close to the center of your house as possible, to maximize the wireless range.
So, you’ve found a central location with a bit of breathing room for the router. It’s near a power outlet, and is out of the way enough that you’re not going to trip over it.
Grab some masking tape and a marker before you start setting things up. Tag your cables as you go along so that someone looking for a free outlet doesn’t pull your cable modem’s plug, or you don’t forget which port plugs into what, should they get separated.
Plugging Everything Together
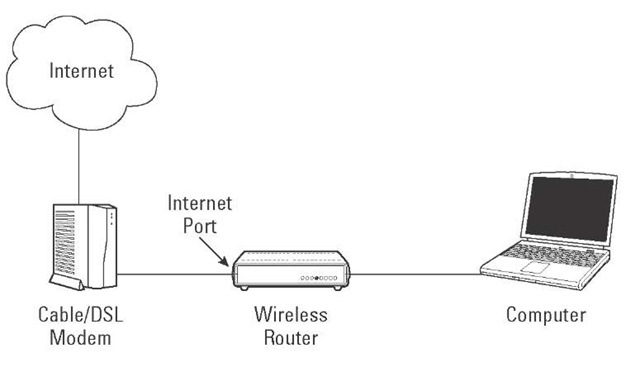
Before you start hooking equipment up, throw together a quick picture of what you’re trying to build. Figure 3-1 shows an example of a network.
Starting on the left, you have your cable modem, which is probably already plugged into your phone or cable line. The cable modem hooks into the external side of your router. Your router connects wirelessly to your workstations, and optionally through a wired interface to any devices that need it.
While you’re configuring your network, you can connect your PC to the router using an Ethernet cable. After you’ve set up the router, you can begin using your wireless network.
Figure 3-1:
The plan for your new network.
Connecting the router to the Internet
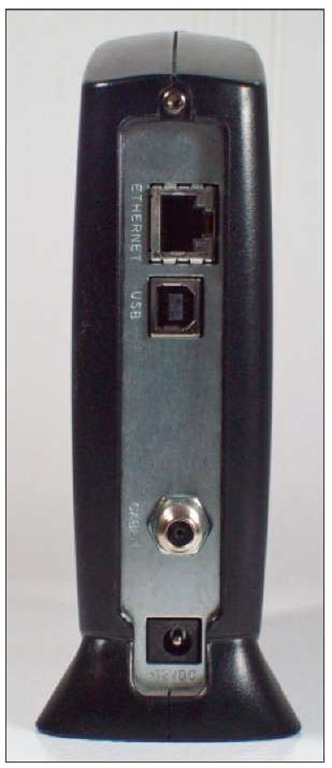
Your cable or DSL modem will have one Ethernet cable coming out the back of it. To help you find it, I’ve taken a picture of my cable modem in Figure 3-2. An Ethernet jack looks a lot like a regular telephone jack, except the Ethernet jack is wider than the phone jack.
Figure 3-2:
Finding the Ethernet jack on a cable modem.
Your router has several Ethernet jacks on it. Your router connects your internal network to the Internet. It’s expecting the Internet to be on a certain port. This port might be labeled:
♦ Internet
♦ Outside
♦ WAN
♦ External
Whatever it’s called, this port is marked differently than the other ports.
1. Plug the router’s Internet port into your cable or DSL modem’s Ethernet port.
2. Hook up the power adapter to your router and give it a few minutes to get started.
You should see lights on both your cable or DSL modem and the router, indicating that a connection was made. Sometimes the light is right underneath the port itself, sometimes it’s on the front of the device.
3. Unplug the power from your router until you’re ready to set it up.
When plugging in an Ethernet cable, it should click. Give the cable a gentle tug. It should not fall out of the port that it’s plugged in.
Plugging your computer into the router
Now that you’ve found the Internet port on the router, the inside ports should be pretty easy. They are likely numbered and in a group, possibly with a label like Ethernet.
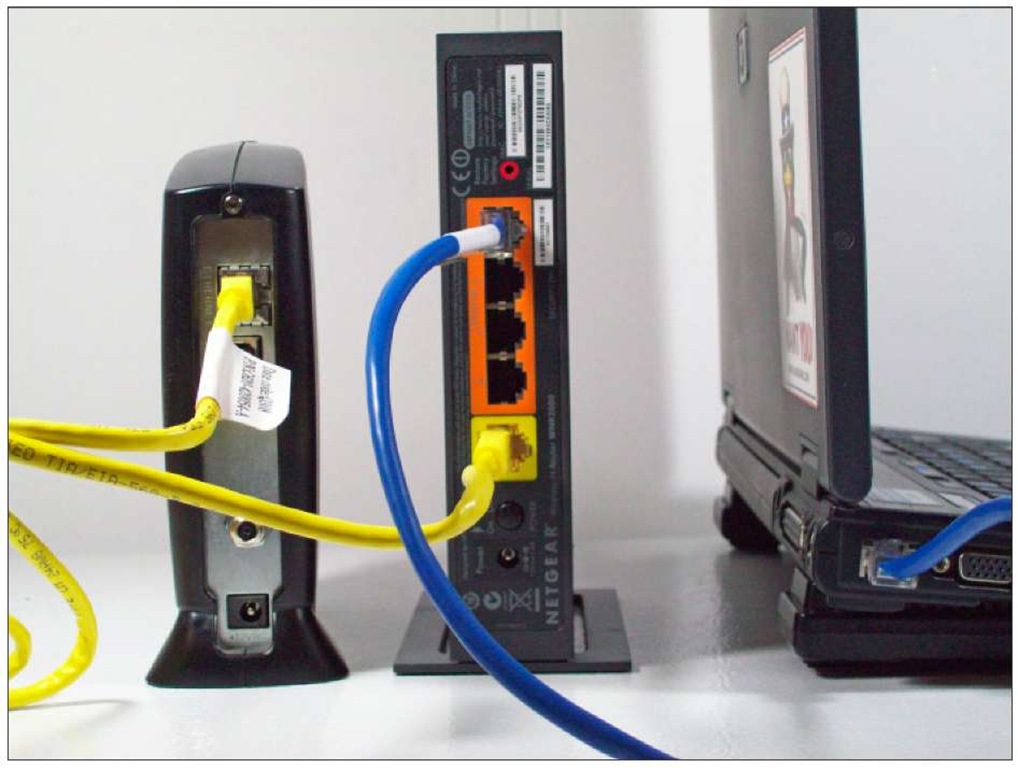
Plug a cable from your computer’s Ethernet port into the first Ethernet port on the router. Now you should have something like Figure 3-3.
Congratulations, the hardest part is over! It’s time to configure the router.
Figure 3-3:
The laptop, router, and cable modem all hooked up.
Configuring the Router
With your router at default settings, you might be able to turn your router on and be on the Internet in a matter of minutes. Even if everything works for you, going through the configuration steps is a good idea. Doing so improves your security, you can upgrade your router’s software to the latest version, and you might even find it fun!
Depending on the router you buy, it may come with a CD that takes you through the configuration section. Feel free to use it, because they generally do a good job. You should still read through this section because it describes the settings you want to look at, and you may have to resort to the method we describe below.
I’m also using a Netgear router. If you have something different, the screens will look different but the process will be similar.
Logging into the router
Your router is configured by using your Web browser by entering a URL pointing to the gateway. The URL you enter is either printed on the router or is in the manual that came with your router.
Maybe your dog ate your instruction manual before you got a chance to copy down the URL, and it’s not on your router. That’s fine — there’s a way to find it.
1. From the Windows Start menu, click on Run.
A pop-up box appears above the Start button, asking which program you want to run.
2. Type in cmd and press the Enter key.
A black window opens.
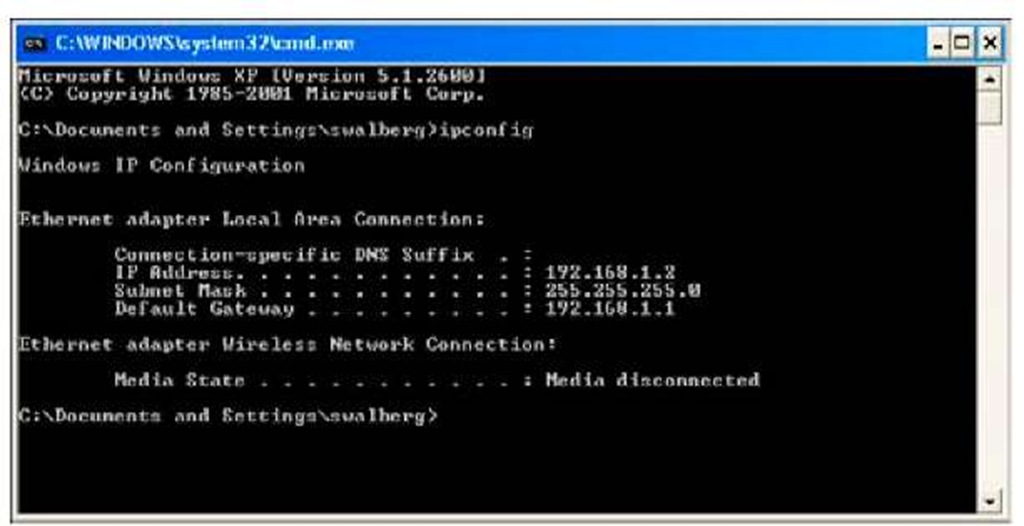
3. Type ipconfig and press the Enter key.
I’ve pasted what I see.
Your window should look something like Figure 3-4. Look for the line starting with Default Gateway. The gateway is 192.168.1.1, which is the address of my router.
Figure 3-4:
Determining your IP address and gateway.
If you don’t have an address, or it starts with 169.254, then make sure that your computer is properly connected to the router. You see a status light on both the router and the computer’s Ethernet port if you have a connection.
Whichever way you find it, open up your Web browser and enter the address of your router. On my Netgear router it is http://routerlogin.net, but it works just as well with http://192.168.1.1 that I learned earlier from the ipconfig command.
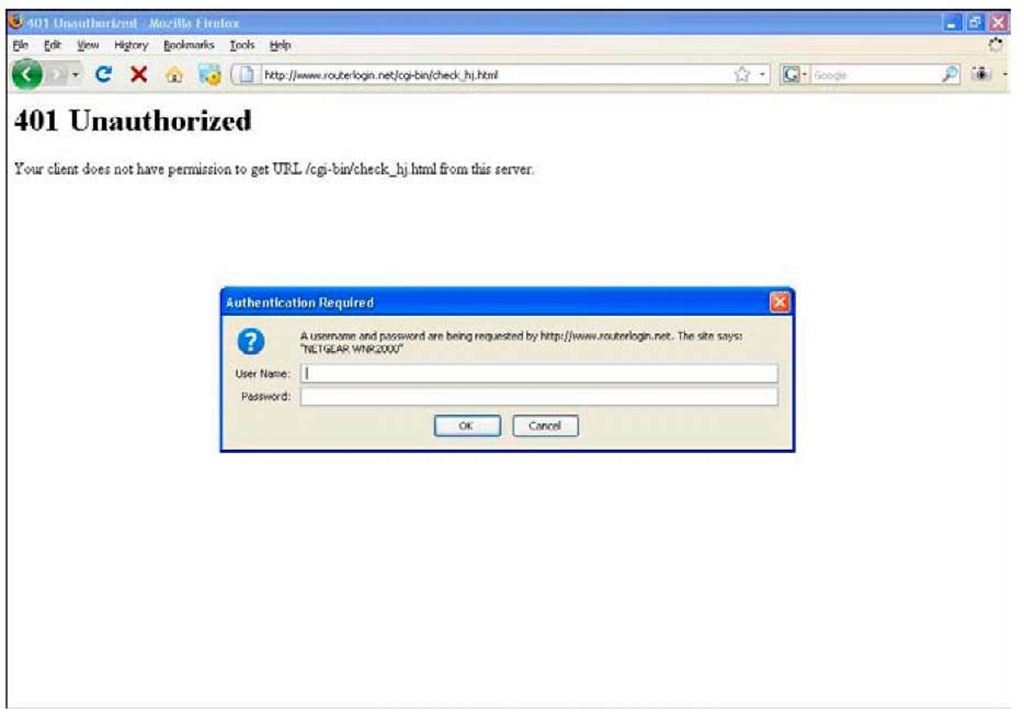
After connecting, you are challenged to log in, as shown in Figure 3-5.
Figure 3-5:
The login screen from a router.
The password is printed on the router or in the manual. You can also try a username of admin and a password of password for many models.
If you lost your manual, the site www.routerpasswords.com has the default username and password for many models of routers.
After you’ve logged in, your router will probably check for software updates. If you are prompted to upgrade your router, you should do so. If you got an error that no Internet connection could be found, don’t panic! You might need to make the changes in the next section.
After the router upgrade completes, for better or worse, you are sent to the wizard (no, not the pointy hat kind! I mean the menus that help you set up your Internet connection).
