This topic covers how to get your computer on a wireless network. First, you take a look at how to configure a wireless network within Windows XP without the benefit of your wireless utilities. Sometimes those utilities just don’t work as well as you’d like, and you have to resort to the old standard.
After looking at using the default wireless configuration, you see how life can be made easier by using the manufacturer’s utilities. For those that are still running Windows 2000 or earlier, you need to use the manufacturer’s utilities in any case.
Vista is the latest release from Microsoft, so after looking at Windows XP, you find out how wireless is configured in Vista. A lot has changed in Vista, so it’s worthwhile looking at it separately.
Finally, you discover what else you can see in the wireless world. If you’re ever on the road, this information can come in handy, because you’ll have to find a different network to connect to.
Configuring Windows XP
Before you can configure wireless networking in Windows XP, you need to find out some information about the network you’re currently connected to. You may think that I’m putting the cart before the horse, but knowing what a properly configured network looks like makes it easier to follow along when configuring your own network.
Microsoft developed the Wireless Zero Configuration system (WZC) short) for configuring wireless inside Windows XP. The name implies that there’s no configuration for you to do; unfortunately, that’s not necessarily true.
You put a password on your wireless network, so you know that at some point you’ll have to type it in. But WZC for short tries to make most of the other choices on your behalf.
Figuring out if you are connected
The system tray, way down in the bottom right of your screen, contains a bunch of icons that give you both a status indicator of some aspect of your system as well a quick way to access options.
Figure 6-1 shows my system tray when I’m connected to the wireless network. The icon of the computer with the radio waves refers to wireless network adapter.
Figure 6-1:
Hovering over the network icon shows the network status.
If a red X shows, you know that you aren’t connected to your wireless network. But if an X does not appear, you know you must be connected to some network. Hovering the mouse over the icon brings up the network status. From there, you can find out some information, such as
♦ This computer is connected to the myhome network.
♦ The connection speed is 54 Mbps (Wireless G or A).
♦ The signal strength is excellent, which is the best you can get.
♦ The computer is connected to the network (but you already knew that!).
The example in this section shows a signal strength of excellent. Other options are very good, good, low, and very low. As you can imagine, those are fairly subjective. I look at some better ways to measure the strength but in the meantime shoot for excellent through good.
Checking status
That information from the hover was nice, but you can find more help by clicking your mouse a few more times.
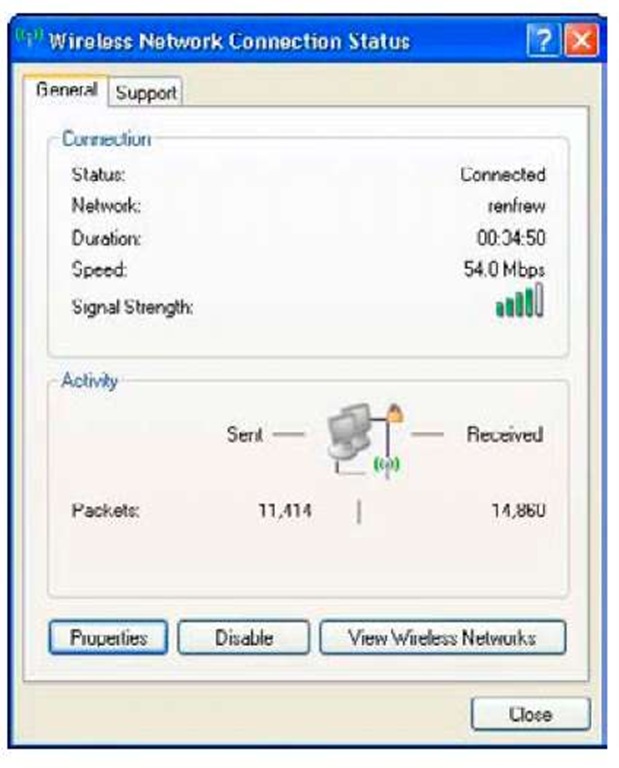
Right-click on the wireless adapter icon in the system tray and select Status. Something like Figure 6-2 appears.
Figure 6-2:
The Status page for a wireless network adapter.
At the very top you see two tabs, General and Support. The General tab gives a lot more information than you had before. You can see the status, name, and connection speed of the network. The duration tells you how long you’ve been connected, and instead of the nondescript signal strength, you get a display from 0 to 5 bars (which really maps to the same scale as before, but looks a lot nicer!).
In the section marked Activity, you can get an idea of how much data you’ve sent and received. The actual numbers aren’t important, other than for curiosity’s sake, but sometimes you want to make sure that you’re able to transmit and receive. If your computer is supposed to be working, but the received packets counter isn’t increasing, you are having a problem receiving data.
The final point of interest on this tab is the three buttons along the bottom (right above the Close button, which closes the window, and is not at all interesting). You’ve got three options here that you can use later:
♦ Properties: This button takes you to the adapter’s property configuration window, which has everything from IP addressing to firewalls.
♦ Disable: Pressing this button disables your adapter and then changes to an Enable button. Pressing the button again re-enables the adapter.
♦ View Wireless Networks: You use this later to show all the wireless networks that your computer can see. You can then pick the one that you want to connect to.
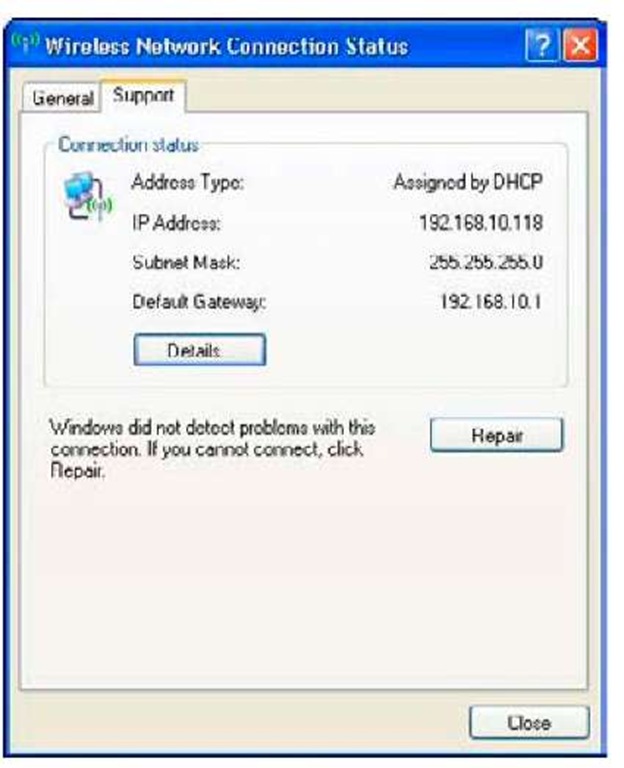
The Support tab, shown in Figure 6-3 has more information about your connection.
Figure 6-3:
The Support tab within the Wireless Network Connection Status page.
The Support tab shows you your IP address, mask, and gateway.
You can click on the Details button to get even more details, but usually knowing your IP address is enough.
The most important button on this page is the Repair button. If you click this button, Windows disables your adapter, re-enables it, and then goes through the connection sequence again. Often, if everything else looks right but things still aren’t working, using the Repair button fixes the problem.
Configuring wireless, the zero configuration way
Ideally, Windows will take care of all the technical details behind wireless configuration. All you need to know is the name of the network and the password.
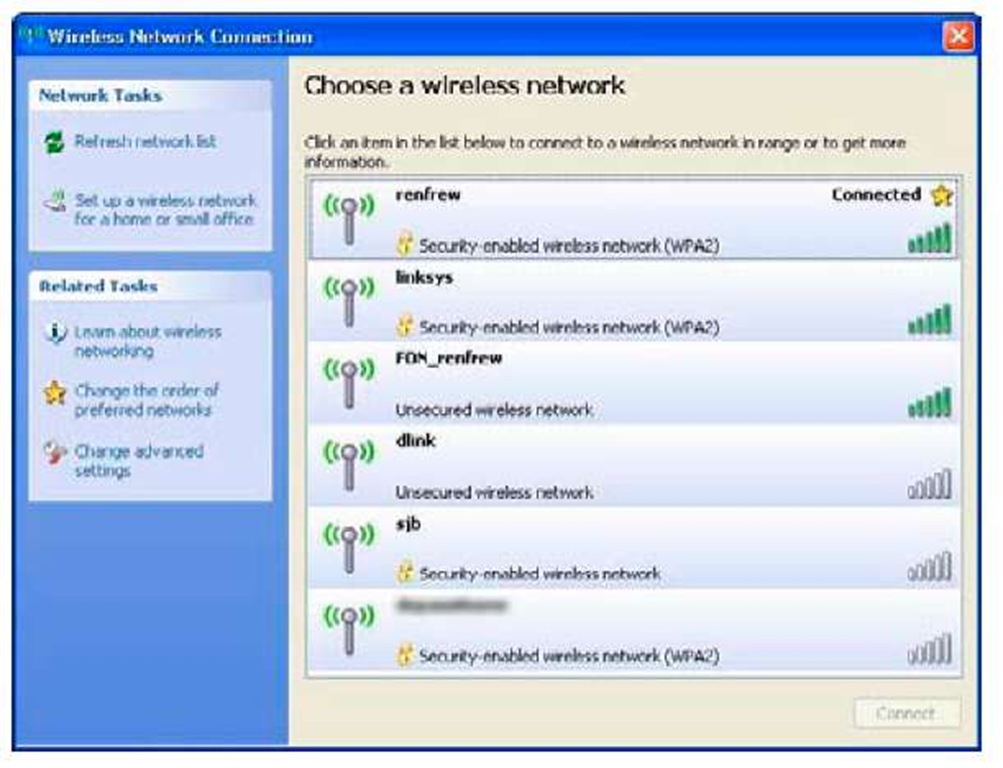
With that in mind, open up a list of the available wireless networks. You get there either by right-clicking on the adapter icon in the system tray and selecting View Available Wireless Networks or by double-clicking on the same icon and pressing the button marked View Wireless Networks. Either way you go, you see a dialog box as in the one shown in Figure 6-4.
Figure 6-4: The list of available networks.
When you pull up the list of available networks, your computer stops transmitting and receiving on the wireless network and starts listening for any networks that might be in range. This list is then displayed to you.
Several pieces of information in Figure 6-4 help to find the right network to connect to. First, the SSID (Service Set Identifier) is displayed in bold. The SSID is the technical term for the name of the network. Here I can see renfrew, which is the name of the network I configured earlier on. Off to the right is the now-familiar signal strength icon. Along the bottom of each row is a description of the type of security the network uses. Anything with a padlock requires a password to join. The text to the right of the padlock describes the exact protection being used, which Windows takes care of on your behalf.
Finally, the gold star on the rightmost side of some rows indicates that this is a so-called preferred network. A preferred network is one that Windows will automatically try and connect to. In addition to the star is a behavior, such as Connected for the network you’re currently connected to, and Automatic for networks that Windows has been told to automatically connect to.
If you think that a network should be on the list, but it isn’t, click the Refresh network list under Network Tasks.
Joining the network
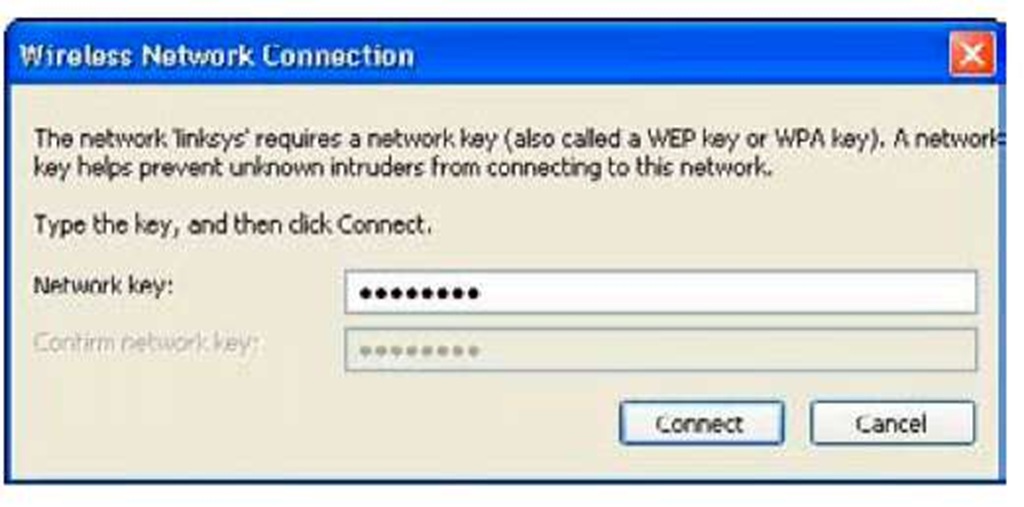
Join the network you want by double-clicking on the row for that network. If the network is secured then you are prompted for a password.
In the dialog box shown in Figure 6-5, you must enter the same password you entered when you configured WPA protection on your router. Type the password twice and click the Connect button. After you’ve connected to the network, you are returned to the list of available networks.
Figure 6-5:
Entering the network key.
You’re connected now — congratulations! You can confirm this by noting that the word Connected appears next to your network in the list of wireless networks or by hovering your mouse over the network icon in the system tray.
Configuring wireless, the longer way
Sometimes the network you’re connecting to doesn’t advertise its existence, even though it’s still there. This is often the case at businesses, where at one point in time, hiding your wireless network was considered a security bonus.
Hiding your network doesn’t solve any security problems; all it does is make it slightly harder to connect.
If you’re playing around as you go, you might find a faster way of getting to certain menus than the way I’m showing you — which is great! I’m showing you the foolproof one.
Follow these steps to connect to a network when you know its configuration but don’t see it in your list of available wireless networks:
1. Right-click on the wireless adapter icon in your system tray and select View Available Wireless Networks.
2. Select Change Advanced Settings.
The Wireless Network Connection Properties dialog opens.
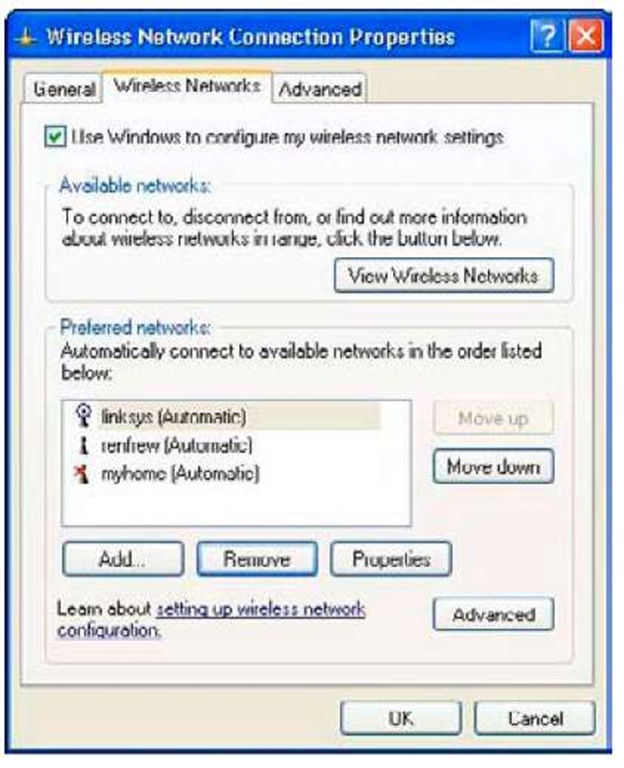
3. Select the Wireless Networks tab shown in Figure 6-6.
Figure 6-6:
The Wireless Network Properties window
This dialog is used to manage all the preferred networks.
4. Create a new profile by clicking Add, which is found at the bottom of the window.
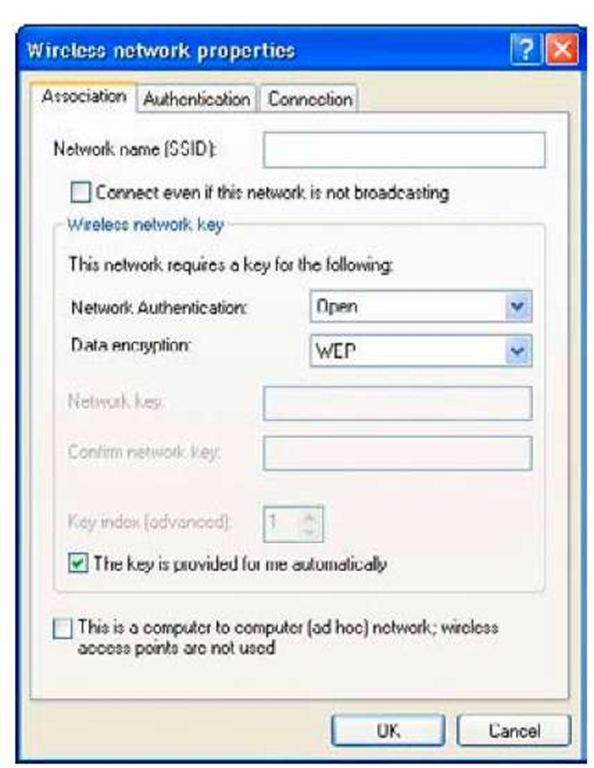
The window shown in Figure 6-7 pops up has three tabs: Association, Authentication, and Connection. Most of the work is in the first tab; in fact, we’re just going to glance at the last two.
Figure 6-7:
The new network’s properties window.
5. In the Association tab, type the SSID of the network you’re trying to connect to, which is the same as the name of the network.
This value is case sensitive, so "myhome" is different than "MYHOME" and "MyHome."
6. Make sure the Connect Even If This Network Is Not Broadcasting checkbox is selected.
This option is important for networks that are hidden. Checking this option tells Windows to actively look for the network rather than waiting to hear the network announce itself.
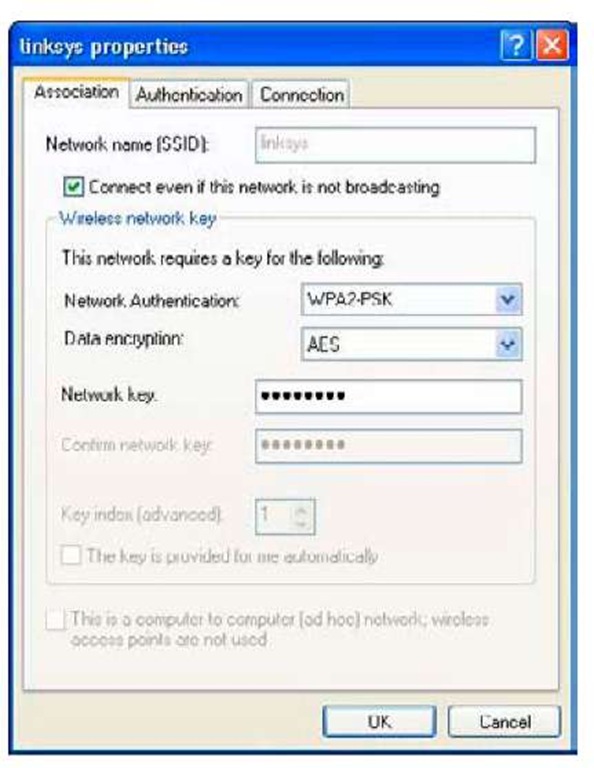
The Wireless network key section is the trickiest part. If you set up your network following the instructions earlier on, you will be using WPA2-PSK authentication and AES data encryption. Make sure to choose WPA2-PSK and not WPA2! The PSK means Pre-Shared Key, which refers to the password you set up on your router. The non PSK version is used in enterprise networks where you are authenticating against a directory server.
7. Type the network password in the section that asks for the network key. Confirm this value in the next line.
If you are unsure of this information, plug back into your router and make sure. It’ll save a lot of frustration later.
8. Make sure that the This Is a Computer-to-Computer Network checkbox is not selected.
Figure 6-8 shows a dialog that’s been filled out. In the Authentication tab, everything should be grayed out if you are using WPA2-PSK or WPA-PSK.
Figure 6-8:
A network that’s been configured.
9. In the Connection tab, make sure that the Connect When This Network Is In Range checkbox is selected.
If you don’t have a WPA2-PSK option, then your computer’s software might be out of date. Upgrade Windows XP to at least Service Pack 2, which includes WPA2 support. Alternatively, search http://microsoft.com for KB893357, which is the patch that provides WPA2.
10. Click the OK button to exit the configuration and then click OK again to exit the properties window.
If you have configured the network correctly, and the network is within range, Windows connects.

