Technique
Save Time By
Having Windows Scheduler clean your disks, even if you aren’t around
Setting up Scheduler so you can use it with other periodic chores
If you’ve ever tried to use the Windows Scheduler, you probably discovered that it’s incredibly easy — a wizard handles all the niggling details — and after you’ve set it up, you can forget about it.
Right?
Wrong.
One little problem. Bet you didn’t know that you have to run Scheduler from an account that has a password on it. If you tell Scheduler to run using an account that doesn’t have a password, nothing runs — and you’re never notified of the fact.
This technique shows you how to set up an account that works with Scheduler (if you don’t have one already), and then it steps you through the method for scheduling automatic disk cleanup runs. As a nifty bonus, by following the steps in this technique, you do everything necessary to quickly set up Scheduler to run any other program automatically.
And that’s a timesaver that works.
Setting Up an Account for Scheduler
You have to run Scheduler from an account with a password. Even more bedeviling: The password you type into Scheduler when you first schedule a task has to be valid when the scheduled task runs. If you change your password, bang, all of a sudden your old scheduled tasks don’t work anymore — and you aren’t notified of that fact, unless you look in a very obscure place. To make your scheduled tasks work again, you have to go through the whole scheduling procedure all over again — run through the steps for every scheduled program — specifying your new password.
If you don’t have an account with a password, you have to set one up. If you have an account with a password that never expires, you’re in good shape (but then, the security mavens would ask, what good is the password?). If you have an account with a password that expires, and you’re very careful to make your new password identical to your old password every time it expires, that works with Scheduler, too (but those security mavens will howl!). All in all, the password restrictions in Scheduler force you to consider whether it’s more important to have a secure password or to be able to schedule jobs to run automatically. You can’t have both.
Bet they didn’t tell you that in Windows class, did they?
If you have an account with a password that you use every day, and that password hasn’t expired (or doesn’t expire, as is usually the case in Windows XP Home Edition), and when the password expires you always make the new password identical to the old password, then you can use that account to run Scheduler. Skip to the section, “Running Disk Cleanup Manually.”
Creating a new Scheduler account
I figure about 90 percent of you are still with me. Good.
In the remainder of this section, I show you how to set up a dummy account (if you’ll pardon the expression) whose only purpose in life is to allow you to use the Scheduler. You need the dummy account, set up with a password that never expires, to run the Scheduler. You don’t want to use your regular account for Scheduler because that prevents you from ever selecting a new password. Besides, if you’re tricky, you can hide the dummy account where most people wouldn’t know how to find it.
If you’re attached to a Big Corporate Network, you may be able to run Scheduler with an account that’s recognized on the server. Give it a try on your system and verify that everything works before you rely on Scheduler to perform as advertised.
Microsoft has confirmed that Scheduler’s refusal to run tasks “is a problem” (see support. microsoft.com/default.aspx?scid=kb;en -us;311119), but Microsoft offers no long-term solution. Security concerns boxed Scheduler into a tight corner. This technique gives you a way to escape the box.
I have detailed instructions for setting up accounts in Technique 47, but here are the bare bones of what you need to set up a functional account just for running Scheduler:
1 Make sure you’re logged on with an Administrator account.
2. Choose Start Control Panel User Accounts.
Windows shows you the Pick a Task dialog box.
3. Click Create a New Account.
You see the Name the New Account dialog box (see Figure 56-1).
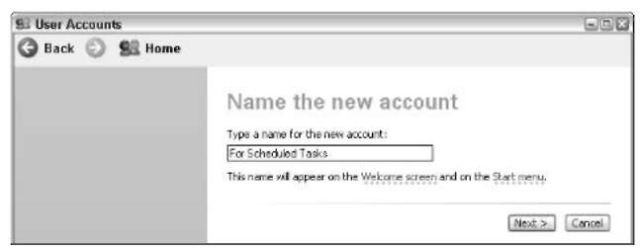
• Figure 56-1: Give the new account a name.
4, In the Type a Name for the New Account box, enter something that won’t be easily mistaken for a regular account, such as For Scheduled Tasks. Click Next.
5, In the Pick an Account Type dialog box, click Computer Administrator (see Figure 56-2), and then click the Create Account button.
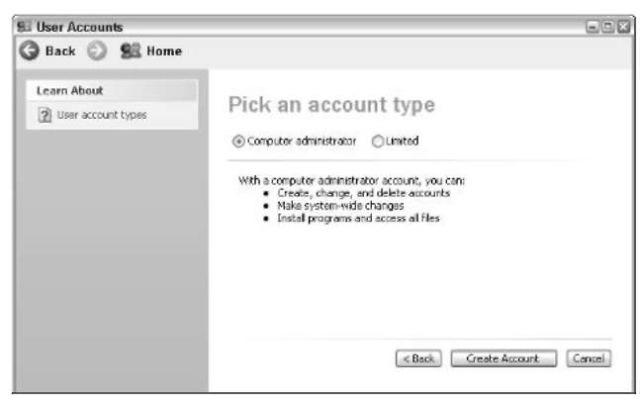
• Figure 56-2: Almost all scheduled tasks require an Administrator account.
6, Back in the Pick a Task dialog box (see Figure 56-3), click the For Scheduled Tasks account.
You see the What Do You Want to Change about For Scheduled Tasks’s Account dialog box.
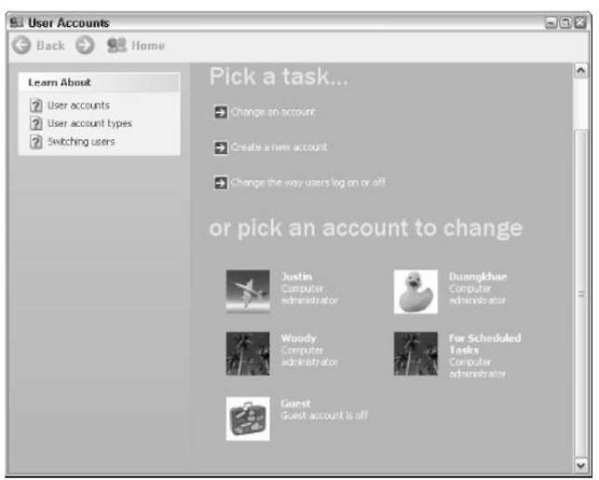
• Figure 56-3: Now edit the new For Scheduled Tasks account.
7 Click Create a Password.
8, In the Type a New Password text box, type a password that you can easily remember. Then type it again.
You need this password every time you use the Windows Scheduler.
9, Click the Create Password button; then click the Close button (X) to get out of the User Accounts application.
Don’t worry about the hint. In spite of what the dialog box says, only the most determined (and knowledgeable) cracker will ever see it.
This is a real password on a real Administrator account, so you need to take some care in assigning it. See Technique 9 for good advice on choosing strong passwords.
Ensuring that your password doesn’t expire in Windows XP Professional
Now that you have a dummy account set up with a password, you need to make sure the password doesn’t expire. If the password expires, the Scheduler won’t run until you change it — and if you change the password to anything but the old password, you have to modify every single scheduled task. By hand. It ain’t pretty.
Windows XP Professional has a nifty interface that allows you to quickly and easily make your password immortal. Finding the interface is another story. Windows XP Home, on the other hand, only offers an obscure, completely half-seat-of-the-pants approach.
If you’re using Windows XP Professional, and your network administrator hasn’t blocked your ability to determine your password’s destiny, follow these steps to immortalize your password:
7. Choose Start Control Panel Performance and Maintenance Administrative Tools Local Security Policy.
The Local Security Settings window appears (see Figure 56-4).
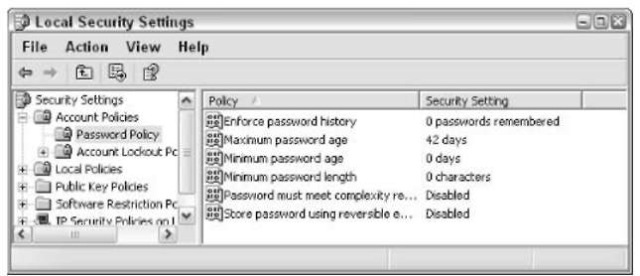
• Figure 56-4: Security settings are only accessible on Windows XP Professional machines.
2. On the left, choose Security Settings Account Policies Password Policy.
3. On the right, if the Maximum Password Age says anything but Unlimited, right-click Maximum Password Age and choose Properties.
You see the Maximum Password Age Properties dialog box, shown in Figure 56-5.
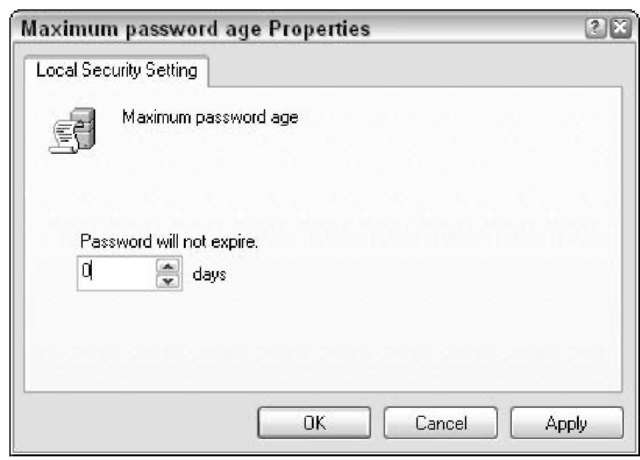
• Figure 56-5: Set the time limit for passwords here.
If you can’t set the Maximum Password Age at this point, it’s almost undoubtedly because your computer is hooked into a network and your network administrator doesn’t allow it. Talk to your administrator and see whether he or she can be swayed by the need for a permanent password for a Windows Scheduler account.
4. Click the Password Expires In text box and type a zero:
The caption on the box immediately changes to
Password Will Not Expire.
5. Click OK and then choose File Exit to get out of the Local Security Settings window.
At this point, all the passwords on this machine are immortal. Guard them well.
Ensuring that your password doesn’t expire in Windows XP Home
If you’re using Windows XP Home, your password probably doesn’t expire. I say “probably” because it may be possible to jimmy things around internally so passwords do expire — unfortunately, no documentation (official or otherwise) settles the question once and for all.
If you have XP Home, you may want to go in and make sure the password can never expire, no matter what. If you want to try the procedure I describe in the previous section, go ahead, but it’s completely useless to you. Microsoft doesn’t include any console support for passwords in XP Home; however, you’re not totally out of luck. You can tinker with the settings directly by following these steps:
7. Choose Start All Programs Accessories Command Prompt.
2. Type net accounts and press Enter.
You see the current status of your PC’s password policies, as shown in Figure 56-6.

• Figure 56-6: The only way to get at password settings in XP Home is through the command line.
3, If the Maximum Password Days entry is anything other than Unlimited, type net accounts
/maxpwage:unlimited and press Enter.
4 Click the Close (X) button to close the Command Prompt window.
Now that’s what I call “user-friendly.”
Hiding your dummy Scheduler account
If you set up a For Scheduled Tasks account, you can effectively hide it so that you don’t keep bumping into it — and so anyone casually using your machine or watching you use it won’t know that it’s there.
7. Download and install Tweak UI.
For full details, check out Technique 5.
2, Choose Start All Programs PowerToys for Windows XP Tweak UI.
The Tweak UI About screen appears.
3, On the left, click Logon.
Tweak UI offers to hide individual accounts on your machine (see Figure 56-7).
4, Uncheck the Show “For Scheduled Tasks” on Welcome Screen box.
5, Click OK.
All done.
If you ever need to monkey with the For Scheduled Tasks account — and you shouldn’t — the easiest way to get to the account is to make it appear on-screen again by using this Tweak UI dialog box.
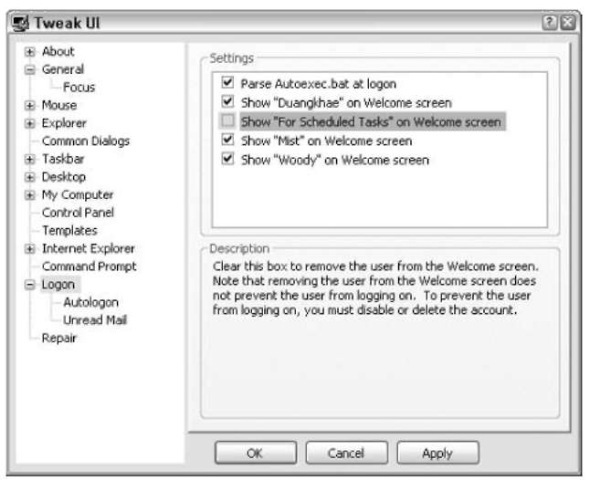
• Figure 56-7: Remove the account from the welcome screen so snoops don’t know about it.
Running Disk Cleanup Manually
If you want to schedule regular automatic runs of Disk Cleanup, it’s important that you run it manually the first time. Disk Cleanup settings are sticky — after you set them, they stay in place until you manually change them. By running Disk Cleanup manually once, the settings persist in the automatic runs. So it’s important that you get everything right the first time — unless you want to waste a bunch of time resetting them later.
To run Disk Cleanup, follow these steps:
1 Choose Start All Programs Accessories System Tools Disk Cleanup.
If you have more than one hard drive, Disk Cleanup responds with a very Spartan dialog box that invites you to choose a drive for cleaning.
2, Select the drive you want to clean and click OK.
There doesn’t appear to be any way to automatically clean more than one drive, so make sure you select the drive letter that gets the heaviest use.
Disk Cleanup spends an inordinate amount of time scanning the drive and then offers you a smorgasbord of file types to delete (see Figure 56-8). (For a tricky way to speed up the scan, see Technique 68.)
3, Choose the kinds of files you want to clean; then click OK.
Generally, I use the guidelines in Table 56-1.
4. Disk Cleanup asks whether you want to perform these actions. Click OK.
Unless it’s been a long time since you cleaned your hard drive, or if you’ve chosen to compress a horrendous bunch of old files, the cleanup shouldn’t take more than a minute or two.
If Disk Cleanup went as you expected, don’t touch anything. The settings will be used when you automatically run Disk Cleanup in the future.
On the other hand, if you don’t like what happened — if Disk Cleanup took away some files that you want to keep (for example, temporary Internet files), or if it missed some files that should’ve been tossed (say, Debug dump files),
start all over again at Step 1 and keep doing it until you get it right. Harumph.
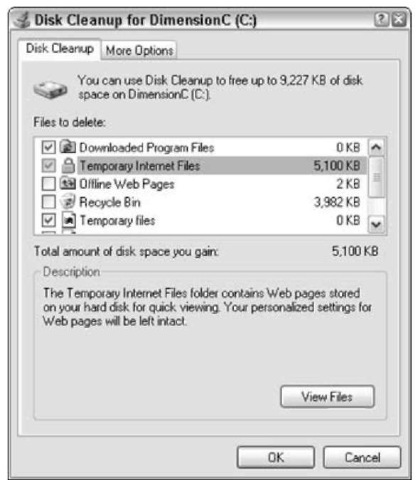
• Figure 56-8: Types of files that Disk Cleanup can clean.
Table 56-1: Choosing Which Files to Clean
| Type of File | Contains | Recommendation |
| Downloaded Program Files | ActiveX controls and Java applets. (These used to be called OLE files, and will soon be called .NET controls and applets.) Typically these are small programs downloaded from the Internet. They work with “custom” applications: games, Web file viewers, and the like. | Give ‘em the heave-ho (that is, delete them). |
| Temporary Internet Files | Cached pictures. | Say, “Hasta la vista, baby,” and delete them. |
| Offline Web Pages | Pages that are downloaded automatically so that you can see them without being connected to the Internet. | Keep ‘em exactly as they are. |
| Recycle Bin | Files in your Recycle Bin. | Never delete Recycle Bin files automatically. If you’re ready to get rid of your old files, delete the files manually, one by one. (continued) |
Table 56-1 (continued)
| Type of File | Contains | Recommendation |
| Temporary Remote Desktop Files | Pictures used for Remote Desktop. | Zap ‘em. |
| Temporary Files | Anything in a Temp folder. | Delete ‘em. |
| Web Client/Publisher Temporary Files | Obscure files. | Delete ‘em. |
| Compress Old Files | Only available on NTFS-formatted hard drives. If a file is more than 50 days old, Windows offers to use NTFS’s compression routine on it. | Marginal space gain, potential heavy hit on performance. Don’t do it. Keep these files at their regular, uncompressed size. |
Scheduling Automatic Cleanups
If you have an account with a password (preferably a password that doesn’t change), and you’ve run Disk Cleanup at least once, you’re ready to set up the Windows Scheduler to run Disk Cleanup on a regular basis.
To schedule Disk Cleanups
1 Choose Start All Programs Accessories System Tools Scheduled Tasks.
Windows Explorer — yes, plain old everyday Explorer — appears on the screen, with the Scheduled Tasks folder open.
2, Double-click the Add Scheduled Task icon.
The Scheduled Task Wizard appears.
3, Click Next.
The Scheduled Task Wizard presents a list of all the programs on your Start menu (see Figure 56-9).
4, You can schedule any of them, or click the Browse button and choose from any program on your computer. But almost everybody wants to run Disk Cleanup in the middle of the night. Spybot is another good choice for the late-night treatment. (Almost all antivirus programs schedule themselves.)
5, Click Disk Cleanup and click Next.
The wizard asks you how frequently you want to perform the task.
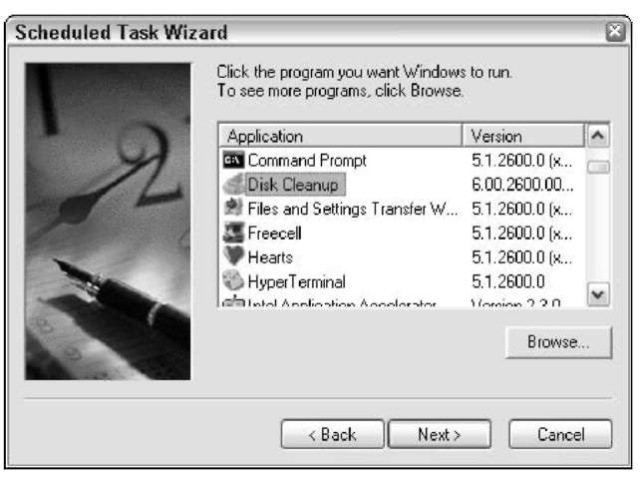
• Figure 56-9: The Windows Scheduler runs any program on your computer, at the time(s) you specify.
6, If you want to run Disk Cleanup once a week (that’s what I do), select the Weekly option and click Next.
The wizard lets you pick the time and days that it runs (see Figure 56-10).
7 Set Disk Cleanup to run at 2:00 a.m. on
Mondays — or any other time that you figure the PC will be on, but you won’t be using it.
Click Next.
Whether you should leave your PC on all the time or turn it off is a personal religious issue that you should resolve with your spiritual advisors. Suffice it to say that I leave my PCs on all the time — or most of the time, anyway. However, I acknowledge that there are plenty of sound reasons for not doing so.
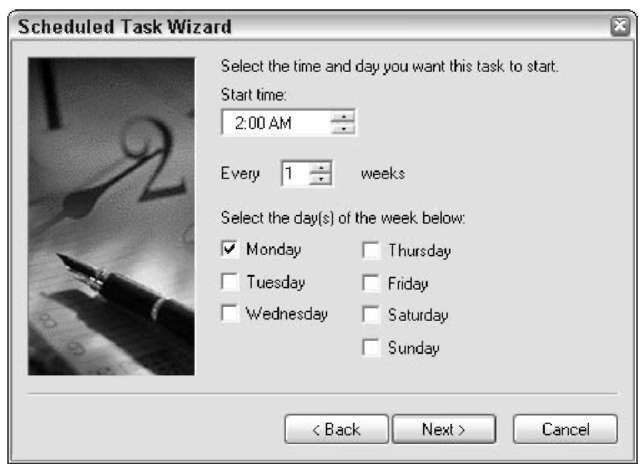
• Figure 56-10: Set the schedule.
The wizard comes up with the key dialog box — the one where you have to enter a user name and password (see Figure 56-11).
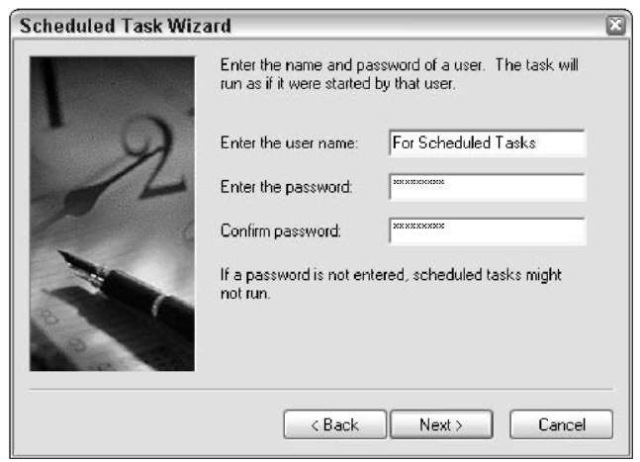
• Figure 56-11: The user name and password are not verified when you enter them.
That little note at the bottom of Figure 56-11 is hogwash, so don’t waste time believing that you have a chance if you don’t enter a password. You must use a user name and password that are valid at the time the Scheduler runs the program. Otherwise, the program won’t run. Period. No maybe about it.
Enter a user name and password that will be valid at the time the scheduled task runs. (The user account doesn’t have to be logged on when the scheduled task runs — it only needs to be valid on the computer, and the passwords need to match.) Ideally, you followed the steps earlier in this technique to create an account called For Scheduled Tasks with a password that never expires. Click Next.
The task has been scheduled, and you’re advised of that fact.
Windows doesn’t check whether you entered the user name and password correctly, so take extra care when you type them in. If you make a typo, Scheduler simply doesn’t run. If you’re typo-prone or just curious, see the next section, “Checking Up on Scheduler.”
9, Click Finish.
If you’re curious, choose Start All Programs Accessories System Tools Scheduled Tasks. You can see your new task in the Scheduled Tasks folder (see Figure 56-12).
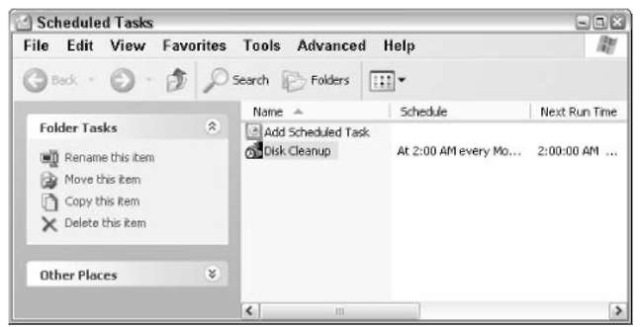
• Figure 56-12: The new task is ready to run.
Checking Up on Scheduler
At times, you may wonder if your scheduled tasks ever run. In fact, I have gone for months thinking that my scheduled tasks were running fine, when password problems kept them from running at all.
A small column is on the right edge when Explorer shows you the Scheduled Tasks folder. It tells you the last time the task was run — but there’s no detail, no indication at all of why things went wrong.
If you ever want to know the full story about your tasks and what they are (or, more likely, aren’t) doing, follow these steps:
7. Choose Start All Programs Accessories System Tools Scheduled Tasks.
The Scheduled Tasks folder opens (refer to Figure 56-12).
2. Choose Advanced View Log.
Notepad shows up (!) with the Windows Scheduler log file, a very retro text file called SchedLgU.txt (see Figure 56-13).

• Figure 56-13: The Scheduler log file.
Unfortunately, Windows Scheduler doesn’t put its latest entry at the top or bottom of the log file. Instead, it keeps the log’s size fixed, adds entries until it gets to the bottom of the file, and then starts again at the top.
3. To find the latest entry, choose Edit Find and search for ***** (five asterisks).
The asterisks take you to the log of the most recent activity. If Scheduler completed successfully, you see an indication (The task completed with an exit code of (0).) in the log file.
4. Choose File Exit to close Notepad, and then choose File Close to exit Scheduled Tasks.
It’s important to realize that Windows Scheduler — as flawed as it is — can launch any program, any time, on a schedule that you can readily adapt. If you set up an account to get around the restrictions (such as the For Scheduled Tasks account I mention in this technique), Scheduler is enormously powerful and a key addition to your timesaving bag o’ tricks.
