Technique
Save Time By
Setting up Windows Firewall for your particular needs
Poking holes in the Firewall
Making fast Firewall changes one-click easy
So you have Windows XP Service Pack 2, and Windows Firewall is driving you nuts.
Good. That’s what it’s supposed to do.
I hate to admit it, but if Windows Firewall doesn’t get in your way from time to time, it ain’t doing its job.
Windows Firewall isn’t a particularly good firewall (see Technique 51 for a look at a much better one). But it comes with Windows XP (at least, with Service Pack 2), and for many people it’s good enough. Better the devil ye ken, eh?
My biggest complaint about Windows Firewall has nothing to do with its intrusiveness, its limited feature set, or its very limited coverage in Windows Help. My number-one beef: Microsoft buried the settings so deep that it takes a century to switch back and forth between various Firewall configurations. If you want to open up the Firewall to play a game, or you want to lock down everything before logging onto a public wireless network, the Windows Security Center requires four or five clicks to make it so. When you’re done, going back to your “normal” configuration takes another four or five clicks . . . assuming you remember to restore your settings. Assuming you can remember which settings need to be changed. Assuming your clicking finger doesn’t fall off in the process.
I figure every Windows user should have a “Lockdown” icon on the desktop — one single button that you can click and have Windows Firewall go into full lockdown. No muss. No fuss. No groping around with a click-click-click-click-click to tell the Firewall “Don’t Allow Exceptions.”
This technique shows you a never-before-published way to make switching Firewall configurations fast, easy, and safe.
Coping with Windows Firewall
If you have Windows XP Service Pack 2 or later, you have Windows Firewall (see the sidebar, “Getting through Windows Firewall”). Windows Firewall isn’t a very capable firewall, as such things go — I talk about a much better one, ZoneAlarm, in Technique 51 — but Windows Firewall plays reasonably well with other firewalls, and you should definitely leave it on all the time.
Getting through Windows Firewall
A firewall is a gatekeeper, protecting your computer from other computers that can reach it. While most people realize that a firewall protects their computer from the big, nasty wide-open abyss commonly known as the Internet, many people don’t realize that a firewall has to protect their computer from other computers on the local network, too.
Windows Firewall is a so-called stateful firewall. To a first approximation, that means WF keeps track of what goes out of your computer, and only allows stuff back in if it’s in response to something that you sent out.
In general, as long as Windows Firewall is working, your computer only responds to three kinds of packets being sent to it:
Packets that are in response to something you sent out.
Packets that are sent to a specific program that you put on Windows Firewall’s Exceptions list.
Packets set to specific addresses — called ports — that you tell Windows Firewall to ignore.
In addition, you can restrict Windows Firewall to only allow packets coming from other computers on your local network — as is the case, for example, with Windows File and Printer Sharing.
Windows Firewall represents a major shift in the way Windows works, and it’s frustrating for network-savvy individuals to adapt. Programs that have worked for the past century or so suddenly stop responding to requests coming from other computers. Believe it or not, that’s A Good Thing from a security point of view.
Windows Firewall’s job is to keep other computers’ stuff from getting into your computer. Unfortunately, in many cases, programs inside your computer need to interact with outside computers to do their job. MSN Messenger (which I discuss in Technique 26) is a good example. When one of your Contacts logs on to MSN Messenger, the network sends you a notice that the Contact is online. That way, MSN Messenger can pop up a little box that says “BillG has just signed in.” That notice from the MSN Messenger network has to break through the Windows Firewall, so MSN can pop up its box.
Windows Firewall is smart enough to intercept many programs as they first attempt to reach the outside world, and ask you if you are willing to let the program communicate freely with other programs, both on your local network (if you have one) and on the Internet. In Figure 50-1, for example, MSN Messenger has just started for the first time, and Windows Firewall wants to know if you want to allow it to communicate freely.
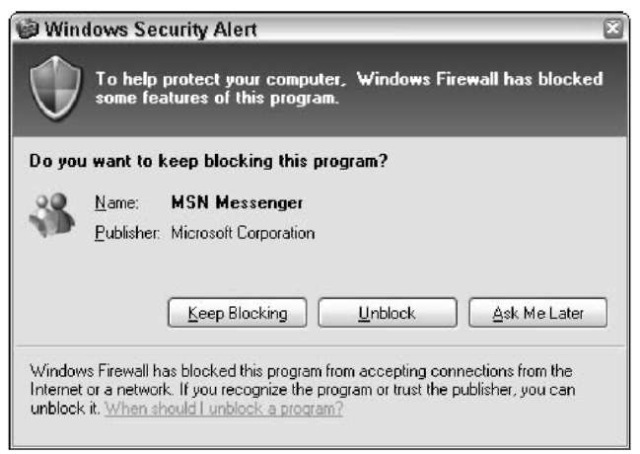
• Figure 50-1: When MSN Messenger runs for the first time, Windows Firewall asks if you want to allow it to get out.
If you unblock MSN Messenger, Windows Firewall automatically creates an entry in its Exceptions list that allows MSN Messenger to receive messages coming from the outside world. To see how these exceptions work, follow these steps:
7. Choose Start Control Panel Security Center
Windows brings up the Windows Security Center, which I discuss in Technique 49.
2, At the bottom, click Windows Firewall.
You see the Windows Firewall dialog box (see Figure 50-2).
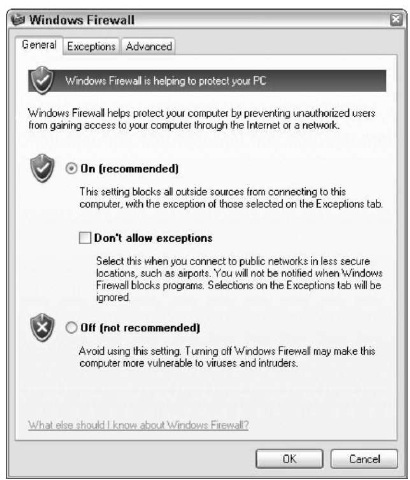
• Figure 50-2: Control Windows Firewall from this screen.
3, Click the Exceptions tab.
Windows Firewall shows you all the exceptions — all the programs and/or ports (addresses) that are allowed to receive information sent to your PC (see Figure 50-3).
4, To see how Windows Firewall identifies exceptions, double-click MSN Messenger.
If you’ve never used MSN Messenger, there isn’t an entry here. Windows Firewall only sets up the entry if you run MSN Messenger, and specifically choose to unblock it.
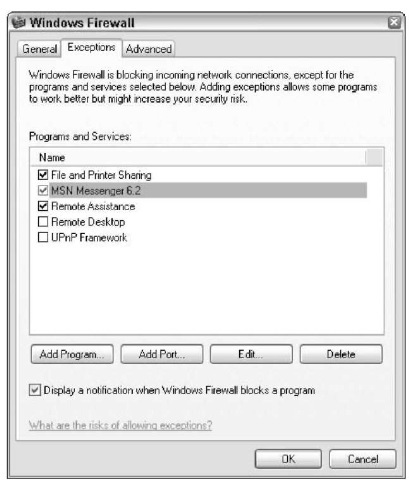
• Figure 50-3: These exceptions are the only programs and ports that are opened up by Windows Firewall.
Windows Firewall shows you that it permits incoming data to pass through the firewall, providing it’s destined for MSN Messenger (see Figure 50-4).
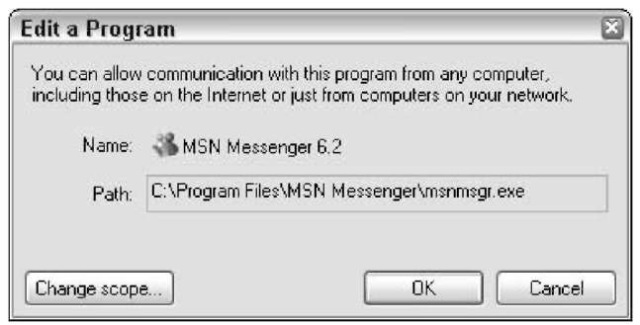
• Figure 50-4: Individual programs allowed to poke through the Firewall are identified by the program file names.
5, Click OK to dismiss the Edit a Program dialog box.
6, To see how Windows Firewall identifies ports that are left open, double-click File and Printer Sharing (on the Exceptions tab).
File and Printer Sharing uses four ports on your computer, as shown in Figure 50-5. Whereas the MSN Messenger entry in the Exceptions list refers to a specific program, the File and Printer Sharing entry refers to a set of ports.
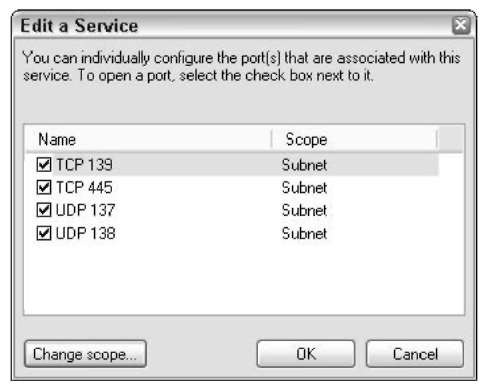
• Figure 50-5: File and Printer Sharing uses a set of four ports.
Every exception in the Windows Firewall Exception list covers either a single program, or one or more ports.
If you suddenly find that you can no longer share files or printers residing on a specific computer on your network, make sure that the computer’s File and Printer Sharing box is checked.
Those four ports are only opened up for other computers on your local network. Heaven forbid that you should open them up to the Internet at large. If you’re curious to see how Windows Firewall restricts access to the local network, click the Change Scope button, and then click Cancel when you have it figured out.
7 Click OK to dismiss the Edit a Service dialog box, and then click OK to leave Windows Firewall.
I talk about Windows Firewall settings extensively in Windows XP All-in-One Desk Reference , 2nd Edition.
Changing Firewall Settings
Every Windows user should be able to lock down Windows Firewall in a New Yawk minute. If you see your ADSL light flickering like a firefly in heat, or if your disk suddenly starts whirring like a tornado is in the box, you’re well advised to lock down first, and ask questions later.
Here’s the official way to lock down Windows Firewall:
7. Choose Start Control Panel Security Center.
Windows brings up the Windows Security Center.
2, At the bottom, click Windows Firewall. Windows Firewall appears (refer to Figure 50-2).
3, Click the Don’t Allow Exceptions box.
That’s Windows Firewall’s “lockdown” setting.
4, Click OK to get out of Windows Firewall, and then click the Close button in the Windows Security Center.
That’s a whole lotta clickin’, especially if you’re feeling a bit panicked. In the next section, I show you how to accomplish the same thing with two clicks.
You may need to change your Firewall settings for plenty of other reasons.
In the preceding section, I show you how Windows Firewall pops open a hole for certain programs (such as MSN Messenger) that need to get out. (Or, more accurately, need to allow traffic from the Internet to
get in.) If Windows Firewall doesn’t pick up a particular program, you have to open a hole manually. In Technique 25, I talk about Shareaza, a scum-free file-sharing program that works remarkably well. When I installed Shareaza shortly after Service Pack 2 hit the streets, it had problems getting through Windows Firewall. (By now those problems are no doubt history.) I consulted the Shareaza Web site and discovered that I needed to add Shareaza to the Windows Firewall Exception list, and that I also needed to open two ports, in order to allow Shareaza to work quickly.
Making ports wide open on the Internet is a risky business. You certainly don’t want to leave the ports open for any extended length of time. If you decide to open a port, make sure you follow the instructions in the next section to make it easy and quick to both open and close the hole. And be ever mindful of the fact that exposing your ports leaves you just as vulnerable as anyone running a version of Windows XP without Service Pack 2.
Here’s how to manually modify Windows Firewall, first to allow a program to receive data sent to it over the Internet, and second to open up ports directly to the Internet, using Shareaza as an example:
7. Choose Start Control Panel Security Center. When the Windows Security Center appears, click Windows Firewall down at the bottom.
You see Windows Firewall Central (refer to Figure 50-2).
2, Click the Exceptions tab.
Windows Firewall’s Exceptions list appears (refer to Figure 50-3).
3. To put a program like Shareaza on the Windows Firewall Exception list, click the Add Program button.
Windows Firewall scans your computer’s \Programs folder and comes up with a list of possible programs (shown in Figure 50-6).
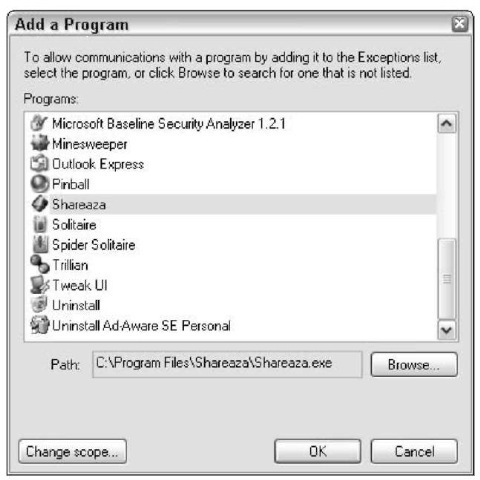
• Figure 50-6: Windows Firewall constructs a list of likely candidates for the Exceptions list.
4. Select the program you want to poke through the firewall. Click Browse to find the program if you don’t see it listed. When you’re done, click OK.
Windows Firewall adds the program to its Exceptions list. The program is allowed to accept incoming data from the Internet.
5, To add a port to the Exception list, click the Add Port button.
Windows Firewall shows you the Add a Port dialog box (see Figure 50-7).
Only add a port to the Exceptions list if a software manufacturer insists — and if you understand the ramifications.
6. Give the exception a name, and then type the number of the port that you need opened. Choose TCP or UDP to conform to the manufacturer’s instructions. Click OK.
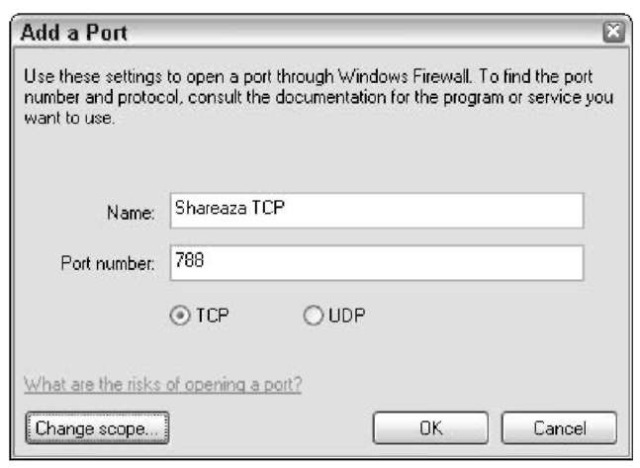
• Figure 50-7: Opening a port for Shareaza.
TCP and UDP are two different ways of talking across a port. See Windows XP All-in-One Desk Reference , 2nd Edition, for details.
When you open a port to the Internet, any creepy-crawly piece of garbage trawling the Net may be able to get into your computer. Only open ports when you absolutely have to, and don’t leave them open any longer than necessary. For example, I check the boxes for Shareaza in the Exceptions list only when I need to have those ports open. When I’m not using Shareaza, I uncheck the boxes, thus closing the hole.
My Windows Firewall’s Exception list, which includes an exception generated by the instant messaging program Trillian (see Technique 27), looks like Figure 50-8. No, I don’t leave those ports open all the time.
7 When you have all your exceptions in line, click OK to get out of Windows Firewall and then close Windows Security Center.
Then run, don’t walk, to the next section, and get those unnecessary holes plugged.
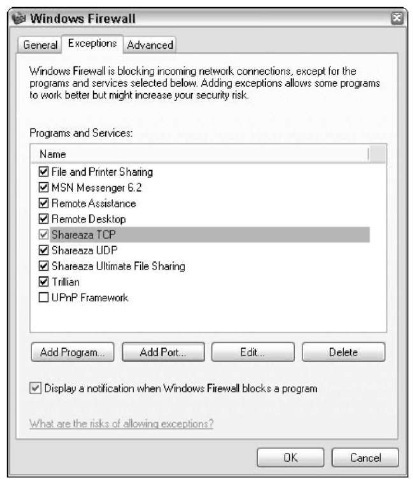
• Figure 50-8: My Exceptions list.
Constructing a Firewall Lockdown Icon
In the preceding sections I show you how to make changes to Windows Firewall that can either poke specific holes in the Firewall, or lock it down completely. All those changes have one thing in common: They’re incredibly time-consuming (and, I would argue, error-prone). There’s a previously undocumented way to get Windows Firewall to make changes quickly and reliably, with just a couple of clicks.
Personally, I have three icons on my Windows desktop that drive Windows Firewall. You may only need two, or you might want more.
I recommend creating icons that perform at least these three actions:
A Normal icon that opens up just enough of Windows Firewall for me to get my everyday work done, and nothing more.
A Lockdown icon that quickly puts Windows Firewall into Don’t Allow Exceptions mode, so I can lock down my machine quickly before I log on to a public wireless hot spot, or if I get the willies. When I’m feeling more secure, I click the Normal icon, and life returns to, uh, normal.
An Open Wide icon, which opens up all the ports that I need for things like running the Shareaza file-sharing program. I use this icon sparingly, and only for a short time, when I specifically need to poke unusual holes into the firewall. When I’m done running Open Wide, I click the Normal icon and get back to work.
All the Windows Firewall settings sit in the Registry, and that’s the key to making these icons work. Here’s what I do on my machine; your situation may be a tad different:
7. Shut down all your programs, including MSN Messenger or any other instant messaging programs.
You may need to right-click the IM program’s icon in the notification area next to the clock and choose Exit.
2. Bring up Windows Firewall: Choose Start Control Panel Security Center; then, at the bottom, click Windows Firewall.
You see Windows Firewall’s main dialog box (refer to Figure 50-2).
3. Make any changes you need to put Windows Firewall in a “normal” configuration.
In particular, turn off all unnecessary programs on the Exceptions list by unchecking the appropriate boxes. In Figure 50-9, I allow File and Printer Sharing, Remote Assistance, and Trillian, but block everything else.
4. Click OK to get out of Windows Firewall.
5. Choose Start Run, type regedit and press Enter.
The Registry Editor (see Figure 50-10) comes up.
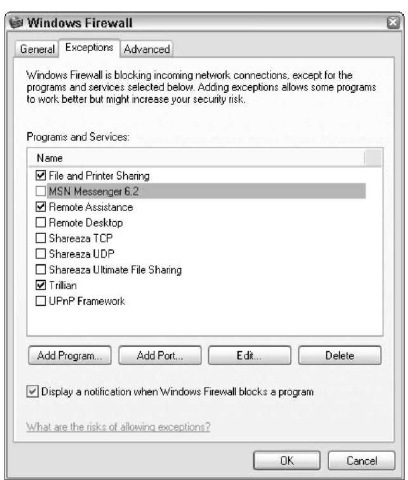
• Figure 50-9: For the “Normal” icon, only enable the programs and ports that you need to get your work done.
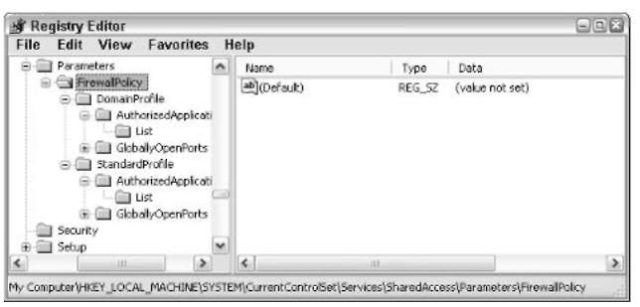
• Figure 50-10: Windows Firewall settings are stored in this Registry key.
I talk about the Registry and how to keep it well-fed in Technique 68, and you might find it worthwhile to scan that technique now. Suffice it to say that if you follow these instructions closely, there’s nothing to worry about.
6, On the left, navigate down to HKEY_LOCAL_ MACHINE\SYSTEM\CurrentControlSet\Services\ SharedAccess\Parameters\FirewallPolicy.
That’s where all your Firewall settings live.
7, Right-click FirewallPolicy and choose Export.
The Registry Editor brings up the Export Registry File dialog box shown in Figure 50-11.
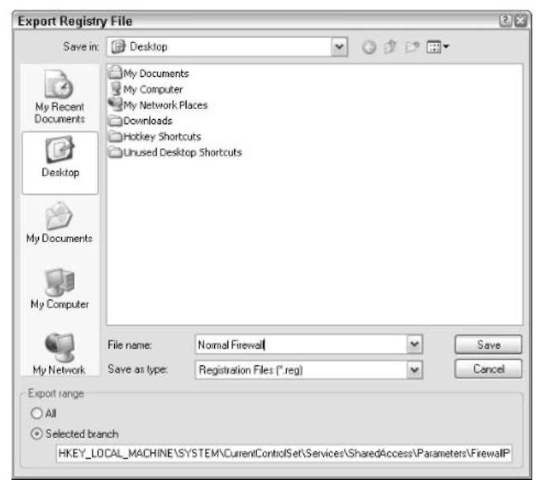
• Figure 50-11: Create a desktop icon by exporting a Registry key.
8, On the left, click Desktop (so your “Normal” icon will go on the Windows desktop). Type a name that’s easy to remember in the File Name box, such as Normal Firewall, and click Save.
The Registry Editor puts an icon called Normal Firewall.reg on your Windows desktop.
9, Choose File Exit to get out of the Registry Editor.
f0. To create a Lockdown icon on your Windows desktop, follow Steps 1 and 2 to bring up the main Windows Firewall dialog box. Select the Don’t Allow Exceptions box, and then click OK to leave Windows Firewall.
Windows Firewall makes the change in the Registry, effectively locking down your PC.
11% Follow Steps 5 through 7 to export the Registry’s Firewall Policy key. Then in Step 8, type a different name, such as Lock Down, in the File Name box, and click Save.
That puts an icon called Lock Down.reg on your Windows desktop.
12. Choose File Exit to get out of the Registry Editor.
13. Repeat Steps 1 and 2, and set up the Windows Firewall so it’s wide open.
Personally, I check all the boxes on the Exceptions list except UPnP Framework. UPnP has been the source of so many problems — including three botched patches from Microsoft — that I simply don’t trust it any more. You may own hardware that requires UPnP (the documentation can tell you). If so, you have my condolences.
14. Click OK to exit Windows Firewall.
15. Follow Steps 5 through 7 to export the Firewall Policy key. In Step 8, type something that will keep you on your toes — I like Wide Open — and click Save.
You now have an icon called Wide Open.reg on your Windows desktop.
16. Choose File Exit and leave Registry Editor.
17. Immediately test your icons by double-clicking the Lock Down.reg icon. The Registry Editor asks you if you’re sure you want to make the changes — yes, of course you do — and it informs you that the changes have been made — yes, you know.
If you then bring up Windows Firewall, you see that you’re in full lockdown — that Don’t Allow Exceptions box is checked.
Hey, maybe Microsoft will figure out how to make Registry changes this quick and easy for the next version of Windows. Whaddya think?
