Technique
Save Time By
Scanning for hard drive problems before they happen
Making Check Disk and Scheduler work together
Defragging your hard drive automatically
The blue screen STOP message includes a cryptic description that’s written in some indecipherable dialect of English. I think. I looked it up in the Knowledge Base and was told that to ‘determine the possible cause, you must properly interpret the error message. If both the first and third parameters are zero, then the four parameters are defined as. . .’ and it goes downhill from there. When I try the procedure that’s listed, it doesn’t help. Now I can’t even get my computer to start. What next?”
The short answer is that you can try a couple of things — but they all involve a little luck and a lot of persistence. The best answer is to solve the problem before it starts. And that’s what this technique is all about.
Scanning Your Hard Drive
In Technique 5, I talk about running Disk Cleanup and the Windows Defragmenter to get rid of unnecessary files and reorganize existing files so that Windows can run faster.
In Technique 56, I give you the lowdown on running Disk Cleanup automatically.
In this section, I show you how to run Check Disk, the low-level disk maintenance program that comes with Windows. In the next section, I take you through the process of setting up Windows Scheduler to run Check Disk automatically, while you sleep.
In general, Check Disk reads data from your hard drive and looks for errors. A full run of Check Disk reads every single bit of data on your hard drive and verifies that all the locations (also called sectors) on the disk are still alive and well.
Before you set up Check Disk, you should know what your options are. Check out Table 57-1 for specifics.
To run Check Disk
7. Choose Start My Computer.
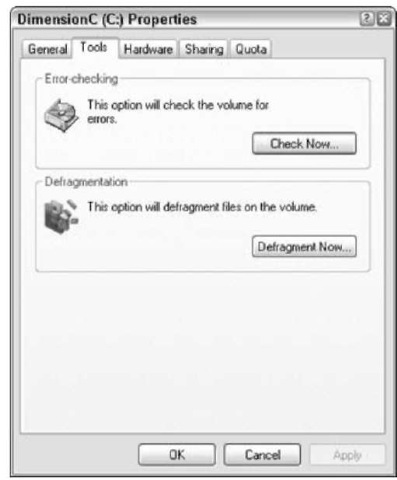
2, Right-click the drive you want to check and choose Properties Tools.
You see the Properties dialog box shown in Figure 57-1.

• Figure 57-1: Check Disk is in here.
3, Click Check Now.
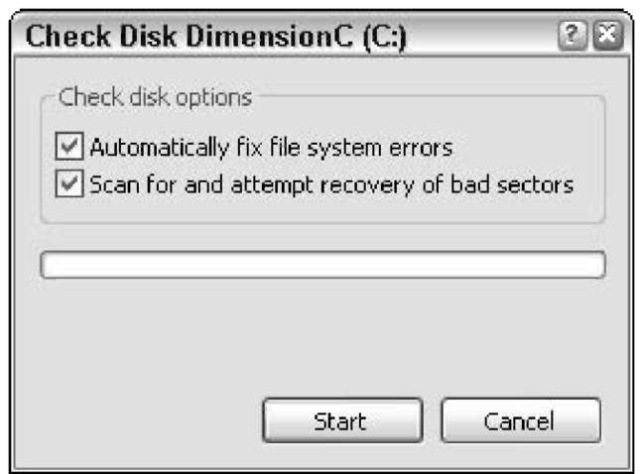
Don’t worry. Windows doesn’t really check right now. Instead, it shows you the Check Disk dialog box (see Figure 57-2).
The choices listed in the Check Disk dialog box aren’t very accurate. For the straight story, refer
to Table 57-1.
4, Check both boxes and click Start.
If you choose to Automatically Fix File System Errors and any file on the disk is open, you almost always get the message shown in Figure 57-3. You always have a file open if you’re trying to scan the drive that has the operating system (typically C:).

• Figure 57-2: How much do you want to check?
I’ve only hit one situation where a check disk went through without rebooting the computer — when I checked a FAT32 disk that didn’t have Windows on it. It’s quite unusual to have Check Disk run while Windows is chugging away.

• Figure 57-3: You see this message if a file is open on a disk while Check Disk tries to do its job.
5, Click Yes and restart your computer.
When your computer comes up for air — immediately after the Windows XP start screen appears — Check Disk kicks in and performs a full check.
If Check Disk doesn’t find any problems, Windows resumes its normal startup routine and shows you the welcome screen. If Check Disk does hit a problem, it slaps a message up on-screen — so many bytes found in so many bad sectors (possibly a notification of lost files) — and waits for you to look at it and click OK.
Table 57-1: Check Disk Options
| If This Box Is Checked | Check Disk Does This | Recommendation |
| Neither (as in, neither of the two boxes is checked) | Scans for internal inconsistencies in the file tables and bad spots on the disk. Check Disk doesn’t fix anything, but reports the results of the scan to you. | Choose this option if you’ve just installed some new hardware (say, a new disk controller) or software that interacts directly with the disk, and you think the problem might be with the new hardware or software. |
| Automatically Fix File System Errors | Scans the drive and repairs the internal inconsistencies. | Choose this option if you don’t ever expect to try to recover the bad data, or if you’re so low on disk space that you don’t have enough room to store copies of the bad sectors. |
| Scan for and Attempt Recovery of Bad Sectors |
Scans the drive and sticks data from bad sectors in separate recovery files. You may be able to dig into the recovered sectors and retrieve some of the data, but it’s a laborious task — and more often than not these bad clusters are useless temporary scraps left behind when something crashes. | Choose this option if there’s any chance you might try to recover bad data. I use this option most of the time. |
Running Check Disk once a week or so is a good idea.
Running Check Disk Automatically
You’d think that Check Disk would be an ideal candidate for the Windows Scheduler (which I describe in Technique 56), and you’d be right. You’d also think that it would be easy to hook Check Disk into the Scheduler so that it could run automatically from time to time. Ah, there you’d be wrong.
Check Disk is an ornery son of a gun. The only way you can get it to run on your main drive (usually C:) is by shutting down Windows entirely, and even that takes using a trick or two in Scheduler.
To complicate matters, unlike Disk Clean, the settings in Check Disk aren’t sticky — when you change the settings, they don’t hang around for the next time you run it.
Setting up Check Disk to run automatically from the Windows Scheduler is a three-step process:
7. Set up Scheduler to run, using an account with a password that never changes.
If you haven’t yet set up a hidden For Scheduled Tasks account with a permanent password, follow the steps in Technique 56.
2, Write a small program that restarts your computer and runs Check Disk.
(I promise it’s easy!)
3, Get Scheduler to run the program.
Because the program restarts your computer, it’s a good idea to run Scheduler in the middle of the night when you’re sure you won’t be around.
Creating a program to restart Windows and run Check Disk
The first thing you need to do is set up Scheduler so that it automatically runs Check Disk. After you accomplish this task, it’s on to Step 2 — creating the short program that automates Check Disk’s processes even more.
To create the three-line program that restarts Windows and then runs Check Disk:
1 Choose Start My Computer.
2, Double-click the C: drive and then double-click Program Files.
If you haven’t yet followed the steps in Technique 20, Windows warns you about all those dangerous files inside your computer (see Figure 57-4). Ho-hum — this warning is not one you need to mind.

• Figure 57-4: Just don’t delete anything while you’re here.
3, Click Show the Contents of This Folder.
4, Right-click an empty location inside the Program Files folder and choose New Text Document.
Windows creates a new document called New
Text Document.txt.
5, Immediately type Restart and Chkdsk.bat and press Enter.
If you can’t get the file renamed properly, right-click New Text Document.txt, choose Rename, and type Restart and Chkdsk.bat.
Windows warns you about changing filename extensions.
6 Click Yes.
You now have an empty text file called Restart and Chkdsk.bat in your Program Files folder.
7 Right-click Restart and Chkdsk.bat and click Edit.
Notepad opens the file.
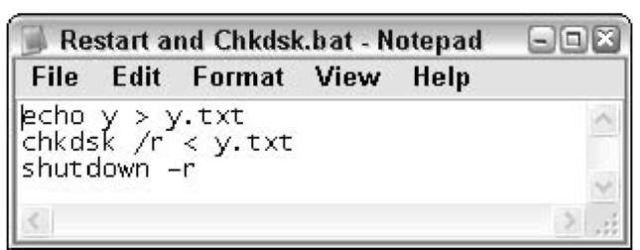
8, Type this three-line program into Notepad.
echo y > y.txt chkdsk /r < y.txt shutdown -r
See Figure 57-5 for an exact listing.
It’s important that you put spaces in all the right places, and that you don’t press Enter except at the end of the first and second lines.

• Figure 57-5: The three-line program that sets Chkdsk to run when Windows boots and then restarts Windows.
9, Choose File Exit to leave Notepad. Be sure you save the changes.
This program is short and sweet, but it’s also abrupt. Best to test it before putting it in the Windows Scheduler.
10. Leave Explorer running with the Program Files folder visible, but shut down all other programs.
11m Double-click the Restart and Chkdsk.bat file. Stand back.
If the program works right, you see a black box appear on-screen for a moment or two, with a warning that Windows can’t lock the current drive.
12, Don’t do anything!
The System Shutdown dialog box appears. See Technique 6.
When your PC comes back, a soothing, light-blue screen appears; you’re politely informed that A
Disk Check Has Been Scheduled .
13. You have ten seconds to press any key to bypass the check — and I suggest you do precisely that if you don’t want to run the scan right now.
After a Check Disk run has started, the only way to stop it is to turn off your PC, and I don’t recommend that you cut the power while Windows is looking at the innards of your drives.
Getting Scheduler to run your program
After you have the Restart and Chkdsk.bat program working, and you’ve been through Technique 56 to set up a Windows Scheduler account, you’re ready to hitch the two together.
Follow these steps to do just that:
1 Choose Start All Programs Accessories System Tools Scheduled Tasks.
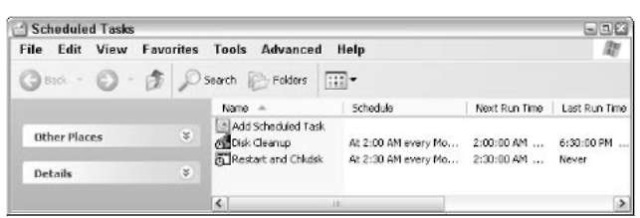
Windows Explorer appears on-screen, with the Scheduled Tasks folder open (see Figure 57-6).

• Figure 57-6: The Windows Scheduler as it appears after you schedule Disk Cleanup.
2. Double-click Add Scheduled Task.
The Scheduled Task Wizard appears.
3. Click Next.
The Scheduled Task Wizard presents a list of all the programs on your Start menu.
4. Click Browse. Using the drop-down list at the top, navigate to C:\Program Files.
5. Select Restart and Chkdsk.bat and then click Open.
The wizard continues, asking how often you want to perform the task.
6. If you want to run Check Disk once a week (that’s what I do), select the Weekly radio button and click Next.
The wizard lets you pick the time and days that it runs.
I set Check Disk to run at 2:30 a.m. on Mondays, which is 30 minutes after my scheduled run of Disk Cleanup (see Technique 56).
7. Pick a time that’s good for you and click Next.
Keep in mind that your computer will be rebooting, and it’ll be basically out to lunch for a couple of hours after Check Disk starts.
The wizard asks you to enter a user name and password.
Scheduler does not check your user name or password when you enter them — so make sure you get them right!
8. Enter a user name and password that will be valid when the scheduled task runs and click Next. (Note that the user name doesn’t have to be logged on at the time the scheduled task springs to life. But the user name has to be valid on that PC, and the password has to match whatever password is currently assigned to the user.)
Ideally, you followed the steps in Technique 56 to create an account called For Scheduled Tasks with a password that never expires.
Windows confirms that the task is scheduled.
9. Click Finish.
You can see your new task in the Scheduled Tasks folder (see Figure 57-7).

• Figure 57-7: The new task is ready to run.
If you have more than one disk drive, I recommend that you schedule Check Disk runs for the drives on separate nights. If you try to run two on the same night, there’s a fair chance the second one won’t ever run because the first one takes too long.
To set up a second Check Disk session, make separate .bat files with different names for each of your hard drives. The only difference between the files is this line:
chkdsk d: /r < y.txt
where you substitute d: with the drive letter for the drive you want to check. For example, to check your F: drive, use the following .bat file:
echo y > y.txt chkdsk f: /r < y.txt shutdown -r
If you wonder whether your tasks are running, choose Advanced View Log and scan for the string *****. Details are in Technique 56.
Running Defrag Automatically
Compared to Check Disk, setting up Windows Scheduler to defragment your hard drive is a breeze.
In Technique 5, I talk about Disk Defragmenter, explain why you need to defrag drives from time to time, and step you through a manual defrag. It’s very, very unusual that Windows XP needs to defrag a hard drive more than once in a blue moon, because Windows is much smarter now than it used to be. But you might want to run one automatically every week or so. Also, don’t worry about wasting your computer’s time. If you request a defrag and one isn’t necessary, Windows XP just ignores the request.
The procedure is very similar to the one in the preceding section, so I go through it quickly:
1 If you haven’t yet followed the instructions in Technique 56, make sure Scheduler is set up and working right.
2. Choose Start My Computer, double-click the C: drive, and then double-click Program Files.
3. Right-click an empty location inside the Program Files folder and choose NewOText Document.
4. Immediately type Defragc.bat and press Enter.
5. Windows warns you about changing filename extensions. Click Yes.
6. Right-click Defragc.bat and click Edit.
7 Type this simple, one-line program into Notepad:
defrag c:
Usually, Windows doesn’t run a full defrag if the files on the drive occupy more than 85 percent of the available space on the drive. (Defragging can be very time consuming if there isn’t a lot of free space.) If you want to force Windows to run a defrag even if files take up more than 85 percent of the space, use this line: defrag c: -f.
8. Choose File Exit to leave Notepad. Be sure you save the changes.
9. Choose Start All Programs Accessories System Tools Scheduled Tasks.
10. Double-click Add Scheduled Task.
11. Click Next.
12. Click Browse. Using the drop-down list at the top, navigate to C:\Program Files.
13. Select Defragc.bat and then click Open.
14. If you want to run a defrag once a week, select the Weekly radio button and click Next.
I run a defrag at 2:00 a.m. on Tuesdays, the day after I run Check Disk.
15. Pick a time that’s good for you and click Next.
16. Enter a user name and password that will be valid at the time the scheduled task runs. Click Next.
See Technique 56 to find out how to create an account called For Scheduled Tasks with a password that never expires.
U, Click Finish.
You can see your new task in the Scheduled Tasks folder (see Figure 57-8).

• Figure 57-8: The new task is ready to run.
If you have more than one disk drive, run defrags for each hard drive on different nights. To do that, make separate .bat files with different names for each of your hard drives. The only difference between the files is this line: defrag d: where you substitute d: with the drive letter for the drive you want checked. Rocket science.
Microsoft didn’t make the defrag program. It comes from a company called Executive Software International. ESI has a more powerful version, called Diskeeper, available at www.diskeeper.com. Among other things, the ESI version includes its own scheduler, has in-depth scanning and reporting capabilities, and can run repeated reads and writes, to see whether there’s any way to make a marginal sector go bad.
