Technique
Save Time By
Demanding a Windows XP CD when you buy a new computer
Creating a Windows XP startup disk that bypasses key system files
Making an old DOS startup disk work on your system
If you grew up in the Windows Me/98 world, you know the importance of having an emergency boot disk — a floppy disk that you could stick in the drive, click Restart, and bring your computer back to life. Heck, those older versions of Windows stepped you through a complicated procedure for creating a two-disk set that could help you cure whatever ailed Windows. And back then, puhlenty ailed Windows.
When Microsoft released Windows XP, there was no provision whatsoever for a boot disk. “Let them eat cake!” came the cry from the Windows executives. Or words to that effect. If your PC wouldn’t boot from the CD, you couldn’t even install Windows. There was a little check box in the disk formatting dialog box that claimed it would create a boot disk — but the generated floppy amounted to little more than a cruel joke. Yes, it would boot your PC. No, you couldn’t do anything much when you booted.
Microsoft now allows you to download a six-disk collection that really does let you boot from your floppy drive — but only so you can install Windows XP from CD, nothing more. The idea: If your PC won’t boot from CD (perhaps the computer refuses to make the CD drive the “boot drive”), you can still boot from a floppy disk — but only if you immediately install or repair Windows. No, you can’t boot from a floppy disk and then run Windows from the CD.
Every Windows user needs a way to get his machine running if the copy of Windows on the hard drive goes bananas. If you prepare for the problem now, you can save yourself hours or days of hassle, down the road.
This technique shows you how to make your machine start, no matter what ails Windows.
Getting the CD You Deserve
Rant /ON.
When you buy a new PC, you should get a Windows XP recovery CD to go with it.
That CD should
Boot all by itself — when you stick the CD in your CD drive and restart, your computer can boot from that CD and allow you to install or repair Windows XP.
Include all the Windows XP files — so when you’ve booted your PC, you can reinstall Windows or make fresh copies of any munged files on your hard drive.
If your friendly computer maker says that you don’t need a recovery CD, tell ‘em to take a hike.
If they tell you all the recovery files are on the hard drive, ask ‘em what you’re supposed to do if your hard drive dies — by far the most likely reason why you need a recovery CD in the first place.
If they tell you Microsoft is forcing them to refrain from distributing recovery CDs, laugh and take your business elsewhere.
Even if the company proffering all this nonsense goes by the name of HP.
When you buy a new PC, you pay for a copy of Windows XP. Make sure that you get your copy on a CD — one that you can hold onto and store away in case you ever need it. If you bought a new PC and didn’t get a CD, you were conned. Contact the company and complain loudly. More and more customers are getting the CD they deserve — even after they pay for their PCs — but only if they bellyache enough.
‘Nuff said.
Rant /OFF.
Creating a Boot File Bypass Disk
Once in a very blue moon, the part of your hard drive that holds Windows XP’s initial programs — the master boot record (or MBR, as it’s called) — will give up the ghost. Occasionally, one of three crucial system files — NTLDR, boot.ini, or Ntdetect.com — can disappear. These maladies have several symptoms, but the most common occurs when you try to start your PC and you get a text message, such as one of the following:
Missing operating system. Error loading operating system. Invalid partition table. NTLDR is missing. A disk read error occurred. NTLDR is compressed.
Your MBR or the key boot files can get scrambled in any number of creative ways:
A particularly stupid virus tries to overwrite the MBR and doesn’t do it right.
You (or, ahem, someone else using your machine) delete a key file, such as NTLDR or
boot.ini .
That part of your hard drive decides it doesn’t want to work today.
You can create a disk that bypasses Windows XP’s MBR and the key startup files. That disk can come in handy if the MBR doesn’t work, or if (for any number of reasons) your PC refuses to boot directly from the hard drive. The big advantage to a boot file bypass disk: If it works, when you finally get your machine going again, everything should work just fine. You have access to all your files on all your drives, all your hardware should be chugging away, and you can scramble around madly backing up your files in anticipation of the possibility you have to replace your hard drive.
If you get to the point that you need this disk, I your machine probably won’t start, so you may have to use a friend’s Windows XP machine to make the disk. There’s no guarantee that a boot file bypass disk generated on one machine will work on another, but I haven’t hit any problems, as long as neither machine is set up to boot to multiple operating systems, and you aren’t using SCSI drives. Your friend must be running the same version of Windows XP that you’re using — XP Home or XP Professional — although it doesn’t matter if you both have the same Service Packs installed.
The steps here create a floppy disk that will boot your PC, bypassing the key files on your hard drive. If you don’t have a floppy drive, and you’re getting error messages, your only real choice is to reinstall Windows, wiping out the old copies of those key files entirely. For instructions on performing a reinstallation, see www.microsoft.com/windowsxp/using/ helpandsupport/learnmore/tips/doug92. mspx.
To make a boot file bypass disk
7. Put a diskette in the floppy drive.
Everything on the disk will be overwritten.
2. Choose StartOMy Computer, right-click the floppy drive (probably A:), and choose Format.
Windows XP’s Format dialog box appears, as shown in Figure 67-1.
3. Type a volume label for the disk, if you wish, and then click Start.
4. When the format is complete, click OK, and then click Close.
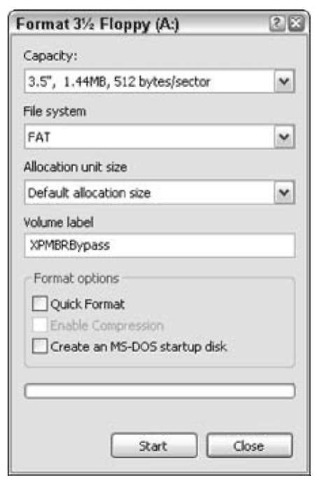
• Figure 67-1: Format the disk under Windows XP.
5. Back in Windows Explorer, double-click the C: drive (or wherever you installed Windows XP).
6, Make sure that Windows Explorer shows you all your files: Choose Tools Folder Options View, click Show Hidden Folders, and uncheck the Hide Extensions for Known File Types and Hide Protected Operating System Files (Recommended) check boxes. Click OK.
7 Under the C: drive, right-click the boot.ini file, and then choose Send ToO3!2 Floppy (A:), as shown in Figure 67-2.
8. Right-click the NTLDR file and choose Send ToO3l!2 Floppy (A:).
9. Right-click the Ntdetect.com file and choose Send ToO3l!2 Floppy (A:).
f0. Look for a Bootsect.dos file here in the root of the C: drive. You probably don’t have one, but if you do, right-click it and choose Send To Floppy (A:).
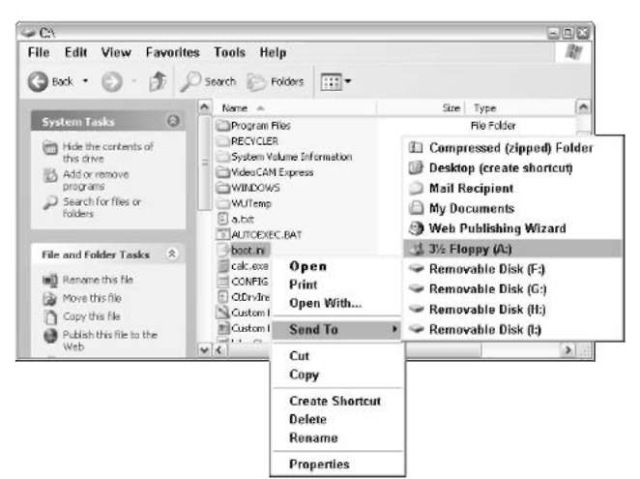
• Figure 67-2: Send a copy of boot.ini to the newly formatted floppy.
11% Look for a Ntbootdd.sys file here in the root of the C: drive. You probably don’t have one, but if you do, right-click it and choose Send To 3i2 Floppy (A:).
12. Close Windows Explorer.
The disk you just created should be able to boot your PC, providing that the hard drive is working and only your MBR or the key files are clobbered.
Using DOS Boot Disks — If You Can
So where’s the beef? Why can’t you just slap an old DOS or Windows Me (or 98 or 98SE or 95 or 3.1) boot disk in your floppy and have your PC fire up DOS — or whatever your particular flavor of Windows uses to call its DOS persona?
The problem: NTFS — the NT File System. I talk about NTFS in Technique 48.
DOS, Windows Me, Windows 98, and all their old, carefully crafted boot disks aren’t smart enough to see an NTFS drive. They work only with the old-fashioned FAT32 hard drive format. If you have an NTFS drive (and you probably do if you bought your PC with Windows XP preinstalled), you can boot to DOS till the cows come home, but unless you have some way of seeing NTFS drives, you can’t do much.
On the other hand, if all your hard drives are formatted as FAT32 drives, any old DOS boot disk works.
If you bought a new PC with Windows XP prein-stalled, your drives almost undoubtedly use NTFS. If you installed Windows XP on a PC, you may or may not have NTFS drives.
Do you have NTFS or FAT32 drives?
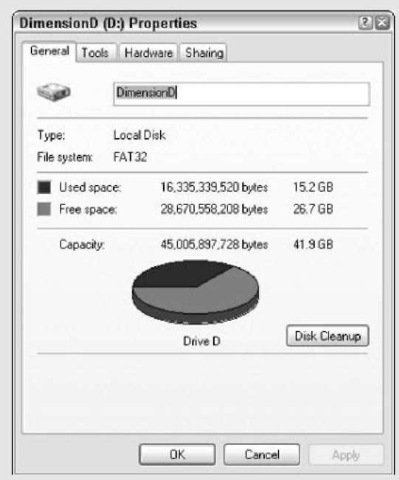
To see if a particular drive is NTFS or FAT32:
1. Choose Start My Computer.
2. Right-click the drive in question and choose Properties.
You see the drive type listed as the File System, as shown in the following figure.
If you have any NTFS drives, when you boot from a DOS boot disk, you won’t see any data on them. Chances are good you won’t get much of your hardware to work, either, because most modern hardware relies on drivers that don’t work with DOS. That said, if you have FAT32 drives, you may be able to use a DOS boot disk to pull the, uh, FAT out of the fryer, if Windows refuses to start. Here’s how to make a DOS boot disk:
7. Put a disk in your floppy drive.
Everything on the disk will be overwritten.
2. Choose Start My Computer, right-click the floppy drive (probably A:), and click Format.
Windows XP’s Format dialog box appears, as shown in Figure 67-3.
For reasons known to only a few people in ) Redmond, you can’t format a disk and make it an MS-DOS Startup disk at the same time. You have to take each step, one at a time.
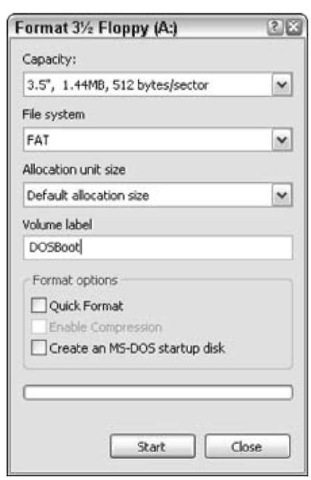
• Figure 67-3: If the disk isn’t formatted, you must format it first.
3. Type a volume label for the boot disk, if you wish. If you know the disk is already formatted, check the Quick Format check box. (If you aren’t sure, leave it unchecked.) Click the Start button.
Formatting a blank disk from scratch is painfully slow.
4. When the formatting finishes, click OK.
5. If the Quick Format check box is checked, uncheck it. Check the Create an MS-DOS Startup Disk check box, as shown in Figure 67-4. Click the Start button.
Windows XP transfers a handful of DOS files to the disk.
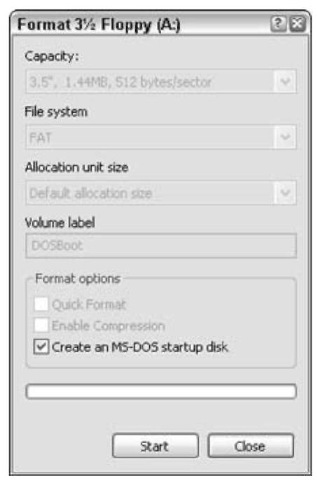
• Figure 67-4: Creating an MS-DOS startup disk.
6, When the format is complete, click OK, and then click Close.
If you have ever used the Windows Me, 98, or earlier boot disks, you may be surprised — shocked — to see what Windows XP has put on this disk (see Figure 67-5). It’s a minimally capable disk, which just barely boots, and absolutely nothing more. All sorts of files that you normally expect to go on a boot disk (and, in fact, are placed on the Windows Me boot disk) aren’t even here.
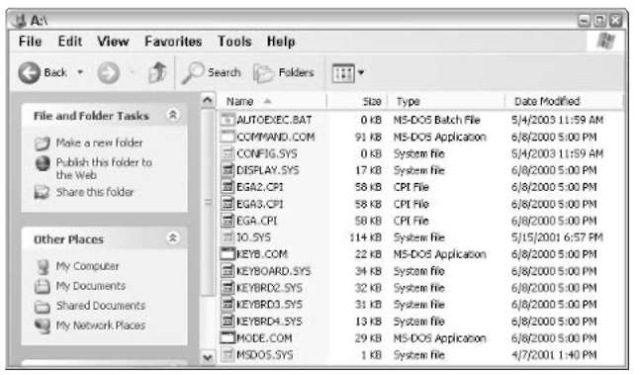
• Figure 67-5: The files on the Windows XP DOS boot disk.
None of the traditional DOS commands go on the disk (not even FDISK or SMARTDRV). The autoexec.bat file is empty, as is config.sys. There aren’t even any CD drivers. If you create a DOS boot disk using Windows XP, you need to put many more files on the disk before you can do much with it.
Try booting with this disk and you’ll see that it does work — barely.
Think of this disk as a starting point, not a finished product. There are two good places to go to help flesh it out with whatever capabilities you need:
To get into your NTFS drives (if you have any), you need a free program called NTFS Reader for
DOS at www.ntfs.com/products.htm. I wouldn’t bet the farm on it, but it may solve some sticky problems.
You can find a huge collection of DOS (and Windows Me) utilities for boot disks at www. bootdisk.com.
Creating Windows XP Setup Disks
The third type of “boot disk” that may come in handy has nothing to do with examining your computer in case of an emergency. The so-called Windows XP Setup Disks have only one purpose: They let you install Windows from a CD, even if your PC can’t boot from a CD.
That’s important because Windows XP, straight out of the box, can be installed only on PCs that can be rigged to boot from their CD drives.
Quite some time after Windows XP was originally released, Microsoft softened its approach to CD booting and released a set of six disks that allow you to start your computer from floppy disk so that you can then install Windows XP from CD.
Some people call these disks “boot diskettes,” but they aren’t, really. They won’t let you do anything except start your computer and install Windows XP from a CD. If you think you have a set of Windows XP boot disks — which is to say, disks that allow you to boot your machine and perform emergency maintenance — you’re mistaken. The last version of Windows with functioning boot disks was Windows Me.
The disks are all different, depending on the version of XP you’re installing, the Service Pack level, and the language.
When you run the downloaded program, you have to provide six preformatted disks. When the disks are assembled, you stick disk number one in your floppy drive, restart your machine, keep feeding it diskettes, and ultimately you get to the Windows XP setup routine, which requires you to insert the Windows installation CD in your CD drive. At that point, you can install or reinstall Windows. But you can’t run Windows.
