Monitoring Changes to the Registry
There is really no single, consolidated resource of Registry keys that will be useful in any particular situation. A spreadsheet containing many of the keys that I and others find useful during various types of investigations is included in the ch4 directory on the accompanying media. However, this is not a be-all and end-all solution, because there simply isn’t one. In some cases, Registry keys that are created during installation or are modified during use may change between versions of a particular application. Shortly after this topic goes to print, is published, and is ready for purchase, you can be sure that a new application will be available that records configuration and setting information in the Registry.
So, how do you go about determining Registry keys and values that are important to you? One way is to snapshot the Registry, perform an atomic action (i.e., do just one thing), snapshot the Registry again, and compare the two snapshots for differences. One particular tool that is useful for this task is InControl5, referred to by PC Magazine (distributor of the application) as "Inctrl5".
Warning::
Inctrl5 is available from www.pcmag.com/article2/0,4149,9882,00.asp; however, it is not a free download. The developer charges a small fee to download the tool, and the license agreement specifically forbids redistributing the software.
InControl5 is a great utility for doing all kinds of analysis. I generally tend to run InControl5 in two-phase mode, where I open the application, have it snapshot my system, do whatever I’m going to do (install a peer-to-peer [P2P] file-sharing application or some bit of malware), and then open InControl5 again and have it complete the process. The HTML output is usually enough for my purposes, and I can clearly see the Registry keys (and files) that were added, modified, or deleted during the process.
Another way to discover useful or important keys is to use RegMon from Microsoft (RegMon is available from http://technet.microsoft.com/en-us/sysinternals/bb896652.aspx, but is also included as part of Microsoft’s Process Explorer utility) to monitor the Registry in real time. When I was trying to determine where user information was kept within the Registry, I found that by running RegMon while executing the net user command I could determine which keys and values were accessed when retrieving user information, as Figure 4.4 illustrates.
Figure 4.4 Excerpt of RegMon Output
Figure 4.4 shows an excerpt of the RegMon output used to monitor the net user command. I started the capture, ran the command, and then halted the capture and searched all the output for SAM. That way, I was able to see that although I had used net.exe to request the information, net.exe passed off the request to lsass.exe, which accessed the Registry to obtain the information regarding usernames on the system.
Test Drive…
Monitoring the Registry
Here’s something you can try. Download a copy of RegMon to your system, open it, and then halt the capture (click the magnifying glass icon so that it has a red X over it). Then open a command prompt and type net accounts, but do not press Enter. Go back to RegMon and start the capture, and then go back to the command prompt and immediately press Enter. As soon as you see the account policies appear in the command prompt, go back to RegMon and stop the capture. To make things easier, filter on lsass.exe and see which Registry keys were accessed to provide the information you see in the command prompt. Now when you’re performing a postmortem investigation you’ll know which keys to look in for information pertaining to the account policies.
Throughout the rest of the topic, you’ll see several references to using InControl5 as well as RegMon. It would be a good idea to have copies of them on hand (due to the terms of the licenses for each tool, they cannot be distributed on the media accompanying this topic), particularly if you want to follow along and try out some of the different techniques mentioned.
Registry Analysis
Now that you know the structure of the Registry, let’s take a look at retrieving and analyzing information from within the Registry. Much of this information will be available to you during live response (with the exception of the keys you cannot access due to permissions), and all of it (with the exception of the volatile portions of the Registry) will be available during a postmortem investigation.
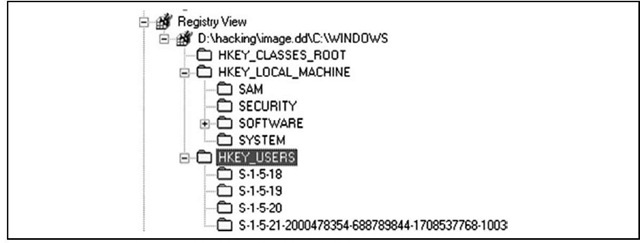
ProDiscover provides a simple interface (actually, an API) for accessing the Registry during postmortem analysis. When a case is loaded into ProDiscover, all you need to do is right-click the Windows directory in the Content View and choose Add to Registry Viewer. ProDiscover then locates the necessary files to populate the Registry Viewer, as Figure 4.5 shows.
Figure 4.5 Registry Viewer in ProDiscover IR
ProDiscover’s scripting language, ProScript, is based on Perl and provides an excellent facility for extracting information from the Registry in an automated fashion. The ProScript. pm module facilitates an API for writing Perl scripts that interact almost completely with ProDiscover; just about anything you can do through the ProDiscover user interface you can also do with a ProScript. With respect to the Windows Registry and postmortem forensic analysis, you can use ProScripts to completely automate a great deal of tedious data collection and formatting. Throughout this topic, I’ll describe ProScripts for performing various tasks such as extracting and analyzing information from within the Registry during postmortem analysis. You can find each ProScript in the ch4\code\Proscripts directory on the media that accompanies this topic.
RegRipper
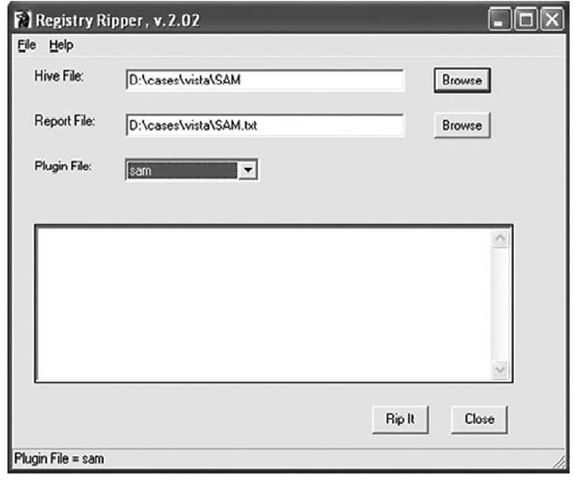
In the first edition of this topic, I included a number of Perl scripts that could be used to extract specific data from Registry hive files (all of these scripts have been moved to the ch4\code\ old directory on the media that accompanies this topic). As I continued to perform incident response and forensic analysis, I found that I kept looking for the same Registry keys, while at the same time adding additional keys to my quickly growing list of Registry artifacts. I began to see that I needed a means of recording a great deal of information; for example, it was one thing to extract a particular value from a Registry key, but including reference information (e.g., Microsoft Knowledge Base articles, etc.) provided a bit more depth to the information, particularly when adding that information to reports. I then thought that I could develop a framework that made it easy to add all of these facets when new Registry keys and values were found to be pertinent to an examination so that I could provide that framework to others for their own use. Also, the framework had to be powerful, but easy enough to use that someone could easily learn to update and extend it. Plugin-based tools such as Nessus (www.nessus.org) seemed to work well, so I wrote a GUI and began developing what I would come to call RegRipper. Figure 4.6 illustrates the GUI for RegRipperVersion 2.02.
Figure 4.6 RegRipper v.2.02 GUI
A complete, up-to-date copy of RegRipper v2.02 is available in the ch4\RegRipper directory on the media that accompanies this topic.
RegRipper is written in Perl, so you can access the source code to see what it does. The GUI is based on the Win32::GUI module (which means the GUI will run only on Windows systems), and RegRipper uses James MacFarlane’s Parse::Win32Registry module to do most of the "heavy lifting" with respect to accessing Registry hive files. However, I also provide RegRipper and the other tools associated with it as executables "compiled" with Perl2Exe (found at www.indigostar.com/perl2exe.htm; other tools such as PerlApp from ActiveState, or PAR, the Perl Archiver, can be used to achieve similar results) so that you can run them on your Windows system without having to install Perl.
To run on other platforms, such as Linux, RegRipper (rr.exe) would need to be run under Wine (www.winehq.org/), with minor modifications to the Perl code to address path separator issues. CLI versions of RegRipper tools can be run from Linux or Mac OS X. Future releases of these tools will include greater care and attention toward cross-platform compatibility.
The basic idea behind RegRipper is pretty simple. I began thinking that I didn’t want to keep a list of all of the possible Registry keys I would want to examine under myriad different circumstances. I found myself keeping lists of keys and values, and references to how the keys were modified or why they were important under different circumstances, and I even had little notes about how to correlate the information from multiple Registry keys to build a more complete picture of activity. I began to write specific bits of code to do very specific tasks, and that code made up a great deal of this topic in the first edition of this topic. But I began to see the need for a greater level of flexibility and usability. My thought was to create a framework that, like Nessus, used text-based plugins to do all of the heavy lifting for extracting Registry data, and even perform some degree of analysis. Because the plugins are text-based, anyone can open them in an editor such as Notepad and read or modify them; all that is required is a modicum of Perl programming knowledge. I found that I could easily add things such as references to Microsoft Knowledge Base articles, short "analysis tips" explaining how to interpret the information extracted, and similar information. With enough different plugins being used as code samples, my hope was that eventually analysts would begin to extend the plugins, and even write their own plugins. That’s exactly what happened.
You need to understand a couple of concepts behind RegRipper (these apply to other tools in the RegRipper family, which we will discuss shortly) to run the tool properly and effectively. First, Registry hive files can be accessed in a number of ways: via a remote system’s hard drive "mounted" via F-Response, by extracting the hive file from an acquired image (using FTK Imager, etc.), or by "mounting" an acquired image as a read-only file system via applications such as Smart Mount or Mount Image Pro. Some have even added RegRipper tools to Guidance Software’s EnCase forensic analysis application as an external viewer.
Warning::
You should not run RegRipper against the Registry hive files on your live system. Running RegRipper and selecting any of the hive files on your live system is not how the tool was intended to be used. Also, several users have run RegRipper against hive files extracted from the systemprofile or Default Users directory and not found any useful information; in many cases, these files are placeholders and are full of zeros.
As mentioned earlier, you can run RegRipper against live systems if you need to, but you need to have the remote system’s hard drive mounted on your analysis system as a read-only drive letter via F-Response to do so.
RegRipper acts as a framework or a facility for running plugins against Registry hive files. Plugins are text-based Perl scripts maintained in the /plugins/ subdirectory within the directory where RegRipper is kept. Plugins have a .pl extension and contain all of the actual code instructions for accessing, extracting, and displaying Registry hive file data.
RegRipper can also parse lists of plugins from plugins files. A plugins file is simply a text file that contains a list of plugins. Whereas a plugin has a .pl extension a plugins file has no extension. Within the plugins file, each plugin the analyst wants to run is listed in the order in which it is to be run, with no extension. For example, the appinitdlls.pl plugin was written to be run against a Software hive file in order to extract the data from the AppInit_DLLs Registry value. Within the RegRipper distribution, in the /plugins/ directory, you will also see a file named "software". This file contains a list of plugins that you can run against a Software hive file to extract a wide range of information. Within the software file, you will see appinitdlls listed with no extension; when you select this file in the RegRipper user interface or via the command line, the tool will run all of the listed plugins against the selected hive file.
So, rather than running one plugin against a hive file at a time, you can put together your own list of plugins in a plugins file, put them in the order in which you want them to run, and even create your own examination-specific hive files. The RegRipper distribution ships with several default plugins files based on the names of the hive files for which they are intended; the plugins themselves contain similar information. However, neither RegRipper nor the plugins check to see whether they are being run against the correct hive file type; if an analyst chooses to run a plugin intended for a System hive file against the SAM hive file, he should not be surprised when he doesn’t find any useful information.
RegRipper ships as both rr.pl and rr.exe, which is the RegRipper Perl script "compiled" with Perl2Exe so that you do not have to install Perl to run it. To launch RegRipper, simply double-click the rr.exe file. The GUI illustrated in Figure 4.6 opens, and from there you can browse to select the hive file you’d like to parse, select the location of your output report file, and then select the plugins file you’d like to run against the hive file from the drop-down box (RegRipper populates this list automatically when it’s started). Clicking the Rip It button launches the plugins within the selected plugins file, one at a time, against the selected hive file.
Another interesting aspect of RegRipper is that it automatically generates a log of its activity, recording specific events that are included in the plugins. When you select the location of the report file, RegRipper will automatically create its log file using the same filename (with a different extension), in the same directory as the report file. At the least, the log file will contain the path to the hive file examined, the name and version of each plugin run (in order), and the time at which each plugin was run. RegRipper is very fast, so the times in the log file will be very close together; however, this log file serves as thorough documentation that you can add to your case notes.
The RegRipper distribution is available on the media accompanying this topic, as well as at the RegRipper.net Web site set up and maintained by Brett Shavers. The RegRipper.net forums and download page serve as a great way to request, test, and distribute new plugins, which several people have done; some have posted their plugins to the site, and others have e-mailed their work directly to me. Jason Koppe even wrote a RegRipper plugin generator (http://nssadoc.blogspot.com/2008/10/regripper-regview-and-bluetooth.html) to facilitate the creation of simple RegRipper plugins.
Rip
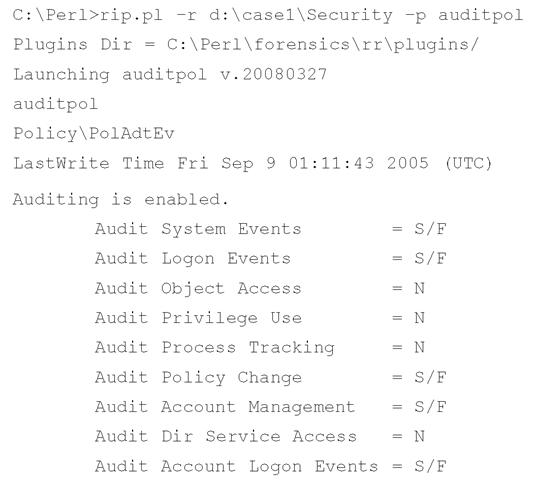
While working with RegRipper, I found that in some instances I just wanted to do a quick check, maybe just run one plugin against a hive file. For example, when analyzing Windows Event Logs, one of the first things I do is extract the audit policy from the Security hive file. I may not want to do this by opening a GUI, but would rather just quickly see the information at the console so that I can perform my analysis and then paste that information into my case notes. So, I wrote a CLI version of RegRipper, called "rip," or rip.pl. Like RegRipper, rip.pl is also provided as a Windows executable file so that you don’t have to have Perl installed on your system to use it. Rip is based on the same framework used by RegRipper; it uses the same plugins.
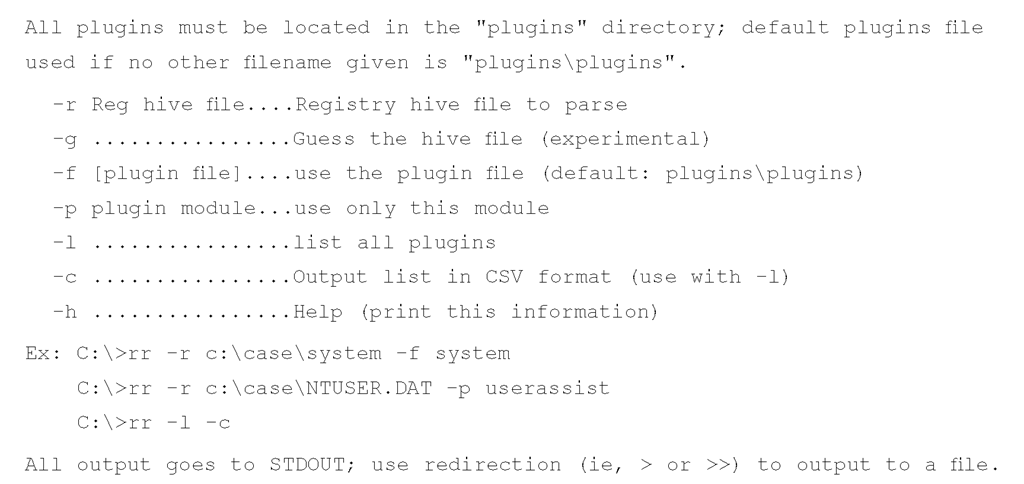
The syntax information for rip.pl/.exe appears as follows:
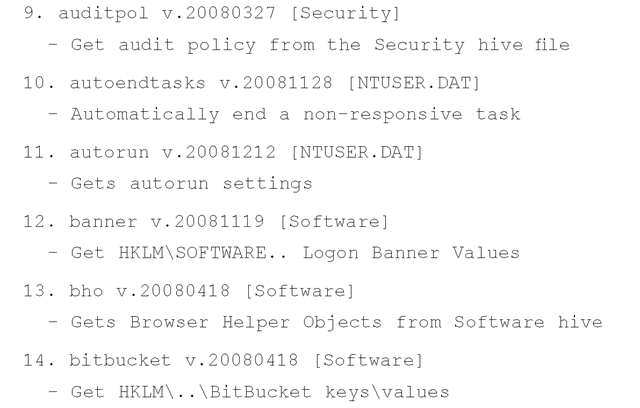
As you can see, rip.pl has a great deal of utility. I added the ability to list the available plugins just so that I could keep track of what was available, and then I added the ability to list the plugins in a comma-separated value (.csv) format so that I could open the list in Excel and sort it based on things such as the date of the plugin, or the hive file for which the plugin is intended. This capability is accessible via rip.pl’s —l and —c switches. The —l switch tells rip.pl to parse through the plugins directory (again, hardcoded to /plugins) and list all of the plugins. By itself, the — l switch lists the various plugins alphabetically, with each one numbered, as illustrated in the following output excerpt:
As you can see, each plugin is listed in alphabetical order, along with the version of the plugin (which is the date in YYYYMMDD format), the hive against which the plugin is intended to be run, and the contents of the short description field within the plugin itself.
Adding the — c switch prints the same listing of plugins, only without the numbers and in a comma-separated value (.csv) format. You can filter the plugins at the command line using the find command (e.g., C:\Perl>rip.pl —l —c | find "Software") to locate specific plugins, or you can redirect the output to a file (e.g., C:Perl>rip.pl —l —c > plugins.csv) and open and sort the list in Excel. I should point out that the banner.pl plugin was written by a member of law enforcement to meet her needs during analysis; she was nice enough to provide me with a copy of the plugin for distribution with RegRipper.
Another useful, albeit experimental, bit of code that I added was the ability to guess what type of hive file (System, SAM, Software, NTUSER.DAT, Security) against which the tool was being run. I made the switch accessible through the command line, but my intention is to incorporate that directly into the code and make it transparent to the user, as this functionality will likely be included in future versions of RegRipper.
As a tool, rip.pl is extremely flexible and powerful. The most basic and direct way to use rip.pl is to run a single plugin against a hive file:
In this example, I ran the auditpol plugin against a Security hive file, which (as you can see) allowed me to view the audit policy from that system. The plugin prints some information about the actions and the parsed key that may be useful to the analyst (such as the key LastWrite time), and then prints out the audit policy itself. Microsoft Knowledge Base article 246120 (http://support.microsoft.com/kb/246120) provides information on how to translate the binary data in the Registry value into something that is easy for an analyst to read and understand; the auditpol.pl plugin takes care of that translation.
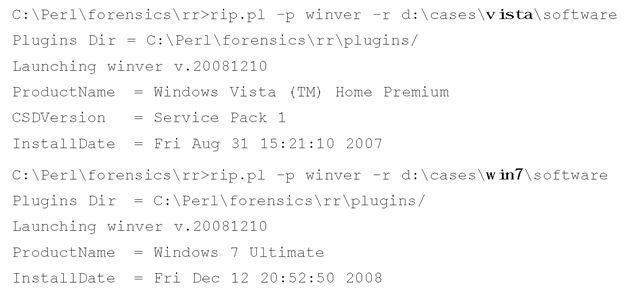
Versions of the Windows operating system beyond XP do have their differences, but when it comes to the Registry hive files neither the structure of the files nor the actual content has changed significantly. As an example, I ran the winver.pl plugin against Software hive files from both a Vista system and a Windows 7 (beta at the time of this writing) system, and saw the following results (emphasis added):
As far as the actual contents of the Registry hive files on the various versions of the Windows operating system are concerned, there are differences in what’s stored in the Registry, and how it’s stored; I will address these differences throughout the topic.
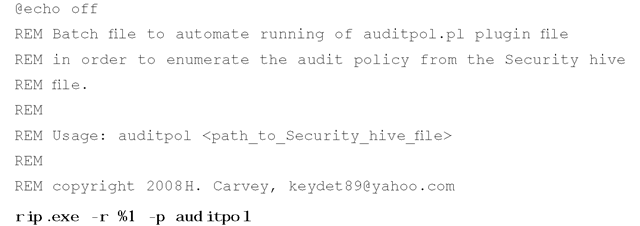
Using the rip.pl —f switch, you can run an entire plugin file against a hive file, rather than just one plugin at a time. Or, as rip.pl (and the associated rip.exe) is a CLI tool, you can create batch files that run only specific plugins against hive files. For example, auditpol.bat is provided as part of the RegRipper distribution and contains the following:
As you can see, the batch file is just a standard, everyday DOS batch file that includes comments for readability (and as a means of documentation). The actual code is run in the boldface line at the bottom of the listing.
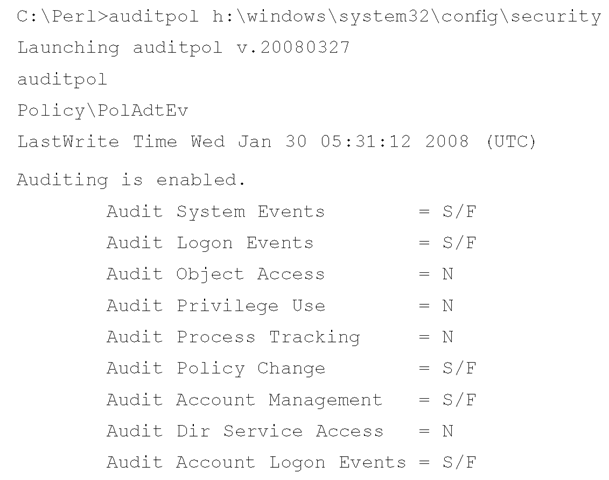
Running the plugin against a hive file exported from an acquired image using FTK Imager or ProDiscover isn’t the only way to use these tools. Mounting an acquired image as a read-only file system using Smart Mount or ImDisk,you can use rip.pl (or batch files using rip.pl or rip.exe) as follows (image mounted read-only as H:\):
As you can see, RegRipper, and in particular, rip.pl, are very versatile and flexible tools. Rather than opening a Registry hive file in a viewer (such as RegEdit), tools such as these provide the analyst with an automated means for extracting (and in many cases translating) specific data from Registry hive files. In this way, a more complete and thorough examination can be performed, in a much quicker fashion, reducing mistakes and allowing the analyst to focus on analysis.
As mentioned in the introduction to this topic, we’ll be taking a look at a number of pertinent Registry keys and values found in the various hives that may be of interest to examiners. In doing so, we’ll take a look at a number of plugins used by the RegRipper tools (RegRipper, the rip.pl CLI tool, as well as ripxp.pl, described in the next section and demonstrated later in the topic). However, we will not cover all of the plugins, nor will we be able to discuss all of the available Registry keys.

