As we noted previously, it is possible to mount a VHD at any time using the command line. Follow these steps:
1. Type disk part and press Enter to start the disk part utility.
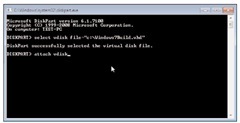
2. Type select vdisk file=”c:\Windows7Build.vhd” and press Enter.
3. Type attach vdisk and press Enter (see Figure 11.6).

FIGURE 11.6
Mounting a virtual hard disk.
4. Type exit.
You can also use the graphic tools within an installed copy of Windows 7 to mount a VHD. Here’s how:
1. Select the Computer Management tab.
2. In the left pane, select Storage, Disk Management.
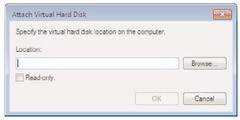
3. From the Action menu, select Attach VHD (see Figure 11.7).

FIGURE 11.7
Choosing the location for your VHD.
Mounting VHDs (Upgrade To Windows 7)
Next post: Native Hard Disk Support in Windows 7
Previous post: Creating VHDs from Within Windows 7
