WORKING WITH MULTIPLE IMAGES
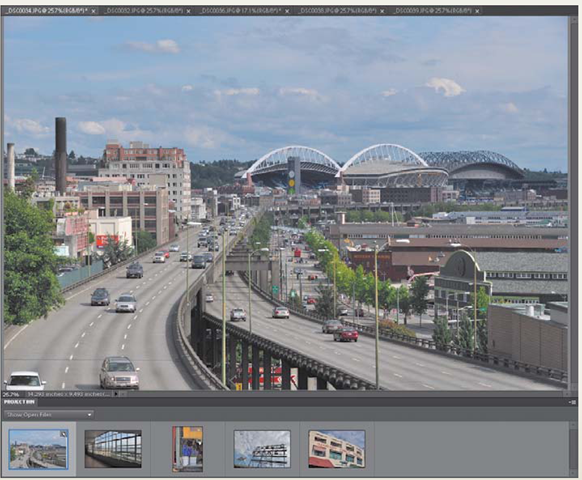
To make your workflow more efficient, try taking multiple files with you from the Organizer into the Editor. First, select the images in the Organizer. Then enter the Editor as you would with just a single image. Now look at the bottom of the editing workspace. You should see thumbnails of the images you selected in the Project Bin. Double-click images in the Project Bin to quickly pull them into the active workspace (Figure 3.12).
FIGURE 3.12
The Project Bin at the bottom of the screen shows you all of the files that are currently opened in the Editor.
FIGURE 3.13
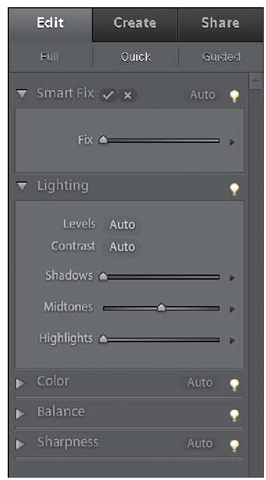
The Quick fixes can be found under the Edit tab.
To access the Quick edits, click the Edit panel on the right side of the screen and then choose the Quick tab (Figure 3.13). Quick edits offer some of the same editing solutions as the Auto tools in the Organizer but with more control over how much of the fix is applied. Those of you who love sliders may find yourself addicted to the Quick edits.
Smart Fix
This slider uses the same algorithms as the Auto Smart Fix feature, but with one very important difference: You can choose how much of the effect is applied to the image. To start fixing your image, drag the slider to the right. Hey, it’s not called a Quick edit for nothing. When the image looks good, just stop sliding. I prefer to move it all the way to the right and then back it off until it looks just right.
If you want a visual representation of how things will look, click the disclosure triangle to the right of the slider. This will open a 9 by 9 grid of thumbnails with varying amounts of the fix applied. As you move the cursor over each thumbnail, the image in the main display changes to reflect your selection. You will also see the slider jumping from position to position as you move from preview to preview. If you like one preview but want to make a fine adjustment, drag left or right to make subtle changes. You can reset everything by clicking the top-left preview or sliding the slider all the way back to the left.
tip
All of the Quick edit adjustments work the same way, with sliders as well as previews to help make your edits. You can also use the sliders together, making adjustments in all of them or just one or two. It’s all up to you.
A big difference between the Auto fixes and the Quick fixes is the amount of fix applied. The Auto fixes make "best guess" changes. The Quick fix sliders allow you to go beyond the usually minimal changes and make large adjustments. If, however, you want to see what the effect would be by using the Auto setting, you don’t need to go back to the Organizer. There is an Auto option for the Smart Fix, Levels, Contrast, Color, and Sharpness sliders that will apply the same results as found in the Auto fixes. If the Auto fix isn’t enough, apply more by using the sliders.
Lighting
This fix is a combination of two of the Auto adjustments we covered (Levels and Contrast) with an additional three sliders that are some of my favorites here in the Quick panel. In the Lighting section, you will see that the Levels and Contrast adjustments only have an Auto option. The real fun here is playing with the Shadows, Midtones, and Highlights sliders, which can do some amazing things for your images.
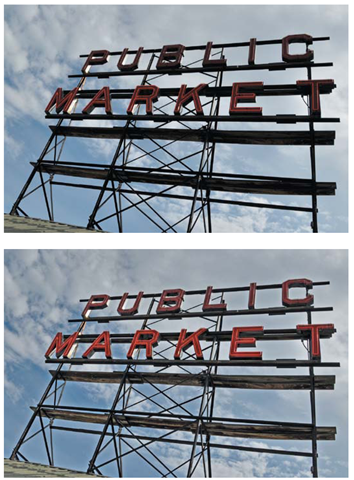
The Shadows slider will brighten dark shadows in your image, allowing you to see more details in the dark areas. The Midtones slider is set with the slide control in the middle, not on the left side of the bar. That’s because you can apply positive (to the right) and negative (to the left) adjustments. Moving this slider will either increase or decrease contrast in the image. The Highlights slider will help with things like bright skies and clouds by letting you darken just the brightest parts of the image. That’s what is so special about these sliders—they adjust certain aspects of the image without affecting the rest. It allows you to really focus on the problem areas (Figure 3.14).
Color and balance
If you aren’t happy with the colors in your image, you can give them a little boost or dull them down a bit using the Saturation slider. The Hue slider will actually change the colors in the image. The best way to experience it is to just slide it back and forth. Truthfully, I don’t think you will use the Hue slider much, but the Saturation slider can definitely liven up your photos. Just be careful not to go too overboard with this one.
FIGURE 3.14
The Shadows slider in the Lighting section allowed the letters in the sign to be brightened without affecting the sky.
If, for some reason, you had the wrong white balance set on your camera, the Balance slider can help you correct the problem. The Tint slider can make adjustments to images that are either too green or too magenta. Usually these tint adjustments are needed when you shoot in artificial light.
SHARPNESS
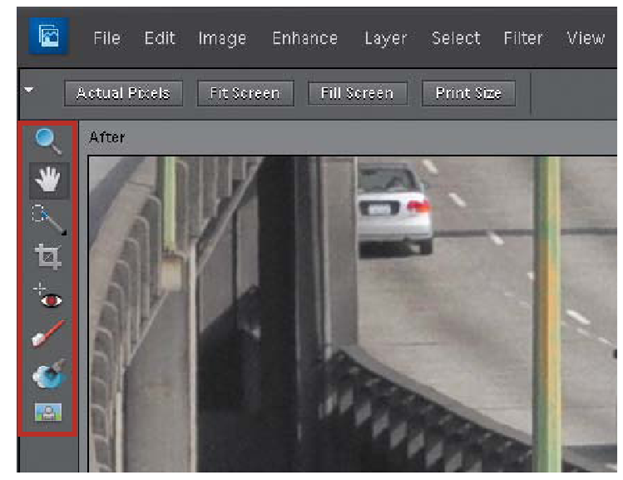
I much prefer the Quick Sharpen tool to the Auto Sharpen tool, although that option is available here as well. The key to sharpening is to do it with your image at 100% view. Then you will see an accurate portrayal of how the sharpening is affecting your image. The easiest way to enlarge your view to 100% is to use the keyboard shortcut Control-1 (Command-1). Then select the Hand tool by pressing the H key or clicking the tool in the Editor toolbar (Figure 3.15). With the Hand tool selected, move your image around in the viewing window so that you are looking at an area that is in focus and that should be very sharp. Then move the Sharpen slider until you are satisfied with the amount of sharpening. When you are done, press Control-0 (Command-0) or click the Fit Screen button above the toolbar to see your entire image again.
CROP
There isn’t a Crop slider in the Quick panel, but if you look in the toolbar you will find the Crop tool nestled between the Red Eye and Quick Selection tools. This tool works similarly to the Crop tool in the Organizer except it doesn’t need to open in its own window.
FIGURE 3.15
The Hand tool, along with the other Quick edit tools, is located in the toolbar on the left side of the editing screen.
After clicking the tool or simply tapping the C key, choose the Aspect Ratio setting. Leaving it set to No Restrictions means that you can freeform crop your image without regard to length versus width. If you want your crop to have the same aspect ratio as the original image, select Use Photo Ratio from the drop-down list. After you’ve set the aspect ratio, drag on your image to choose a new crop.
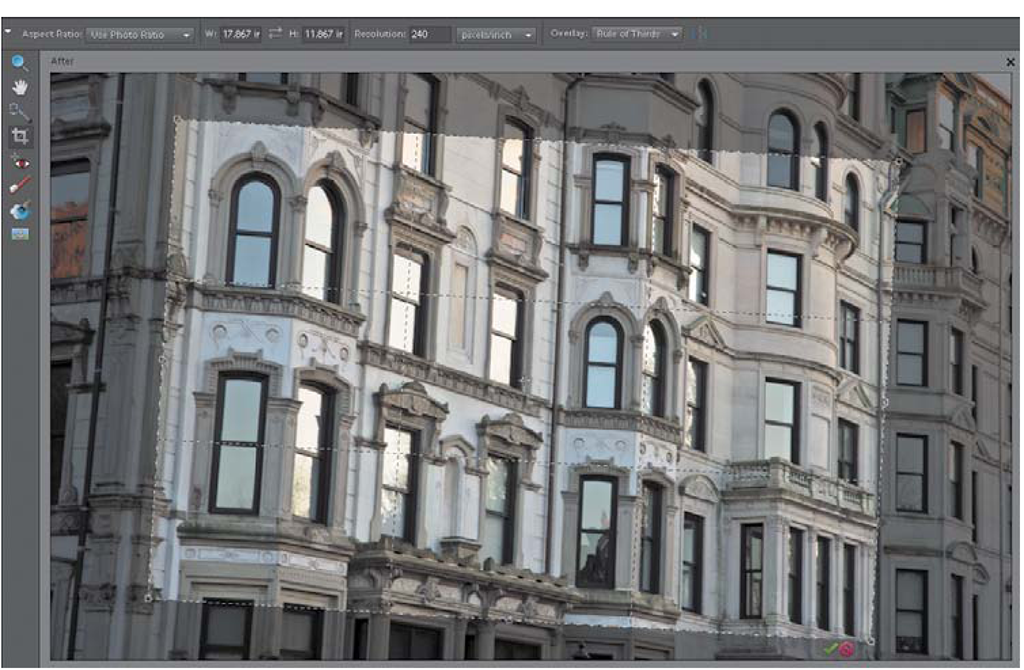
The benefit of cropping in Quick mode as opposed to using the Crop tool in the Organizer is that it allows you to rotate the crop selection. This means that you can eliminate unwanted areas from your image and straighten it at the same time. To rotate the crop guide, move your cursor to one of the corners on the outside area of the crop guide. You should see a double-ended arrow that looks bent in the middle. Click it and pull up or down; you’ll see your crop guide start to rotate. To resize the guide, put the cursor right on the corner and the arrows will turn from bent to straight. Then, just drag toward or away from the center of the image (Figure 3.16).
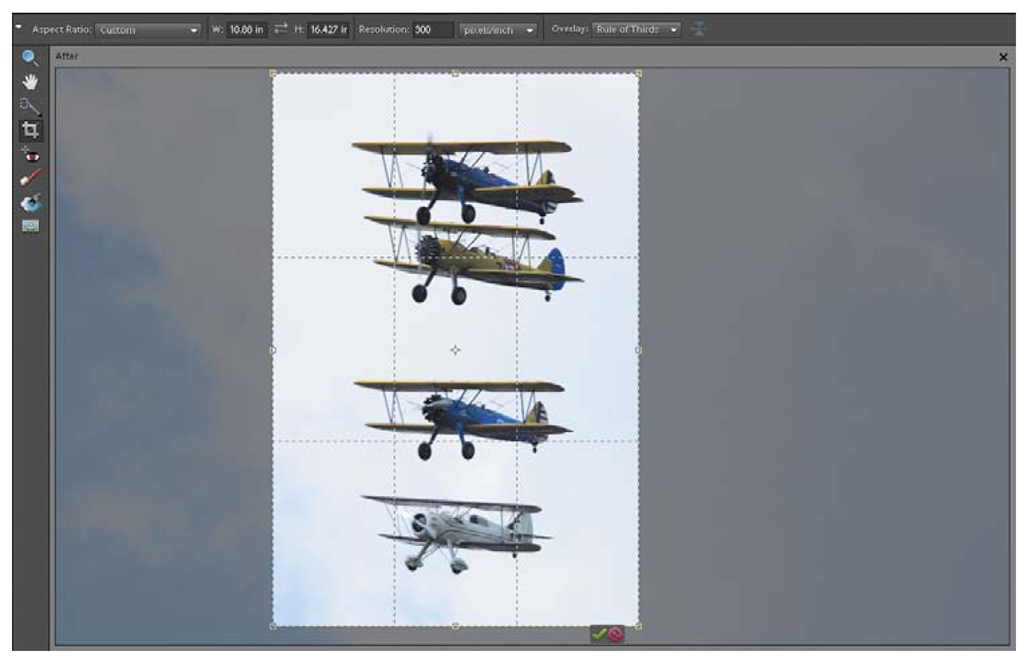
What if you want to change the crop orientation altogether? No problem. To the right of the Aspect Ratio drop-down list, you will see the width and height of the crop. Between the two settings are two arrows facing opposite directions. Give them a click, and it will switch your numbers. Now you can, for example, draw a vertical crop guide inside a horizontal image (Figure 3.17).
FIGURE 3.16
Rotate your crop and straighten an image by dragging the corners.
FIGURE 3.17
Change your crop orientation to create a whole new look for your image.
Selective edits
You may have noticed some other tools in the toolbar besides the Hand and Crop tools. The Zoom tool is shaped like a magnifying glass and is self-explanatory. The Quick Selection tool requires a little explanation, but once you use it, you will find it indispensable.
Quick selection
Simply put, the Quick Selection tool allows you to select portions of your image by painting with the tool as if it were a brush. After you have made a selection, you can do things to the selected area without affecting the rest of the image. To demonstrate, I have a photo of a biplane, and I would like to lighten the bottom of the wing. If I use only the Lighting tools, I will have to lighten the entire image. Instead,
I will paint a selection on the wing using the Quick Selection tool.
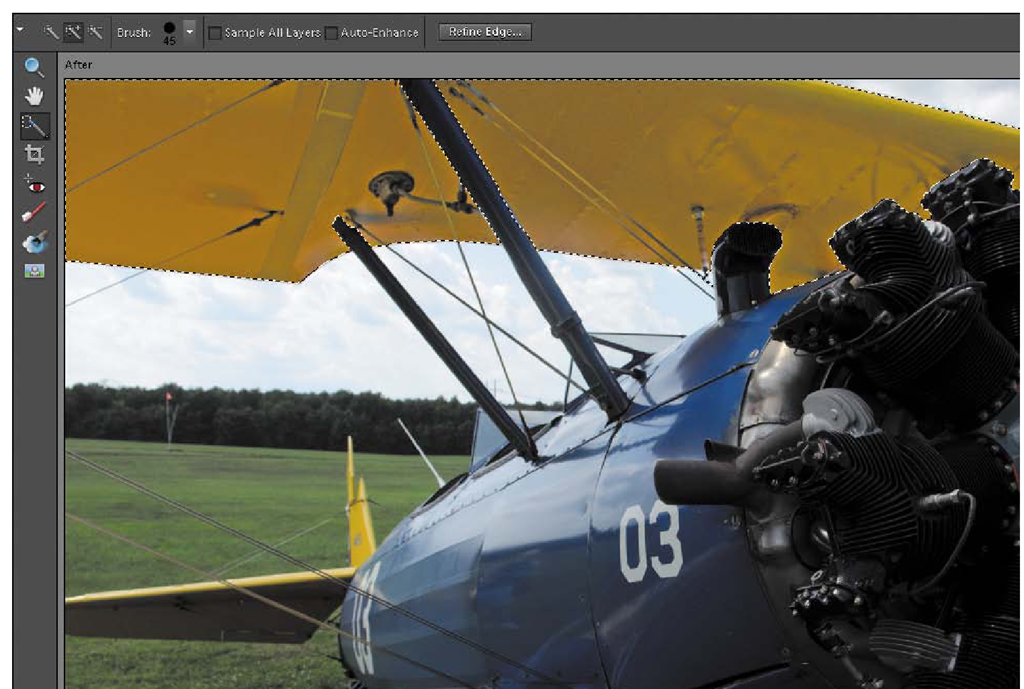
The tool can be used to add to or subtract from a selection. Start with a simple click of the tool in an area you want to select. If it selects too small an area, increase the size of the brush by pressing the right bracket key (]). Pressing the left bracket key ([) makes the brush smaller and more precise. Click different areas to add to your selection. If any portion is added to the selection that doesn’t belong, hold down the Alt key (Option key on a Mac) while clicking to subtract from the selection. In Figure 3.18, you will see that I have used the tool to select the underside of the wing, which is represented by the dotted lines. I can now use the Lighting tools to make corrections to only the selected area. When the edit to the selection is done, choose Select > Deselect or press Control-D (Command-D) (Figure 3.19).
tip
Those dotted lines you see around a selection are often referred to in photo editing as “marching ants.” Make a selection and you’ll soon understand why.
FIGURE 3.18
The underside of the wing was isolated from the rest of the photo by using the Quick Selection tool.
FIGURE 3.19
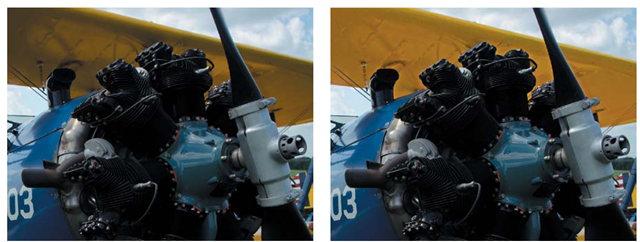
The Quick Selection tool allowed the shadows under the wing to be brightened independently of the rest of the image.
