Creating a SQL Server database connection
The first step that is required in making use of Oracle Heterogeneous Services to access a non-Oracle database using the generic connectivity agent is to create an ODBC connection. We do that by setting up a system DSN (Data Source Name). A DSN is the name you give to an ODBC connection. An ODBC connection defines which driver to use and other physical connection details that are needed to make a connection to a database. On Microsoft Windows, we configure DSNs in the ODBC Data Source Administrator. The following are the steps for configuring a DSN:
1. You can access this application by navigating through the Start | Control Panel | Administrative Tools menu. The application is called Data Sources (ODBC).
2. In ODBC Data Source Administrator, click on the System DSN tab, and then click on the Add button to add a new system DSN.
3. The first screen asks you to select which driver you want to use for your data source. ODBC drivers are specific to a database, so you have to use the one that is defined for accessing a SQL Server database. Scroll down the list until you see the SQL Server entry and click on it. Now click on the Finish button.
This will take you to the screens that create an ODBC data source for connecting to SQL Server. Each ODBC driver requires a different configuration depending on the database it is connecting to.
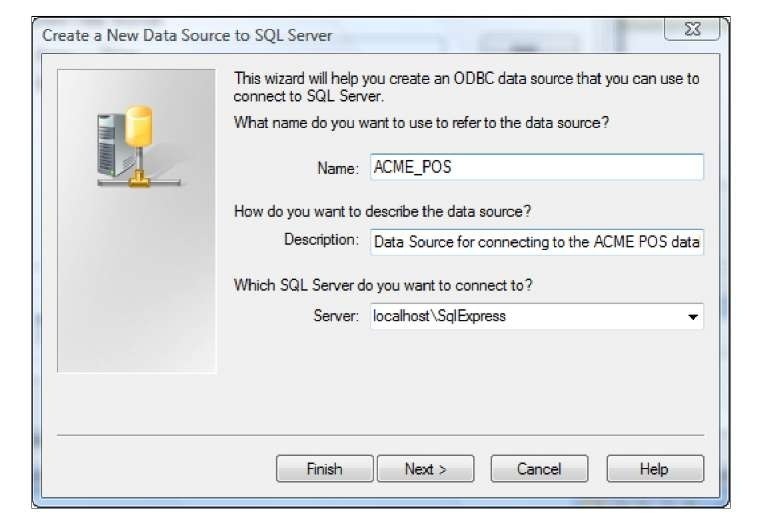
4. For SQL Server, the first screen will ask you for a Name, Description, and the host on which the SQL Server database is located. For clarity, let’s name our DSN ACME_POS after the database, enter Data Source for connecting to the ACME POS database for the description, and localhost\SqlExpress for the hostname in the Server field as illustrated in the following image:
If the SQL Server instance that’s being connected to is not on the same machine as the Oracle Database, then just enter the hostname where it is actually located instead of localhost. In actual business environments, the databases we are going to be using for source databases will most likely be located on other computers elsewhere on the network. We will enter the hostname for the other machine on which the SQL Server database is located in that case.
5. Click on the Next button to proceed.
Notice \SqlExpress at the end of the hostname. This is required because SQL Express is installed as what is called a named instance, which basically requires that the name be included with the hostname for it to be found successfully.
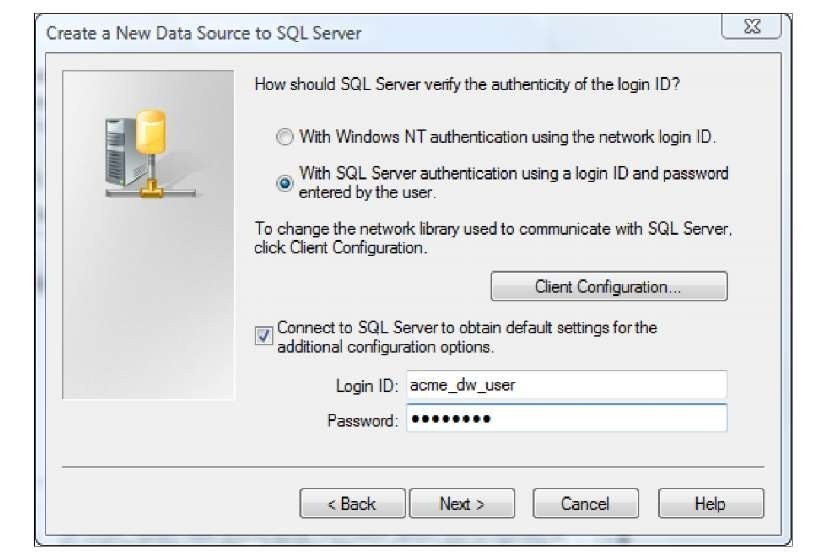
6. In the next screen we will specify the authentication method to use to connect to the database. We have two options here. We can use Windows NT Authentication using the network login ID. (SQL Server will use the network or local machine login ID of the user connected at that time.) Alternatively, we can use SQL Server authentication using a login ID and password provided to us. The ACME DBA in charge of the ACME_POS database has kindly set up a username for us to access the ACME_POS database for importing definitions and data. He’s given that user read permission on the tables in the database. The username is acme_dw_user. So we will use the second option.
The scripts that are provided with this topic are available for download and can be used to set up the SQL Server database to work through the examples in the topic. This database uses the names that are provided here for the database and user.
7. There is a checkbox at the bottom of the screen to check off and have the new data source wizard connect to the SQL Server to obtain additional information. We are going to check that box if it is not checked by default, and enter the username and password provided by the ACME_POS DBA.
An important item to note here is that this username and password are used only by the DSN creation application to access the database for some additional configuration items during the DSN setup process. This username and password will not be used by any application that subsequently uses our ODBC DSN to connect to the SQL Server. We will provide those connection details in a moment when we get to define the connection in the Warehouse Builder.
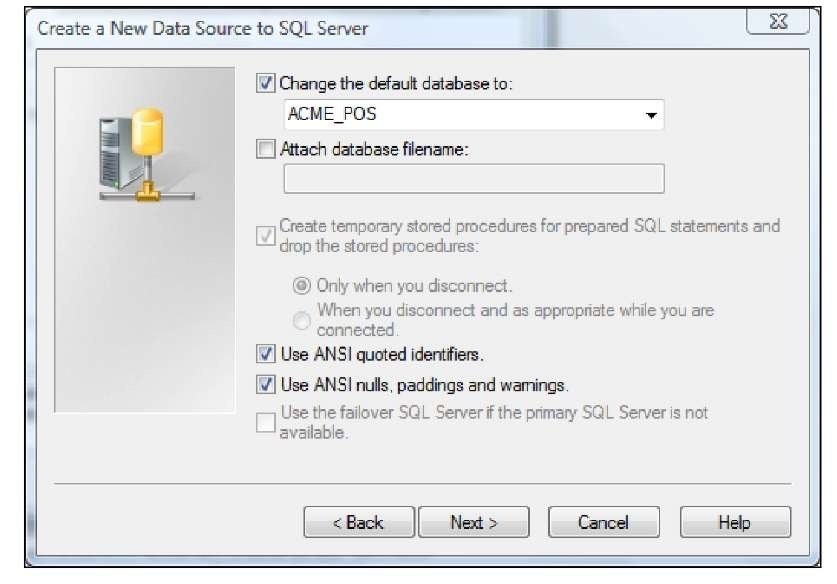
9. In the next screen, the primary item we want to verify is whether the default database is listed as ACME_POS so that when we use the ODBC connection it is connected to the correct database. It’s quite possible for the username provided to have access to more than one database on the SQL Server instance if more than one exists. If the correct database is not showing, then check the box beside the database name and select the correct database as shown in the following screenshot:
8. This is how our screen looks and we will click on Next to continue:
10. Leave all the other options set as they are and click on the Next button to continue.
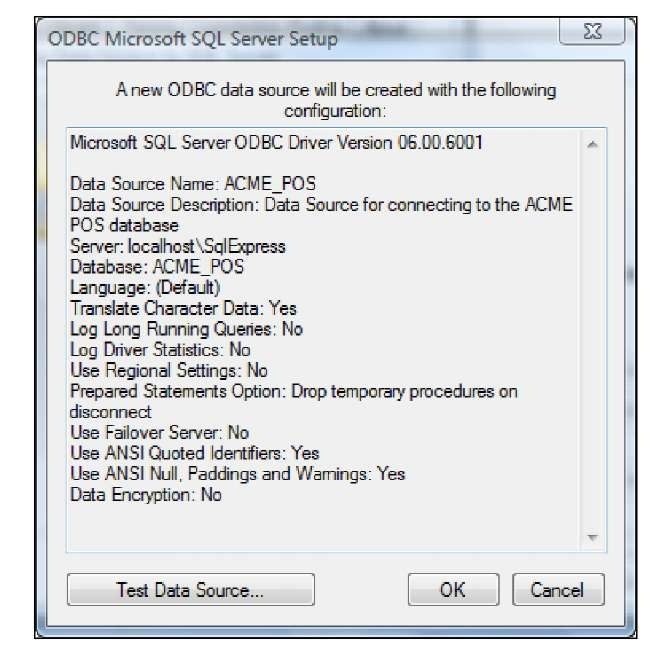
11. The next screen is full of configuration options that we should just leave set to the defaults and click on the Finish button to complete the process. This will present us with the final summary screen of the ODBC connection details as shown in the following screenshot. The screenshot may appear with a different version number and slightly different entries depending on which version of Windows and the ODBC driver is running. These slightly different entries will not make a difference in following along in the steps in this topic and the functionality we’ll be covering.
If we want, we can test the newly created data source right here. If we click on the Test Data Source… button, it will make a connection to the database and return a screen indicating success or failure. Click on the OK button on this screen and the ODBC connection will be created. It will now appear on the System DSN tab of the ODBC Data Source Administrator.
Configuring Oracle to connect to SQL Server
Let’s move on to the next step in the process of getting Oracle Heterogeneous Services to connect to our SQL Server database. We will configure Oracle now that we have our ODBC connection created. The following are the two steps involved here:
1. Create a heterogeneous service configuration file.
2. Edit the listener.ora file.
Creating a heterogeneous service configuration file
We will be creating a heterogeneous service configuration file in the ORACLE_HOME\ hs\admin folder. Just substitute your applicable oracle_home location. The following are the steps to create this file:
1. Open Windows Explorer and navigate to the ORACLE_HOME\hs\admin folder.
There is a sample init file called initdg4odbc.ora that Oracle has been kind enough to supply us with. We can easily modify this file to suit our purpose. It is a plain-text file, so we can use any text editor to edit it.
Let’s open the file named initdg4odbc.ora in our favorite text editor, or Windows Notepad if we don’t have any other text editor.
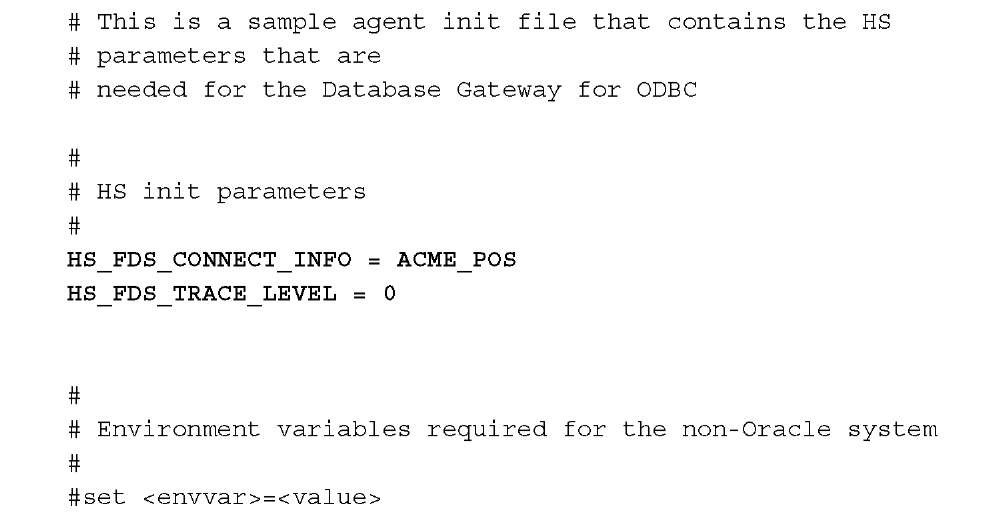
This is the default init file for using ODBC connections. The contents will basically look like the following:
The lines that begin with # are comment lines and will be ignored. The two lines we’re interested in are the ones that are in bold in the code we just saw.
2. The HS_FDS_CONNECT_INFO line is where we specify the ODBC DSN that we just created in the previous section. So replace the <odbc data_source_ name> string with the name of the Data Source, which is (unless you changed it from what was suggested) ACME_POS.
3. The hs_fds_trace_level line is for setting a trace level for the connection. The trace level determines how much detail gets logged by the service and it is OK to set the default as 0 (zero).
To read more about what this entry’s purpose is, refer to the Oracle
Database Heterogeneous Connectivity Administrator’s Guide 11g Release 2 at the following URL: http://download.oracle.com/docs/cd/ E118 8 2_01/server.112/e110 5 0/toc.htm.
Having made those changes, our file should now look like the following:
4. Now we will save the file with a new name and will be careful not to overwrite the default file. We’ll give it a name that begins with init and ends with .ora, and contains a name in the middle that is descriptive and does not contain spaces or special characters. Let’s save it as initacmepos.ora.
Leave out the underscore character as we’re not allowed to use special characters. We might think it’s just a filename and it is certainly allowed to use an underscore in the filename. However, this part of the filename must be used in the next step for a purpose that does not allow special characters to be used.
Editing the listener.ora file
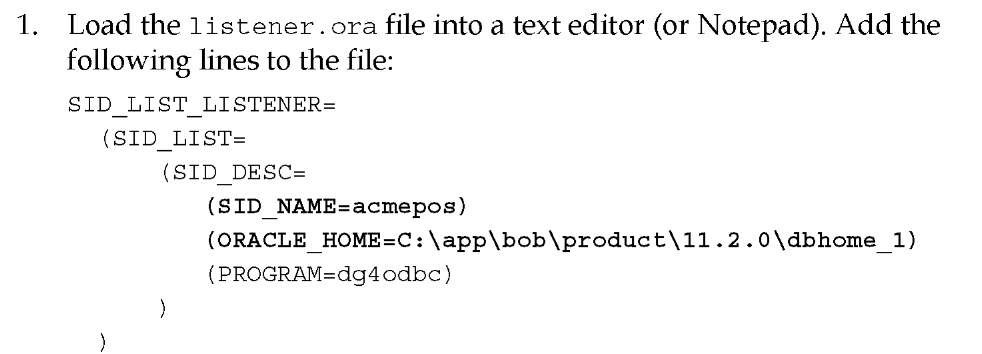
Now we’re going to add a SID to our listener.ora file. When we configured the listener back in topic 1, it created a listener.ora file in ORACLE_HOME\network\ admin. The steps for this are:
There is a sample listener.ora file called listener.ora.sample, which is provided for us in the ORACLE_HOME\hs\admin folder. It contains the above lines that can be cut and pasted into our actual listener.ora. We just need to correct SID_NAME to acmepos.
For sid_name, we have to specify the name we used as part of the name of our init file in the previous step. This is why no special characters were allowed because this name will become the SID for our database connection and SIDs cannot have special characters. However, don’t include the init or .ora from the name of this file.
In the PROGRAM entry, we will specify the agent that will handle the connectivity for us and the name of the generic connectivity agent program supplied with the Oracle Database 11g is dg4odbc. For oracle_home, you will substitute your particular ORACLE_HOME location, which will be different unless your username is also you installed Oracle using the default naming convention on the C drive.
An important tip about the PROGRAM name
Make sure you use the correct name for PROGRAM for your version of the database. In versions prior to 11g, the generic connectivity agent name was hsodbc. However, in Oracle Database 11g, it is known as dg4odbc. If we use the wrong name for PROGRAM, or misspell it, we will get a strange error message when we try to define our connection information using this external link.
There may already be a sid_list_listener entry in the listener.ora file. If so, just add the sid_desc section above the existing sid_list_listener sid_desc entry. By studying that entry, you can see the syntax for how the sid_desc sections are listed; so just follow the same convention.
2. After we save the listener.ora file, we must restart the listener for the change to take effect. We can restart it by navigating to Start | Control Panel | Administrative Tools and then clicking on Services. Now, scroll down until you see the service for your database listener, which will be named starting with Oracle and ending in TNSListener. It will contain ORACLE_ HOME—OracleOraDb11g_home1TNSListener. Now right-click on it and select Restart.
Creating the Warehouse Builder ODBC module for SQL Server
Now that we have defined our source SQL Server database connection information in Oracle, we are done with our foray into non-Warehouse Builder-specific topics. We will get back to the main topic of creating the module and location in the Warehouse Builder. This process is very similar to creating a module for an Oracle database as we just did. There are some slight differences in a couple of screens, which we’ll point out as we go along. The steps to create an ODBC module and location in Warehouse Builder are as follows:
1. Right-click on the ODBC node in the Projects tab of Design Center, and select New ODBC Module… from the pop-up menu. The first screen that will appear is the Welcome screen, so just click on the Next button to continue.
2. The screen with the label Step 1 is where we provide a name as we did for the Oracle module. We’re going to name this ODBC module ACME_POS, which is the name of ACME’s POS transactional database in SQL Server as we discovered earlier when analyzing the existing systems.
3. We’ll leave module status set to Development.
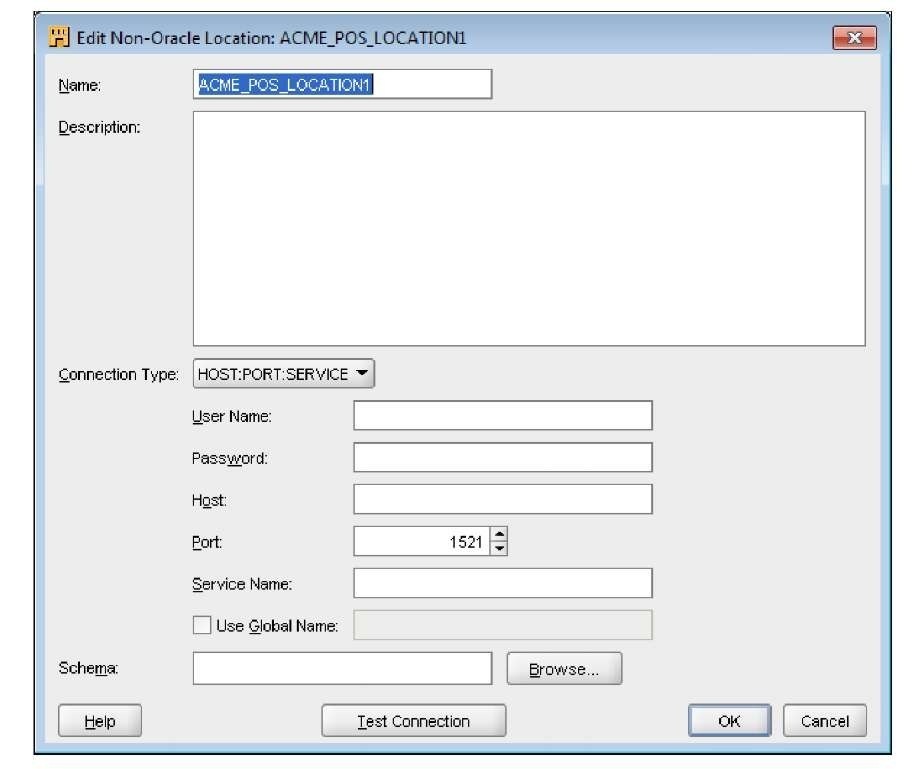
4. The next screen labeled Step 2 is for the connection just as earlier. We’ll click on the Edit button beside the name to fill in the details. This will display the following screen:
We’ll remove the 1 as we did for the Oracle connection.
5. For the connection details, we will enter the User Name as "acme_dw_user", and Password, which was given to us by the DBA for the transactional system.
We have to make sure that both username and password are enclosed in double quotes. The Oracle database will automatically make them uppercase if we don’t, and the SQL Server database does not like that. So, if we get a username and/or password incorrect error, we’ll double-check that we enclosed them in double quotes; yes, even the password. The double quotes in the password will appear as asterisks like the rest of the password, but make sure to put them in there.
6. Enter the Host where the Oracle database resides and where we configured the heterogeneous services. It is localhost as we’re running everything on the same system.
Here we might think that we have to enter the hostname of where the SQL Server database resides, as we’re entering connection information to connect to it. Remember that although we’re using Oracle Heterogeneous Services to make that connection for us and have already gone through the steps to configure it in the listener to connect to the ODBC DSN, where the actual connection information for the SQL Server database is specified. This means what we need to specify here is the connection information for the SID that we configured earlier as if we’re connecting to an Oracle database. In reality, it will actually be connecting to the SQL Server database
7. The Port the listener is listening on is 1521, so leave it as the default. Enter the Service Name that we configured in the previous section in the listener for the generic connectivity dg4odbc agent—acmepos.
8. Finally, enter the schema we’ll be connecting to. For SQL Server, the owner of most databases is referred to internally as DBO and so this is what we’re going to put here.
Just as with the username and password, we have to make sure we enclose the schema name in double quotes also or we will run into problems if we try to import data objects using this location. It is also important to make sure the schema name that is in double quotes is also all lower case letters. It will save us from having issues as we’ll see in a moment when we discuss importing data objects.
9. We should now have a screen that looks similar to the following:
10. We can click on the Test Connection button to make sure everything is working properly and the results will be displayed in the Test Results popup window.
This is where we may encounter an error if the PROGRAM name is incorrect in the listener.ora file. Here’s such an example of an error and you can see how unhelpful these error messages can be: ORA-28545: error diagnosed by Net8 when connecting to an agent Unable to retrieve text of NETWORK/NCR message 65535. Even if we search the Internet and documentation for solutions, many suggestions will mention hsodbc, and not dg4odbc. The solution to this particular error actually refers to the PROGRAM name. In this case, the initdg4odbc.ora and the listener.ora.sample example files in the ORACLE_HOME\hs\admin folder clearly say dg4odbc and not hsodbc. Those who work a lot with Oracle 10g may (out of habit) have used hsodbc, never once thinking about double-checking whether that was correct or not. The error can also occur if we use a different service name than was actually defined in the listener.ora file. The moral of the story: Use the example files as a starting point but make sure the SID_NAME is correct!
11. Click on the OK button to proceed even if there was an error reported when we clicked on the Test Connection button. We will be back at the Step 2 window with all the connection results now filled in and we will be ready to create the module as shown here:
12. The Import after finish checkbox will not be checked by default. We’ll leave it that way since we’re going to import separately in the next step starting with the Oracle module. So, make sure it’s unchecked and click on the Finish button.
We are now back at the main Warehouse Builder interface and we can see that it has added our new module (ACME_POS) under Databases in the Projects tab as seen below:
In the Locations tab, if we expand the Locations | Databases| ODBC node or module, we’ll see ACME_POS_LOCATION listed, which is our location that we just defined as part of the process of creating the module. This is shown in the following screenshot:
Even if we had an error during the previous process of creating this connection, we would still see these entries created. If we could fix whatever caused the error, we’d have a valid working connection without having to go back through the wizard to create it again.

![tmp14-35_thumb[2] tmp14-35_thumb[2]](http://what-when-how.com/wp-content/uploads/2011/06/tmp1435_thumb2_thumb.jpg)
![tmp14-36_thumb[2] tmp14-36_thumb[2]](http://what-when-how.com/wp-content/uploads/2011/06/tmp1436_thumb2_thumb.jpg)
![tmp14-37_thumb[2] tmp14-37_thumb[2]](http://what-when-how.com/wp-content/uploads/2011/06/tmp1437_thumb2_thumb.jpg)
![tmp14-38_thumb[2] tmp14-38_thumb[2]](http://what-when-how.com/wp-content/uploads/2011/06/tmp1438_thumb2_thumb.jpg)
