Viewing the recipe details
In the previous section, you created a simple recipe viewer that displays a list of recipes and their descriptions. In this section, you will add a details screen for viewing the directions and ingredient list. While doing this, you will learn how to integrate graphical assets given to you from a designer who does not work in the Flash IDE.
When you were developing RecipeViewer.swf,you compiled your code directly into it. In this section, you will also add to that code and make it load the new content at runtime to see a different mechanism for pulling in content.
Creating the RecipeDetails.swf file
Imagine a scenario where a designer gives you four graphical assets to represent a window in PNG format. Those assets consist of a background image and three images to represent different states of a Close button.
Once you have the raw assets, you need to create a SWF containing them. To create that SWF, you will use swfmill.Ifyou haven’t, please review and complete the installation.
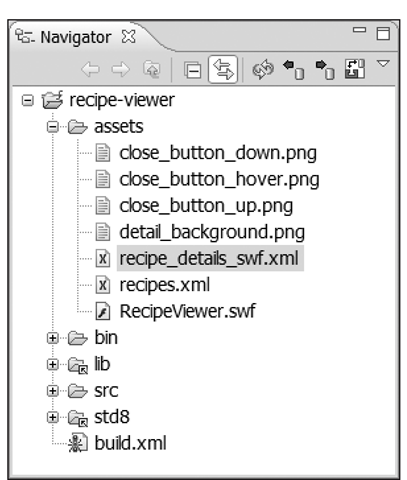
swfmill reads an XML file that describes the SWF you want to create. It can import graphics, sounds, and fonts and can generate a single SWF from them. To start, create a new XML file called recipe_details_swf.xml in your assets folder. Once done, you should have a directory structure like Figure 4-15.
Figure 4-15. The directory structure after adding the necessary files for the recipe details window
swfmill has two dialects of XML input. The first is the “simple” format, which we’ll use here and, as the name implies, is the easier of the two to write. The other, “lower-level” format gives a much higher amount of control over the generated SWF but at the cost of additional complexity.
The following tells swfmill to create a SWF that is 550X400 pixels with a frame rate of 31 frames per second, and it sets the background color to white (hex code #ffffff). Next, you want to create a new frame in the SWF and add some items to the library.
The following tells swfmill to import the four graphics into the library as MovieClips and assign unique IDs to each. The ID can be used as a library identifier from ActionScript. You can also place them directly on the stage through swfmill, which is the approach you will take a bit later in the file. But before that, create a new MovieClip that will represent all the states of the Close button.
This section of code created a new empty MovieClip with an ID of closeButton. It then created a single frame within it and placed three of the previously imported button graphics within it. The id field of the <place> tag represents a library identifier. The name field represents the instance name of the MovieClip that will be available to your ActionScript code.
Enter the following code to finish the swfmill definition file:
This code ends the library definition and then actually places two objects on the stage. It places the background at position 0,0 and the Close button at 390,325. With the given depths, the button will appear in front of the background like you would expect. To build your SWF, execute the following command from your project directory:
The simple parameter tells swfmill to use its simple XML syntax. Then you specify the input XML file and lastly the output SWF.
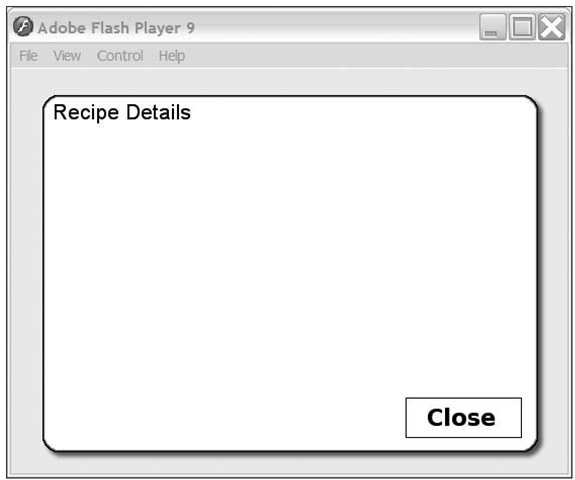
Now, open the RecipeDetails.swf file. You should see the same output as Figure 4-16.
Figure4-16. The RecipeDetails.swf as generated by swfmill
Updating the build script
Now that you can generate RecipeDetails.swf, you will learn howto automate the process in the Ant build script. The first step is to define the swfmill task in the build script. This task comes with the as2lib Ant tasks, so you should already have the necessary files installed. Add the swfmill taskdef line to the top of your build script:
Next, create a new property that tells Ant where to find the swfmill executable:
Lastly, add a call to swfmill to your build target:
Now, when you execute Ant, both RecipeDetails.swf and RecipeViewer.swf will be created in your bin directory.
Loading RecipeDetails.swf
In this section, you will add code to the Recipe Viewer application to load and display the details window. To load the new SWF, first create a private variable to store a reference to it:
Next, add the following code to your startApp method:
This creates an empty MovieClip and then loads the RecipeViewer.swf file into it. We also set the y coordinate so it will not appear over the current graphics. This is a quick hack to get you something functional; in a real application, it would be best to use a MovieClipLoader to load the external SWF. Then you could add an event listener that upon loading would set the visible property to false. Using a MovieClipLoader would also allow you to detect a failed load.
Displaying the recipe details
To display the recipe detail window, create a new class called RecipeDetails. This class will contain the logic to display the recipe details dialog box:
In that class, add three member variables: one to represent the base dialog box, one to represent the Close button, and one to represent the text you want to display:
If you recall, when you made the Close button in swfmill, you created a MovieClip with three child clips inside it that represented the three states of the button. You will have to add some code to manage those states. Let’s start with a method named showButtonState to display the different states:
Next, create four methods that will handle the mouse input from the user. In each of them you will change the state of the button. In the mouse release method you will also hide the recipe details dialog box.
Once that is done, you can write a constructor that brings those pieces together:
The last step is writing a public method that will populate the text field and display the dialog box:
In RecipeViewer.swf, there is a button labeled Details that has been unused up until now. To display the details, edit the RecipeViewer, class and add a reference to the button. While you’re editing that part of the file, also create a new private variable of type RecipeDetails.
Next, add code to your RecipeViewer constructor to initialize that variable and set up an onRelease event handler:
Lastly, write the onDetailsClick method so it initializes the details object and calls the showRecipe method:
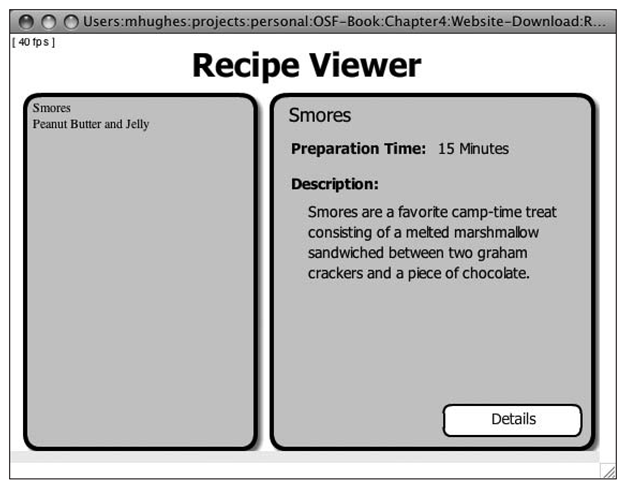
Now, run the Ant script to build and run your RecipeViewer.swf. A list of recipes should be loaded. If you click one of them, the description of the recipe will appear on the right. If you then click the Details button, the ingredients and directions will be displayed to you like Figure 4-17.
Figure 4-17. The finished Recipe Viewer application displaying the details for the Smores recipe
You have now seen two methods of getting assets from designers and two methods of integrating those assets into an ActionScript 2-based project. You have also learned about some of the features ASDT and Eclipse have to make development easier. It should now be possible for you to leverage this basic knowledge to build more complex and sophisticated applications.
In this topic, you learned how to create both an ActionScript 2 and an ActionScript 3 application using completely free, open source tools. You used FlashDevelop to create an ActionScript 3 Flash-based and an ActionScript 3 Flex-based application, and then you used Eclipse and ASDT to make an ActionScript 2 Flash-based application. In later topics of this topic, you will expand this application and learn how to use additional open source tools for optimizing, testing, and deploying it. You will also learn details about several open source ActionScript libraries available to you.

![tmpeeee-136_thumb[2][2][2][2] tmpeeee-136_thumb[2][2][2][2]](http://what-when-how.com/wp-content/uploads/2012/06/tmpeeee136_thumb2222_thumb.png)
![tmpeeee-137_thumb[2][2][2][2] tmpeeee-137_thumb[2][2][2][2]](http://what-when-how.com/wp-content/uploads/2012/06/tmpeeee137_thumb2222_thumb.png)
![tmpeeee-138_thumb[2][2][2][2] tmpeeee-138_thumb[2][2][2][2]](http://what-when-how.com/wp-content/uploads/2012/06/tmpeeee138_thumb2222_thumb.png)
![tmpeeee-139_thumb[2][2][2][2] tmpeeee-139_thumb[2][2][2][2]](http://what-when-how.com/wp-content/uploads/2012/06/tmpeeee139_thumb2222_thumb.png)

![tmpeeee-142_thumb[2][2][2][2] tmpeeee-142_thumb[2][2][2][2]](http://what-when-how.com/wp-content/uploads/2012/06/tmpeeee142_thumb2222_thumb.png)
![tmpeeee-144_thumb[2][2][2][2] tmpeeee-144_thumb[2][2][2][2]](http://what-when-how.com/wp-content/uploads/2012/06/tmpeeee144_thumb2222_thumb.png)
![tmpeeee-145_thumb[2][2][2][2] tmpeeee-145_thumb[2][2][2][2]](http://what-when-how.com/wp-content/uploads/2012/06/tmpeeee145_thumb2222_thumb.png)
![tmpeeee-146_thumb[2][2][2][2] tmpeeee-146_thumb[2][2][2][2]](http://what-when-how.com/wp-content/uploads/2012/06/tmpeeee146_thumb2222_thumb.png)
![tmpeeee-147_thumb[2][2][2][2] tmpeeee-147_thumb[2][2][2][2]](http://what-when-how.com/wp-content/uploads/2012/06/tmpeeee147_thumb2222_thumb.png)
![tmpeeee-148_thumb[2][2][2][2] tmpeeee-148_thumb[2][2][2][2]](http://what-when-how.com/wp-content/uploads/2012/06/tmpeeee148_thumb2222_thumb.png)
![tmpeeee-149_thumb[2][2][2][2] tmpeeee-149_thumb[2][2][2][2]](http://what-when-how.com/wp-content/uploads/2012/06/tmpeeee149_thumb2222_thumb.png)
![tmpeeee-150_thumb[2][2][2][2] tmpeeee-150_thumb[2][2][2][2]](http://what-when-how.com/wp-content/uploads/2012/06/tmpeeee150_thumb2222_thumb.png)
![tmpeeee-151_thumb[2][2][2][2] tmpeeee-151_thumb[2][2][2][2]](http://what-when-how.com/wp-content/uploads/2012/06/tmpeeee151_thumb2222_thumb.png)
![tmpeeee-152_thumb[2][2][2][2] tmpeeee-152_thumb[2][2][2][2]](http://what-when-how.com/wp-content/uploads/2012/06/tmpeeee152_thumb2222_thumb.png)
![tmpeeee-153_thumb[2][2][2][2] tmpeeee-153_thumb[2][2][2][2]](http://what-when-how.com/wp-content/uploads/2012/06/tmpeeee153_thumb2222_thumb.png)
![tmpeeee-154_thumb[2][2][2][2] tmpeeee-154_thumb[2][2][2][2]](http://what-when-how.com/wp-content/uploads/2012/06/tmpeeee154_thumb2222_thumb.png)
![tmpeeee-155_thumb[2][2][2][2] tmpeeee-155_thumb[2][2][2][2]](http://what-when-how.com/wp-content/uploads/2012/06/tmpeeee155_thumb2222_thumb.png)
![tmpeeee-156_thumb[2][2][2][2] tmpeeee-156_thumb[2][2][2][2]](http://what-when-how.com/wp-content/uploads/2012/06/tmpeeee156_thumb2222_thumb.png)
![tmpeeee-157_thumb[2][2][2][2] tmpeeee-157_thumb[2][2][2][2]](http://what-when-how.com/wp-content/uploads/2012/06/tmpeeee157_thumb2222_thumb.png)

