Load the XML file
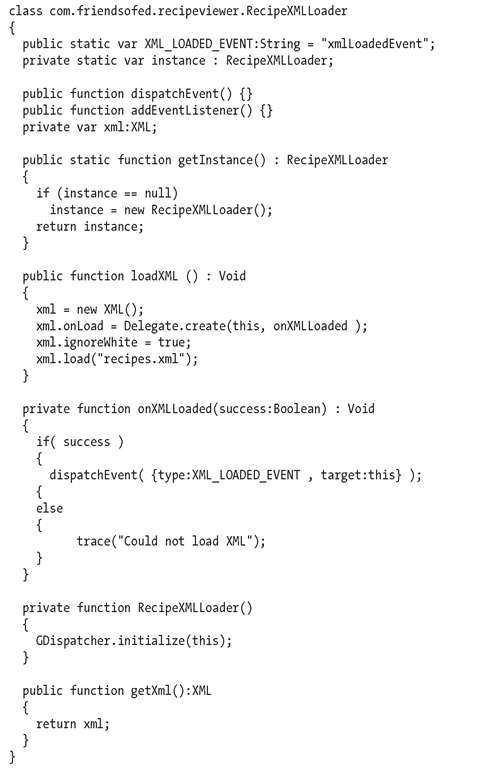
Now that you have a class to hold the details of a recipe, you need to add functionality to load an XML file. While creating this class, let’s explore the ASDT templates feature. First, create a new class named RecipeXMLLoader. Let’s make this class a Singleton so only a single object of this type ever exists. Instead of writing the code to do that, you will use the template functionality of ASDT. First, delete all the code in the file. Then type sing. Press Ctrl+spacebar to invoke the template functionality. You should now have code similar to the following:
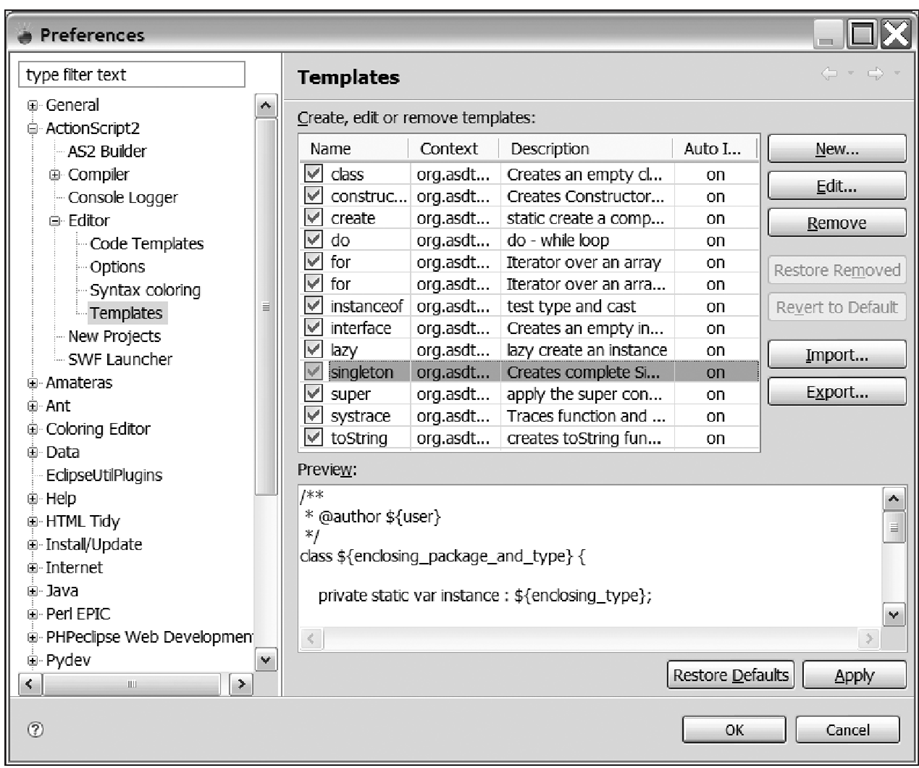
As you can see, code templates can make writing large amounts of boilerplate code very easy. To understand what happened when you invoked the code template, you should open the Window > Preferences menu. From the left panel, select ActionScript2 > Editor > Templates; you will see a dialog box similar to Figure 4-13.
Figure 4-13. The ASDT Templates dialog box
When you press Ctrl+spacebar in the code editor after a word or word fragment, the Name column of the templates is searched for a match. In this case, there was a single match called singleton. ASDT then copied the template code into your source file and replaced template variables (the ${text} pieces) with the appropriate pieces of data. Besides the templates that come with ASDT, you can also create your own. Let’s create one for writing a public method signature.
Creating a custom template I
Creating a custom template makes it available to you when pressing Ctrl+spacebar in the ActionScript editor of ASDT. You can add that custom template to ASDT with the following steps:
1. Click the New button in the Templates dialog box.
2. You want to create a template for a public method, so let’s give it a name of pubmeth.
3. In the description field, type A public method signature.
4. Type the following code into the Pattern field, and then click the OK button:
While you type in the pattern, you will notice a pop-up menu appears whenever you press the dollar symbol ($). In this pop-up is a list of premade variables from which you can choose. As you can see, you inserted the ${cursor} variable. This will move the cursor position to that spot when the template is done executing.
You can also create your own custom variables like you did with methName and methType. Custom variables act as placeholders for text when you use the template. When you insert a template, Eclipse will allow you to enter text for each variable that will be replaced in the template. Every occurrence of the same custom variable will be replaced with the same text. Although the simple example contained each variable only once, you could have used them multiple times like so:
This would cause a comment to appear before the method that contained the name of the method. Since you used ${methName} in multiple locations, you’d have to type it in only once when using the template.
To use this template, exit the template dialog box and return to the RecipeXMLLoader.as file. Position your cursor in the class, but outside of any other method. Type pubmeth, and press Ctrl+spacebar. The code from your template will appear. Your first custom variable (methName) will be highlighted. You can type a method name that will overwrite the variable; let’s use loadXML. Then press the Tab key. The cursor will advance to the methType variable, and you can type the method type. For this example, let’s use Void. After entering the type, you can press the Tab key one more time, and the cursor will be positioned inside the method body, ready for you to type in the body of the method.
Now that you know how to use templates, finish the RecipeXMLLoader class by filling in the following code:
If you are familiar with ActionScript, most of the preceding code should be familiar. The event dispatching functionality that uses the GDispatcher class may be new to you, so some explanation is in order.
These lines define two empty methods that will be filled in by GDispatcher in the constructor:
When the GDispatcher.initialize(this) call is made, those methods are dynamically replaced by code in the GDispatcher class. The modified dispatchEvent method is then used by this class in the onXMLLoaded method:
This call causes an event of type XML_LOADED_EVENT to be dispatched to any other objects listening for it. Later in this topic you will use the addEventListener method to add an event listener from the RecipeViewer class.
To load the XML, you used the XML.load() method. Although it’s easy to use here, when loading different types of assets in the same application, the syntax for each is slightly different and can become confusing quickly. There is an open source project called Fling (Mtp://osflash.org/fling) that contains utility methods for loading any type of content over the network in a consistent manner.
Create an XML parser
Once the XML file has been loaded, you need to parse the details and put it in a form you can more easily use. To do this, create a class named RecipeXMLParser with the following code that loops through an XML object and creates an array of Recipe objects.
The parseXml method will take a chunk of XML and return an array of Recipe objects:
Next, loop through the XML, getting each recipe node, and create a recipe object to hold the results in. Since preptime is stored as an attribute of the recipe XML node, you also set that here:
Next, you loop through the recipe’s child nodes, and you parse each child node, determine what type it is, and set the appropriate property on the recipe object. Since ingredients are more complex, you separate the parsing of them into a new function called parseIngredients.
After each recipe is parsed, you add it to the array. At the end of processing, you return the list of recipes:
Lastly, you add the parseIngredients method, which will loop through the list of ingredients and add them to the recipe:
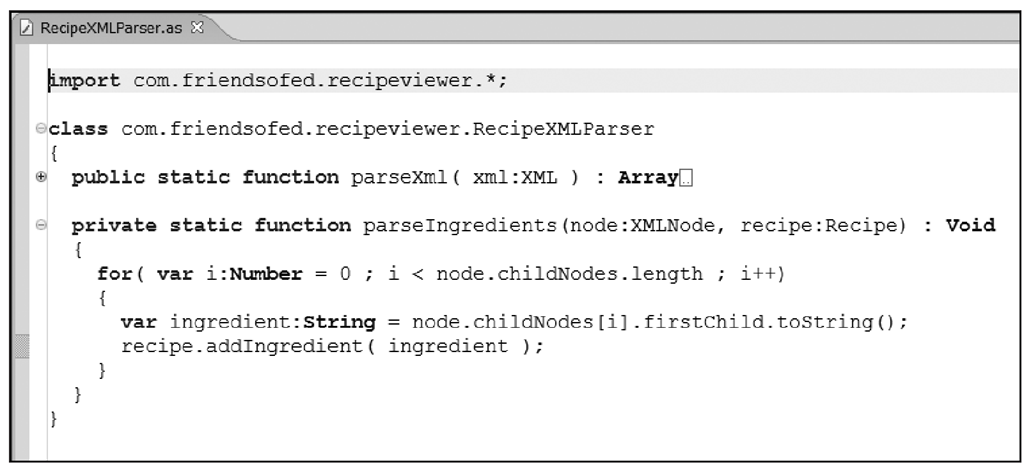
While writing this class, remember to take advantage of some of the Eclipse/ASDT features. If you used code folding to collapse the parseXml method, the display in Eclipse will look like the following:
The code for the parseXml method is still there; it’s just hidden from view to make it easier to find other parts of the class. You can mouse over the circle with a plus sign in it to get a tooltip of the hidden code, or you can click it to reexpand the code. Classes, methods, import statements, and comments can all be collapsed.
Bringing it all together
Once the ability to read in and parse the XML data file is done, it’s time to add code in the RecipeViewer class to tie it all together. For the first step, add two private variables to store information about the recipes and the currently selected recipe:
Next, add some variables that will represent the various onscreen MovieClips and TextFields:
In the constructor, initialize those references:
Later in the application, you could have accessed these onscreen components through code such as this:
However, by doing that, the compiler doesn’t know what types recipeDetails_mc and recipeTitle_txt are until runtime. By explicitly declaring variables, you get type checking during compile and context help while editing.
Now, you need to update the display with details from your recipe. While writing the next bit of code, press Ctrl+spacebar after typing the pieces in bold to get a code completion pop-up. This code completion is part of the context-sensitive help you gain by explicitly declaring variables.
The updateDisplay method populates the four text fields with data from the currently selected recipe. The updateIndex method creates a list of recipes the user can click. To do this, it creates a MovieClip and assigns a method to the onRelease property. It then adds a TextField to that MovieClip and updates it with the recipe name. Since you’re using the open source Delegate class from Steve Webster, you can supply additional parameters that will be passed to the onClick method. The third parameter to Delegate.create is an array of parameters to pass. As you can see, you’ve set it to [i], which will pass the index of the recipe to the onClick method.
The next step is to create and invoke the XML loader at application startup. Modify the startApp method to add this:
Here, you’re using the addEventListener to create a new event listener on the loader. As discussed previously, this functionality comes from the GDispatcher class. You’ve set the event to be dispatched to a method called onXmlLoaded, so that’s the next thing to write.
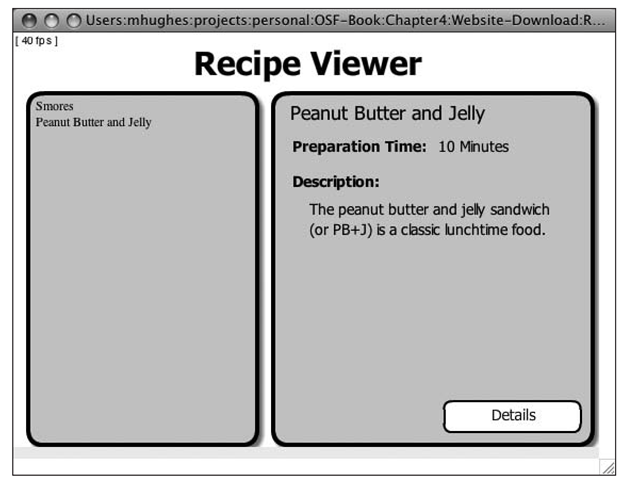
After adding that code, run Ant to build and then run your new SWF to see the output like Figure 4-14. Clicking the recipe titles on the left will switch the view on the right between them.
Figure 4-14. The running Recipe Viewer application after clicking the Peanut Butter and Jelly option
![tmpeeee-111_thumb[2][2][2] tmpeeee-111_thumb[2][2][2]](http://what-when-how.com/wp-content/uploads/2012/06/tmpeeee111_thumb222_thumb.png)
![tmpeeee-112_thumb[2][2][2] tmpeeee-112_thumb[2][2][2]](http://what-when-how.com/wp-content/uploads/2012/06/tmpeeee112_thumb222_thumb.png)

![tmpeeee-114_thumb[2][2][2] tmpeeee-114_thumb[2][2][2]](http://what-when-how.com/wp-content/uploads/2012/06/tmpeeee114_thumb222_thumb.png)
![tmpeeee-115_thumb[2][2][2] tmpeeee-115_thumb[2][2][2]](http://what-when-how.com/wp-content/uploads/2012/06/tmpeeee115_thumb222_thumb.png)

![tmpeeee-117_thumb[2][2][2] tmpeeee-117_thumb[2][2][2]](http://what-when-how.com/wp-content/uploads/2012/06/tmpeeee117_thumb222_thumb.png)
![tmpeeee-119_thumb[2][2][2] tmpeeee-119_thumb[2][2][2]](http://what-when-how.com/wp-content/uploads/2012/06/tmpeeee119_thumb222_thumb.png)
![tmpeeee-120_thumb[2][2][2] tmpeeee-120_thumb[2][2][2]](http://what-when-how.com/wp-content/uploads/2012/06/tmpeeee120_thumb222_thumb.png)
![tmpeeee-121_thumb[2][2][2] tmpeeee-121_thumb[2][2][2]](http://what-when-how.com/wp-content/uploads/2012/06/tmpeeee121_thumb222_thumb.png)
![tmpeeee-122_thumb[2][2][2] tmpeeee-122_thumb[2][2][2]](http://what-when-how.com/wp-content/uploads/2012/06/tmpeeee122_thumb222_thumb.png)
![tmpeeee-123_thumb[2][2][2] tmpeeee-123_thumb[2][2][2]](http://what-when-how.com/wp-content/uploads/2012/06/tmpeeee123_thumb222_thumb.png)

![tmpeeee-125_thumb[2][2][2] tmpeeee-125_thumb[2][2][2]](http://what-when-how.com/wp-content/uploads/2012/06/tmpeeee125_thumb222_thumb.png)
![tmpeeee-126_thumb[2][2][2] tmpeeee-126_thumb[2][2][2]](http://what-when-how.com/wp-content/uploads/2012/06/tmpeeee126_thumb222_thumb.png)
![tmpeeee-127_thumb[2][2][2] tmpeeee-127_thumb[2][2][2]](http://what-when-how.com/wp-content/uploads/2012/06/tmpeeee127_thumb222_thumb.png)
![tmpeeee-129_thumb[2][2][2] tmpeeee-129_thumb[2][2][2]](http://what-when-how.com/wp-content/uploads/2012/06/tmpeeee129_thumb222_thumb.png)
![tmpeeee-130_thumb[2][2][2] tmpeeee-130_thumb[2][2][2]](http://what-when-how.com/wp-content/uploads/2012/06/tmpeeee130_thumb222_thumb.png)
![tmpeeee-131_thumb[2][2][2] tmpeeee-131_thumb[2][2][2]](http://what-when-how.com/wp-content/uploads/2012/06/tmpeeee131_thumb222_thumb.png)
![tmpeeee-132_thumb[2][2][2] tmpeeee-132_thumb[2][2][2]](http://what-when-how.com/wp-content/uploads/2012/06/tmpeeee132_thumb222_thumb.png)

