Integrating the database and Flash
It’s time to connect the product view from Flash CS3 to the ProductService.php file you just created. You will start with populating a Flash user interface DataGrid component with the products data returned from the new ProductService class. You’ll first set up a new Flash for a Product View user interface. Like the “Hello, World” example, you will then create a Main class that will make the connection to the server and bind the returned data to the user interface.
1. Open Flash CS3, and create a new Flash file (ActionScript 3).
2. Save the document as ProductView.fla in a new folder.
3. Create a new ActionScript file by selecting File > New > ActionScript File.
4. Save the file, and name it Main.as.
5. Select the ProductView.fla tab to continue working on the interface.
6. Change the stage width to 800 and height to 400.
7. From the Components window, drag a user interface DataGrid component to the stage. We will use the DataGrid component to show the results from the getProducts remote method.
8. Align the DataGrid in the top-left corner of the stage. Update the DataGrid’s properties to have an instance name of products_dg and a width of 600 and height of 350.
9. Drag a Button component to the stage, and place it below the products_dg component. Update the properties of the Button component to have an instance name of getProducts_ btn, and change its label to Get Products.
10. Select the stage by clicking it.
11. Change the Document class to Main, which links the Main.as ActionScript file with the HelloWorld.fla user interface.
12. Copy RecordSetDP.as from the examples folder into the same directory as your ProductView. fla file and your Main.as file. The RecordSetDP.as file will be imported into your Main.as class file to help in putting the returned data into the DataGrid.
The user interface on the stage is ready to consume the getProducts data. Now open the Main.as tab in Flash to work on the class file. The code you’ll write for retrieving the data set from the ProductService is similar to the HelloWorld example. The main difference between the two examples is that we are now getting an ArrayCollection as a result rather than a String.
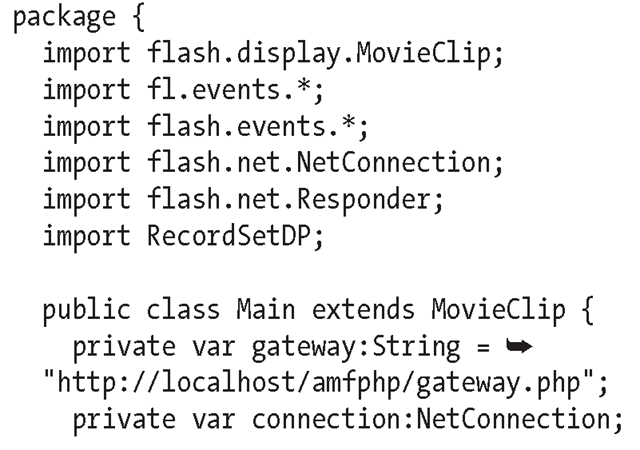
As of the writing of this topic, Flash CS3 does not support ArrayCollection objects, although they are extensively used in ActionScript 3 in Flex. It is my assumption that Flash CS3 will eventually have this class, but until then I have provided a simple class called RecordSetDP that converts a RecordSet into a DataProvider. You can then apply the DataProvider directly to your DataGrid and instantly have your data update the DataGrid. Let’s look at the Main.as file:
Your first reaction should be that not much has changed. You are right—there are only three little changes to make this work:
1. First, you import RecordSetDP, which needs to be in the same directory as your Main.as file. This class file will be used later to convert the result from the server into a DataProvider.
2. Second, you changed the server class from HelloWorld.say to ProductServices.getProducts in the sendData method. This change makes it so that Flash is now connecting to the new ProductService class rather than HelloWorld. You are also calling the getProducts method inside the ProductService class. This method was created to query all the data in the products table and return that data set.
3. Finally, you changed the onResult method to pass the result into RecordSetDP. toDataProvider, which returns a formatted DataProvider that is applied directly to the DataGrid on the stage. You can open the RecordSetDP and see that it is just looping through the result to format the data properly for a DataGrid DataProvider.
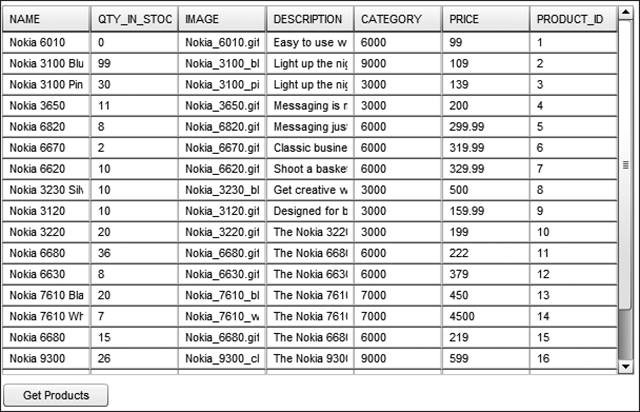
Run the application, and click the Get Products button. You now have a DataGrid populated from your remote MySQL table, as shown in the following screenshot.
Updating the product database
Now that you have retrieved a record set of data from the products database, you want to be able to manipulate that data before sending it back. The following example shows how to update, delete, and create products through the Flash interface. I will start by showing how to add methods to the ProductService.php file to allow for the new features. In the following sections, I will not be walking you through the step-by-step instructions to build the updated user interface because of the immense amount of repetitive changes.
I’m doing this so you can add buttons to evoke changes and add several input fields for altering data. Because of the amount of changes to the user interface, it’s best to load up the ProductUpdate example from the topic download file (http://www.friendsofed.com) into Flash to walk through this example.
Additional ProductService methods
You need to make three additions to ProductService to handle the new functionality. The new method removeProduct deletes a row based on a product ID, updateProduct makes updates to an existing row in the database, and finally addProduct creates a new row in the database. Here are the three new methods in full:
Each of the three new methods uses a SQL statement and the mysql_query method to execute the SQL statement. You can define more complex functions by utilizing the same concepts to search, get products of a certain type, or get products greater than or less than a certain price. PHP is the optimal place to put your business logic because it is faster than the client computer, it is a controlled environment, and it protects your intelligence from being downloaded to each computer.
Before moving forward, update your ProductService with the new methods or upload the completed ProductService.php file from the ProductUpdate folder in the topic download file. You can use the Service Browser to test these new methods.
Interface alterations to manipulate products
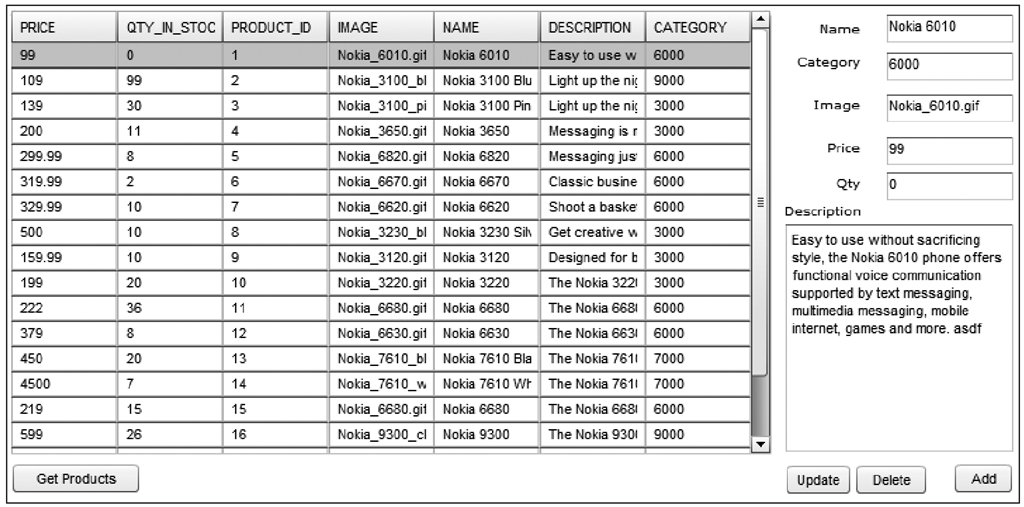
Open ProductUpdate.fla in the ProductUpdate folder in the topic download file, and you will see that the interface has been updated to add several text areas and labels to the right side of the DataGrid. These will be used for updating the selected product content or just adding a new product. When you select a row out of the DataGrid, the input fields on the right side are populated with the associated data. The running application looks like the following screenshot.
Let’s first walk through the data ActionScript code that is used to populate the input fields on the right side of ProductUpdate.fla. It is important to note that you are copying the data into the text input fields so that you are working with copies of the live data. All the data sent to the server for updates, deletions, and additions will be based on this copied data. The following is an updated Main.as file with all the functionality needed for the UI to work. After you look through the code, I will walk through the additions to enable the new functionality.
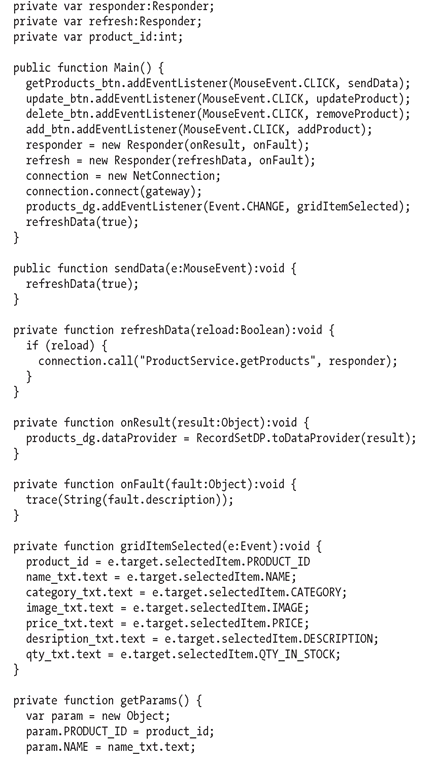
The first place where you have updated the ProductUpdate Main.as file is when you added another Responder called refresh. The refresh Responder is used whenever you successfully update, delete, or add a new product to the database. The refresh Responder is instantiated in the constructor with the callback method refreshData to be used on a successful service call. The method refreshData takes a single Boolean parameter. In each of our new ProductService methods (removeProduct, updateProduct, and addProduct), you return true if the SQL statement is executed successfully. When this happens, you want to refresh the DataGrid with the new data. The refreshData method calls the ProductService getProducts method again to bring the user interface in sync with the changes to the server. I will talk more about the refresh Responder when I cover the three new service call methods in Main.as (updateProduct, deleteProduct, and addProduct).
In the Main method or class constructor, you have added three new event listeners for the three new buttons, update_btn, delete_btn, and add_btn. The buttons have assigned the functions updateProduct, deleteProduct, and addProduct, respectively, as the function to handle the click event fired when the button is selected. In addition to the button event handlers, an event handler for products_dg has been added to call the griditemSelected method whenever a row is selected in the DataGrid.
You have also added in the constructor a call to the refreshData method to populate the DataGrid as soon as the Flash file is loaded. As in the previous example, clicking the Get Products button still performs the same operation of refreshing the data in the DataGrid.
Let’s look through some of these new methods to see what they do. The method gridItemSelected handles the event of someone clicking the DataGrid and selecting a product. The method takes the values in the DataGrid and assigns them to the associated text areas on the right side of the stage. It also populates the product_id variable, which is used to keep track of the currently selected product.
The method getParams is used to prepare any changes that have been made to the TextInput into an object to be sent to the server. This method will be used in all of the new features to the application to make sure it has the most recent data.
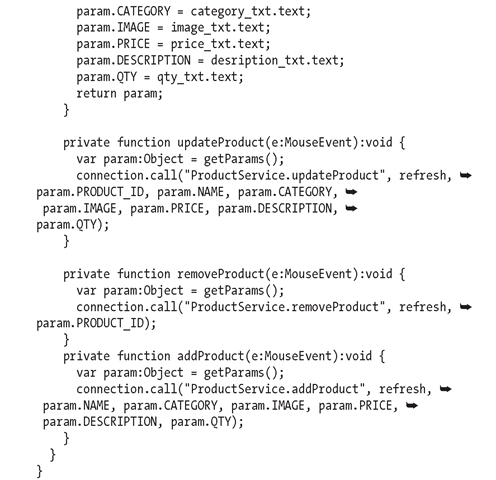
The next three methods make service calls to the ProductService class on the web server. These methods are called when their respective buttons are clicked. These three methods all use the refresh Responder to handle data returning from the server. Each one of the server methods returns a Boolean true when the update, delete, or add is executed on the database successfully. The true result from the server methods is checked in the Main.as refreshData, and if this is successful, getProducts is called again to update the interface.
■ updateProduct is the first new feature to the application; it takes the data in the TextInput and sends it back to the ProductService.updateProduct method, which takes the variables and calls a SQL update on the product database. With each of these three methods, it is important to note that the order of the parameters must be the same as the order they are listed in their corresponding method in ProductService.php. Changing the order will result in the data being placed in the wrong field.
■ removeProduct deletes from the database the currently selected product_id. For testing I recommend you first add a product and then delete it from the database.
■ addProduct looks almost exactly like updateProduct except it does not send the product_id to the server. When the server tries to insert the new product into the database without a product_id, the database automatically increments the unique field and creates a new product_id.
Although I have covered a lot of functionality in a short time, you should be able to see that it is not difficult to implement a create, read, update, delete (CRUD) user interface in Flash with the help of AMFPHP. I recommend that you try to add some functionality to this base application. Some suggestions are to add validation to the TextInputs so that you can validate whether the data has changed on button submissions and also format some of the inputs. From the service side, try sorting the data in different ways when you call getProducts. You could even add a parameter for the way you want the returned data sorted. Ifyou are ready to try to consume the same services in Flex, move on to the next tutorial, where you’ll rebuild a similar user interface and use the same ProductService to access the database.
![tmpeeee-287_thumb[2] tmpeeee-287_thumb[2]](http://what-when-how.com/wp-content/uploads/2012/06/tmpeeee287_thumb2_thumb.png)
![tmpeeee-288_thumb[2] tmpeeee-288_thumb[2]](http://what-when-how.com/wp-content/uploads/2012/06/tmpeeee288_thumb2_thumb.png)
![tmpeeee-290_thumb[2] tmpeeee-290_thumb[2]](http://what-when-how.com/wp-content/uploads/2012/06/tmpeeee290_thumb2_thumb.png)
