The HelloWorld logic
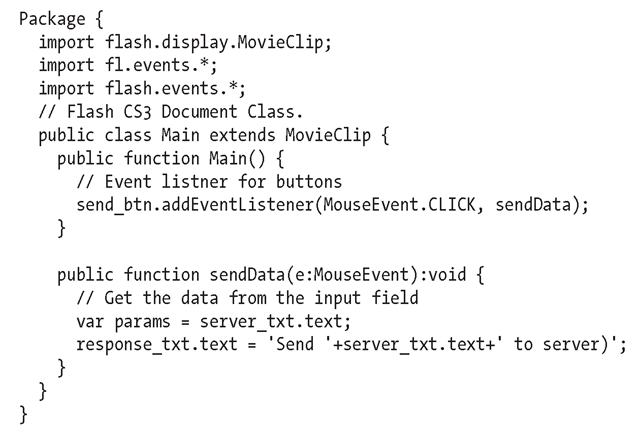
Open the Main.as tab in Flash to work on the class file. First you’ll build the Main.as class file so that all the events are fully functional without the connection to the server. Then you will update the class with the remoting functionality.
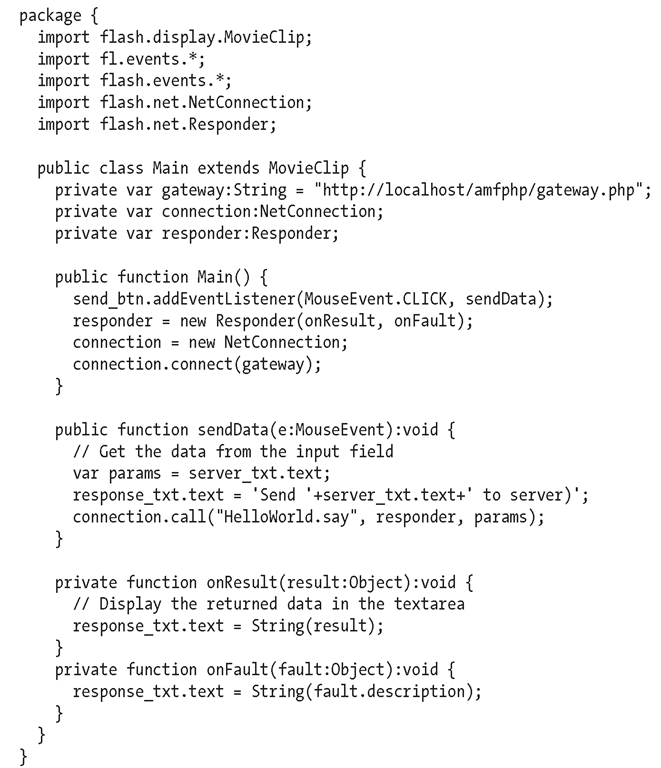
If you are new to ActionScript 3, the public class Main is executed as soon as the HelloWorld.fla document is run. This is called the constructor. The constructor adds an event listener for the send_btn component and tells it to use the sendData function whenever the button is clicked. The sendData method takes the input from the server_txt component and displays it in the response_txt component. It’s very simple, so let’s make it a little more complicated. I’ll now show how to update the class so that you can send the data to the server and display the result. You first need to import two ActionScript libraries that perform the bulk of the work. The first is NetConnection, which acts like a bidirectional pipe between the client and the server. The second is a Responder object, which handles the return values from the server related to the success or failure of the call.
In the class, you need three variables to represent the NetConnection library, the Responder library, and the gateway URL to your AMFPHP installation:
In the Main constructor, create a Responder and a new connection to the AMFPHP gateway. The Responder defines two different methods for handling the response from the server. For simplicity I have called these onResult and onFault. You can call them whatever you want, but many examples use these method names.
In the sendData function, you need to now send the data to the server. You need to add one more line that makes a call to HelloWorld, say in the AMFPHP services directory:
When you created the Responder variable, you defined onResult and onFault functions to handle the response from the server. You need to add the onResult function for the successful result from the server. A successful event handler is run every time the connection is handled properly to the server.
The onFault function is called if there was an invalid response from the server. This happens when the PHP file errors out, when the URL to the server is invalid, when the remote service or method does not exist, or with any other connection-related issues.
Adding the ActionScript to make the remoting connection is now complete. In review, you added the required variables to open a connection to the remote server, you defined what methods should be used when your application receives a response from the server, and finally you displayed the returned data to the user interface. Walk through the completed example one more time to make sure you understand it:
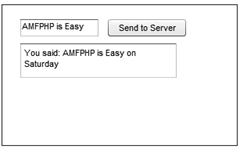
Publish the HelloWorld.fla file to see your fully functional remoting application, as shown in the following screenshot.
The finished HelloWorld.fla, Main.as, and HelloWorld.php files are located in the download examples for this topic.
Creating, reading, updating, and deleting with Flash and PHP
Most users turn to AMFPHP for a simple way to get database data in and out of their Flex or Flash application. The remaining examples in this topic are built on a Product View mock application. Say you have a list of products located in a database to which you want to display, update, delete, and add new products. You will build upon this example with the end goal that you are capable of managing data from Flash. To start, I will walk you through how AMFPHP handles database connections and how it retrieves that data into a Flash DataGrid. After this example, you’ll learn how to update from Flash to PHP the same data that you displayed in the first product example. Finally, I’ll explain how to use class mapping to better organize the data on the client and the server. Each example builds on the last, so let’s get started!
Building the database adapter
An impressive and time-saving feature of AMFPHP is its ease of returning a result set from a database query formatted for use in Flash or Flex. By default, AMFPHP investigates the resource being used to connect to the database. When you return a query, AMFPHP checks the resource type against a list of database adapters and then automatically converts the result into an ArrayCollection for AMF 3 and a RecordSet for AMF 0. As of the writing of this topic, Flash CS3 does not support ArrayCollection objects, and therefore AMFPHP always returns a RecordSet unless the connection is a RemoteObject connection from Flex. The following database adapters are available in AMFPHP 2:
■ MySQL
■ SQLite
■ PDO
■ Zend::DB, including ZendDBTable_Rowset
■ PHP Doctrine
■ Postgres
■ PEAR:DB
■ ODBC
■ MySQLi
■ MSSQL
■ Informix
■ FrontBase
■ ADODB
■ Oracle: oci8
For testing purposes, you can now use the RecordSet class in AMFPHP. This enables you to test your application without having to connect to a database. Place the following code in one of your services, and it will return an ArrayCollection for AMF 3 or RecordSet for AMF 0:
Testing the database connection
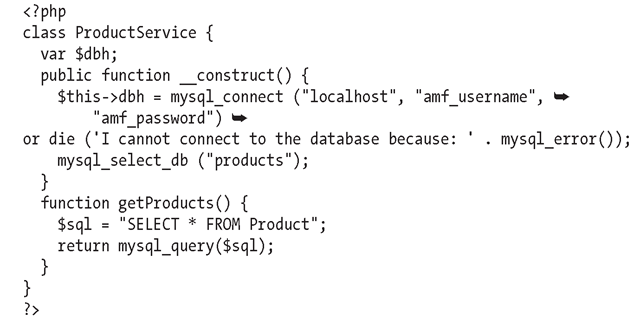
For the following examples, you will need a MySQL database to connect to. MySQL is a robust database that is easy to install and usually supported on web servers with PHP. Create a new database named products in MySQL. Use the create_product.sql file located in the topic download file (http://www.friendsofed.com) to create the tables and insert the data necessary for the example. Run create products.sql against your MySQL products database to create the tables and insert the data necessary for the examples. To use the script from the command line, run mysql -u USERNAME -p PASSWORD products < create_products.sql. Replace USERNAME and PASSWORD with your own. Create a new PHP file called ProductService.php. This file will be used to connect to the product database and retrieve the data for Flash.
Walking through the code, you can see that the database connection is created on line 5 in the class constructor. This makes sure the connection is available before any of the methods are called from Flash Player. The getProducts method is a simple query to select all the data from the products database and return it in a data set. Notice that there is nothing unique about the query. What is unique is that AMFPHP handles the return type, catches that it is a resource type of mysql, and converts the result into an ArrayCollection for AMF 3 connections or a ResultSet for AMF 0 connections. This makes it easy to start using the result in Flex or Flash.
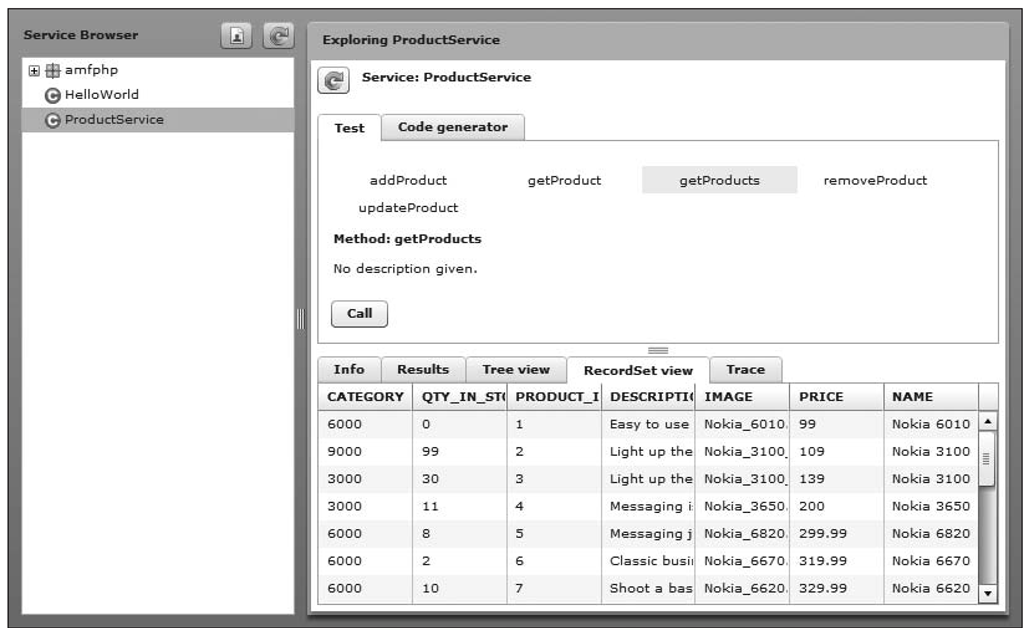
Make sure you edit your ProductService.php database name, username, and password to what you used when you created the database, ran the create_products.sql script, and then uploaded the file to amfphp/services/ on your web server. As always, navigate in a web browser directly to the service (http://www.localhost/amfphp/services/ProductServices.php) to test it for any errors. If the script is unable to connect to the database, it should display an error when you go to the URL. If there is no error, open the AMFPHP browser to test the getProducts method. In a web browser, go to http://localhost/amfphp/browser/, and select ProductService from the left navigation. Select the Test tab, and select getProducts. Click the Call button to make the service call from the browser. The Results tab will show you the raw result from the query. Select the RecordSet view tab to see a Flex DataGrid populated with the ArrayCollection returned from AMFPHP. Everything is working perfectly on the server now, as shown in the following screenshot, so let’s connect Flash to your new database service.
