Creating an AsUnit test suite
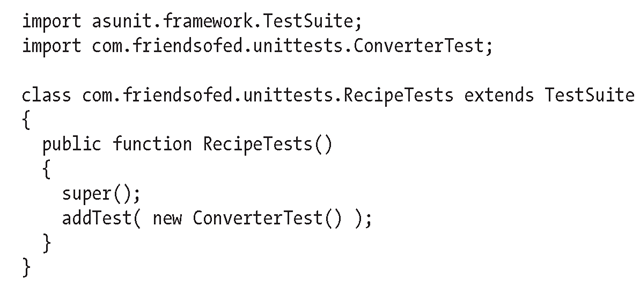
Next, you need to create a test suite for the test case to be run from. In this example, the sample suite will have only a single test case in it. In a real-world application, you would probably have many test cases to add. To create the test suite, you extend the TestSuite class and add an instance of the ConverterTest class to it in the constructor:
If you had other test cases to be added to this suite, you could have called addTest() multiple times, once for each case.
It is also possible to create test suites using composition instead of inheritance. To use this method, you would instantiate a TestSuite object and call addTest on it with your tests:
Which of these two methods you choose is a matter of preference and style. For the rest of the topic, I’ll be assuming the inheritance model.
Creating an AsUnit test runner
The last piece to build for an AsUnit test is the runner that you can launch and that will handle running and reporting the status of the unit tests. In this example, we’ll use MTASC to compile a new SWF from code. If you’re using the Flash IDE, the same code should work, but instead of placing it in a new class’s main() method, you can place it in the Actions panel of your first frame on the timeline.
To make the test runner, create a new class that extends from TestRunner. Add a static main() method to the class that instantiates it. Lastly, in the constructor of the class call, add the start() method with a class reference to your test suite.
To compile your unit tests, you can either call MTASC from the command line or add it to your Ant build script. A sample command line to build this application is as follows:
After building the unit tests, you can run them in your browser or the stand-alone Flash Player.
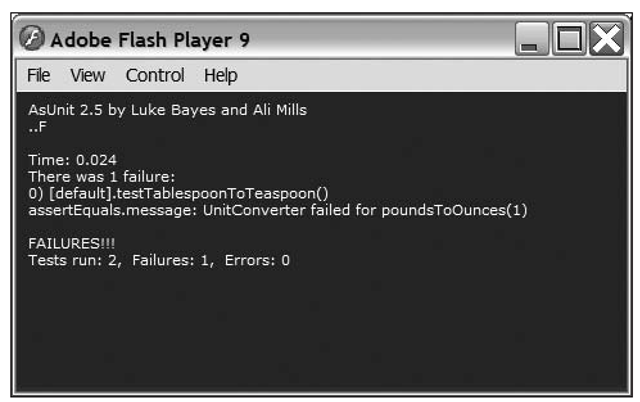
Figure 5-2 shows some sample output from AsUnit for our example unit tests. As a quick visual reference, at the very bottom of the test runner, AsUnit displays a red bar if any of the tests fail and a green bar when all of the tests succeed. In the AsUnit output, you can see that the test runner attempted to run two tests (Tests run: 2) and one of them failed (Failures: 1). If there had been any fatal application errors, they would have been reported in the Errors section. Above that, you can see the specific test that failed and the error message that goes along with it. If you look at the code for the example test, you’ll see this line:
Notice that the message that you passed as the first parameter is displayed in the test output.
AsUnit, like most unit testing frameworks, stops the test at the first failure it finds. So if you had more test cases to try, you’d have to resolve any errors before you could progress to them.
Figure 5-2. After running the unit tests, you can see that one of them has failed.
To fix the failure, you can edit the UnitConverter.poundsToOunces method and change the 13 to 16 in this line:
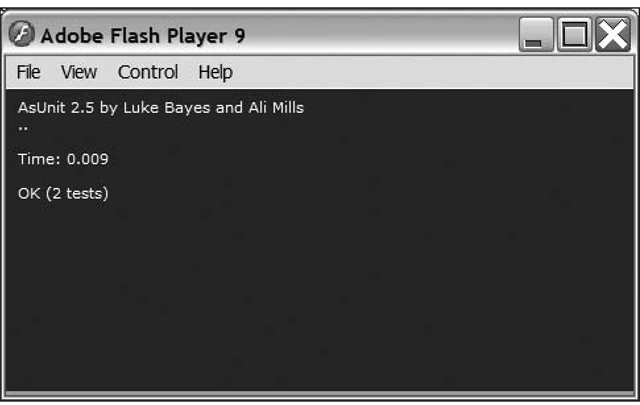
After making the fix and rebuilding the application, the output from the successful unit tests will resemble Figure 5-3.
Figure 5-3. The successful results from the unit tests after fixing any errors
After you’ve written your first unit test for a project, adding more becomes easier since you don’t always have to re-create the test suites or runners.
Getting started with FlexUnit
FlexUnit is a unit testing framework originally written by Adobe that is aimed at ActionScript 3 development. It is now hosted as an open source project on Google Code at this URL: http://code. google.com/p/as3flexunitlib/.
To use FlexUnit, download the archive from the URL and extract it to your computer. Then, in your project, add flexunit.swc to your compiler library options.
Adding flexunit.swc to Flex Builder
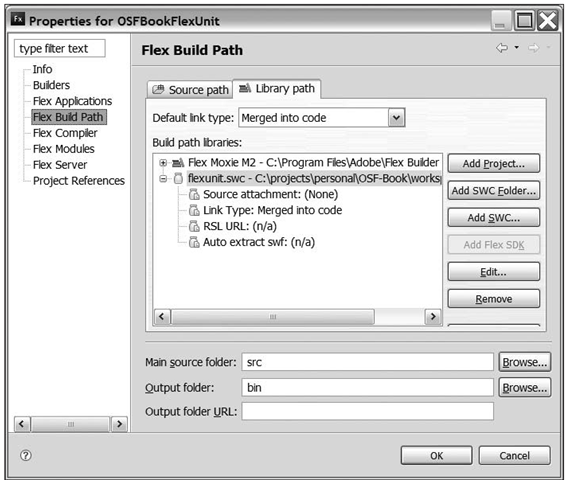
To add FlexUnit to a Flex Builder project, first right-click your project and then select Properties. Click the Flex Build Path option on the left, and a dialog box similar to Figure 5-4 will appear. Click the Library Path tab, click the Add SWC button, and select the flexunit.swc file.
Figure 5-4. The Flex Builder project properties dialog box showing how to add flexunit.swc to your project
Adding flexunit.swc to FlashDevelop
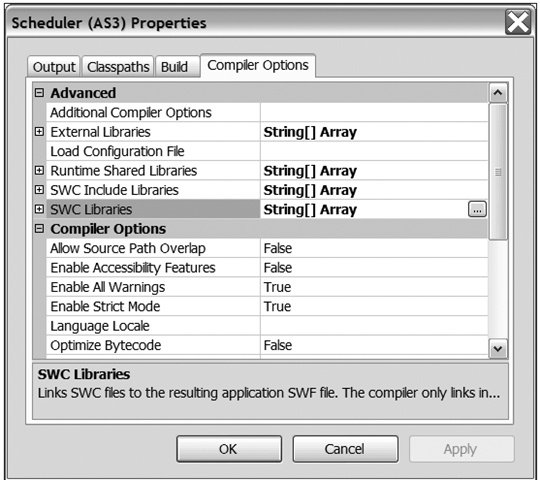
The process for adding a SWC to FlashDevelop is similar to adding one to Flex Builder. First, right-click your project and select Properties. Next, click the Compiler Options tab. A dialog box like Figure 5-5 will be displayed. In this dialog box, click the … button corresponding with the SWC Libraries option, and add the full path to flexunit.swc in the prompt.
Figure 5-5. Compiler options for a FlashDevelop project
Adding flexunit.swc to your Ant-based build script
To add a SWC using this method, you must add an include tag as a child to the mxmlc tag.
If you had other library SWCs to add, you would have multiple include tags, with one for each library.
Creating the FlexUnit example
The FlexUnit API is similar to the AsUnit API. To help illustrate the similarities, I’ll show how to write tests for an ActionScript 3 version of the UnitConverter class you used in the AsUnit section. Since the example class and the classes to test it are so similar to the ActionScript 2/AsUnit versions, I won’t be spending a lot of time reexplaining them.
Notice that I introduced the same error of 13 ounces to a pound instead of 16 as in the previous section.
Creating the FlexUnit test case
Like with AsUnit, the test cases are contained in classes that descend from a base TestCase class in the FlexUnit framework. Each test is contained within a method with a test prefix. FlexUnit also uses an identical syntax for the assert calls, with one exception. The assertSame method from AsUnit is called assertStrictlyEquals in FlexUnit.
The following listing shows the ConverterTest class with two test methods:
Creating the FlexUnit test suite
Test suites in FlexUnit are classes that descend from the flexunit.framework.TestSuite class. The following is a listing for a simple suite:
This class simply extends the TestSuite class and adds a TestCase in its constructor. Like with AsUnit, you could also have created the suite through composition using code like the following:
The style you use is a matter of preference. I like the inheritance model since you then have a suite class that knows all the information it needs to run a set of tests.
Creating the FlexUnit test runner
FlexUnit has a graphical test runner that shows the current status of running tests as well as the status of any completed tests. First, create a new MXML application that descends from the normal Flex Application class. Add an event listener for the creationComplete event that you will use to execute the unit tests.
Next, instantiate a TestRunnerBase that will represent the onscreen status of the unit tests. Notice you also set up an XML namespace of flexui in the previous Application tag:
Finally, create a script block and add the onCreationComplete method that you referenced in the creationComplete event handler. In that method, add code to create your test suite and start the tests.
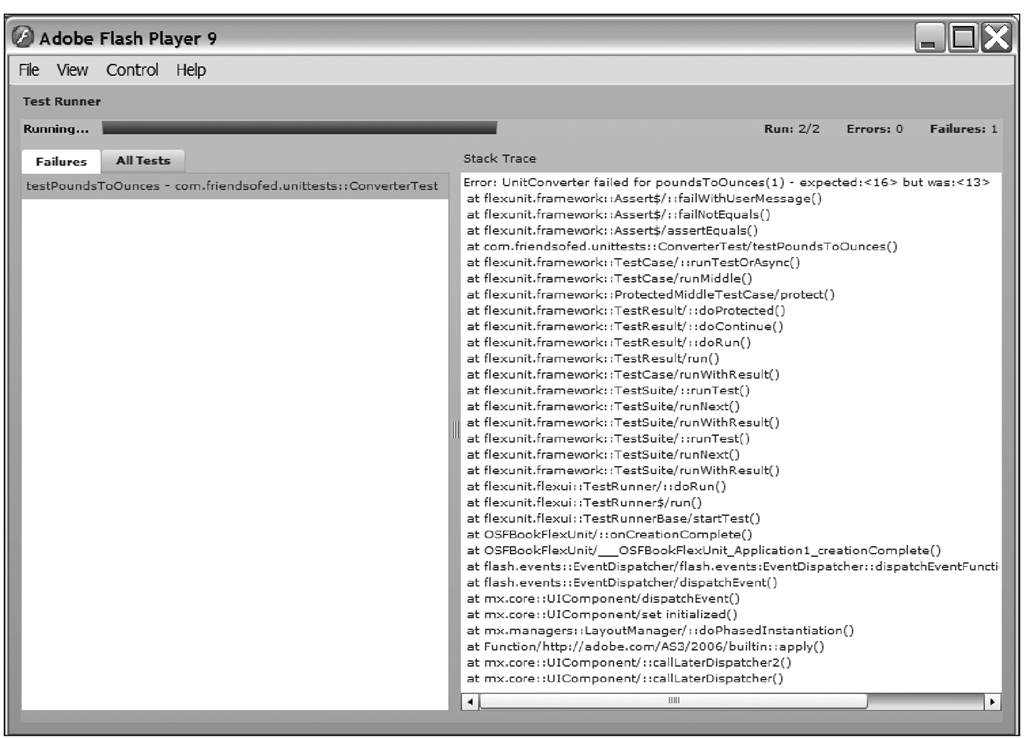
You should now be able to compile your unit test application and execute the resulting SWF. Since I intentionally made an error in the UnitConverter test, you should see output similar to Figure 5-6. In it, you can see that one of the unit tests has failed. Along with that information, you can see the expected value (16) vs. the actual reported value (13). A full stack trace is provided so you can find the class, function, and line on which the test failed. FlexUnit also stops the test on the first failure it finds, so if you had more tests after the failure, they’re not run until you fix the first problem.
Figure 5-6. FlexUnit displaying an error in the UnitConverter class
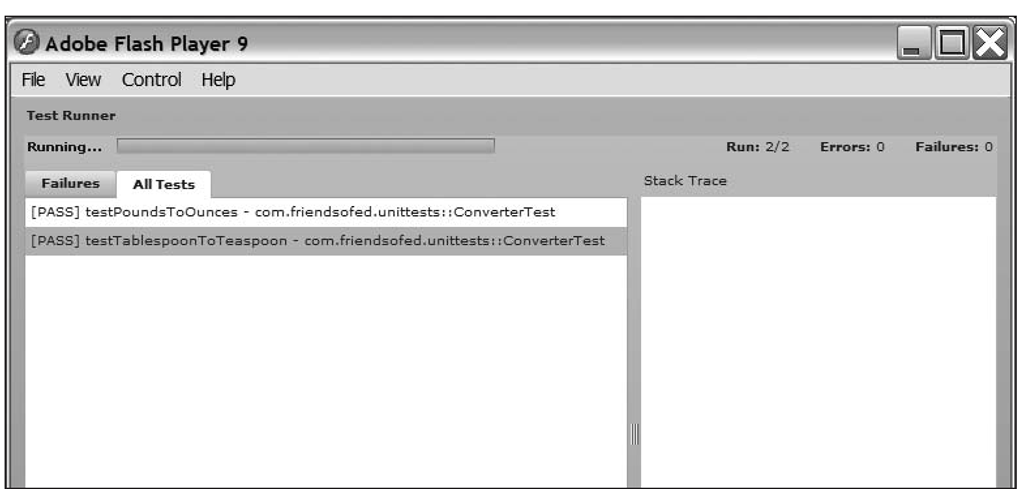
If you were to fix the UnitConverter test, recompile it, and run it again, the resulting output would resemble Figure 5-7.
Figure 5-7. A successful run of the unit tests
![tmpeeee-174_thumb[2] tmpeeee-174_thumb[2]](http://what-when-how.com/wp-content/uploads/2012/06/tmpeeee174_thumb2_thumb.png)
![tmpeeee-175_thumb[2] tmpeeee-175_thumb[2]](http://what-when-how.com/wp-content/uploads/2012/06/tmpeeee175_thumb2_thumb.png)
![tmpeeee-176_thumb[2] tmpeeee-176_thumb[2]](http://what-when-how.com/wp-content/uploads/2012/06/tmpeeee176_thumb2_thumb.png)
![tmpeeee-177_thumb[2] tmpeeee-177_thumb[2]](http://what-when-how.com/wp-content/uploads/2012/06/tmpeeee177_thumb2_thumb.png)
![tmpeeee-179_thumb[2] tmpeeee-179_thumb[2]](http://what-when-how.com/wp-content/uploads/2012/06/tmpeeee179_thumb2_thumb.png)
![tmpeeee-183_thumb[2] tmpeeee-183_thumb[2]](http://what-when-how.com/wp-content/uploads/2012/06/tmpeeee183_thumb2_thumb.png)
![tmpeeee-184_thumb[2] tmpeeee-184_thumb[2]](http://what-when-how.com/wp-content/uploads/2012/06/tmpeeee184_thumb2_thumb.png)
![tmpeeee-185_thumb[2] tmpeeee-185_thumb[2]](http://what-when-how.com/wp-content/uploads/2012/06/tmpeeee185_thumb2_thumb.png)
![tmpeeee-186_thumb[2] tmpeeee-186_thumb[2]](http://what-when-how.com/wp-content/uploads/2012/06/tmpeeee186_thumb2_thumb.png)
![tmpeeee-187_thumb[2] tmpeeee-187_thumb[2]](http://what-when-how.com/wp-content/uploads/2012/06/tmpeeee187_thumb2_thumb.png)
![tmpeeee-188_thumb[2] tmpeeee-188_thumb[2]](http://what-when-how.com/wp-content/uploads/2012/06/tmpeeee188_thumb2_thumb.png)
![tmpeeee-189_thumb[2] tmpeeee-189_thumb[2]](http://what-when-how.com/wp-content/uploads/2012/06/tmpeeee189_thumb2_thumb.png)
![tmpeeee-191_thumb[2] tmpeeee-191_thumb[2]](http://what-when-how.com/wp-content/uploads/2012/06/tmpeeee191_thumb2_thumb.png)
