2.13.
These are widely used for workshop and inspection purposes for checking out the roundness
of cylindrical workpieces and for marking centres accurately, etc. Generally the angle of V is 90°

Fig. 2.45. V-Block.
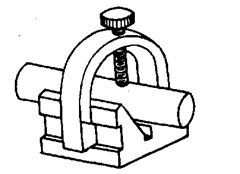
and these are available in wide variety of shapes. Sometimes clamps are also provided which bridge
the vee to secure the work. These are also supplied as matched pairs in which case two V-blocks
are of similar size and of the same grade of accuracy. In the case of V-blocks the working surfaces
are flanks of vees, base end faces, top and side faces. (Refer Fig. 2.45)
Depending upon the accuracy, IS : 2949—1964 specifies the V-blocks into two grades, viz.
grade A and grade B. As in the case of surface plates, here also the tolerance on flatness is defined
as the maximum permissible distance separating two imaginary parallel planes, within which the
surface under consideration can just be enclosed. Similarly the tolerance on squareness is defined
as the maximum permissible distance separating two imaginary parallel planes, (which are
perpendicular to the datum face of the part in question) within which the surface under considera-
tion can just be enclosed.
V-blocks are furnished by hand scraping process till they have a bearing area of not less than
20%. Any departure from flatness in case of vees should be a convexity and on other surfaces it
should be a concavity. In a direction parallel to the axis of the vee the departure from flatness should
be a concavity and not convexity.

Fig. 2.46 Fig. 2.47
Various forms of vee-blocks.

Fig. 2.48. Vee-Block with stirrup clamp.
Two types of V-blocks commonly used are shown in Fig. 2.46 and 2.47 Fig. 2.46 shows a
V-block having two vees, one of them being deeper and wider than the other. Fig. 2.47 shows a
larger vee block having one vee only. For special purposes such as checking triangle effects or taps
and other three-fluted tools, 120-degree included angle vee-blocks are also available.
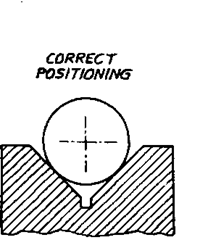
The major purpose of the vee-blocks is to hold cylindrical pieces, or move to the point, to
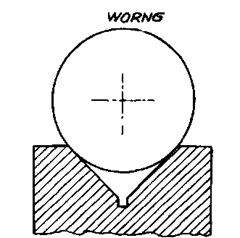
establish precisely the centre line or axis of a cylindrical piece. In using a vee-block, it is very
essential that the cylindrical piece should rest firmly on the sides of the vee and not on the edges
of the vee as in Fig. 2.50.
Before using a vee-block, first check it visually, or with the finger nail, for dents, edge nicks,
scratches and burrs which might either damage the surface plate or cause the vee-block to tilt
imperceptibly from true flat or vertical.

Fig. 2.49. Workpiece resting
firmly on the side of the vee.

Fig. 2.50. Workpiece resting
on the edge of vee.
Using a vee-block correctly.

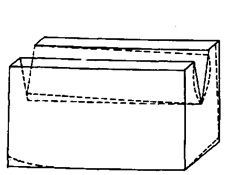
Fig. 2.51. Various inaccuracies
in a vee-block
Any vee-block should be checked periodically for basic accuracy. If it has rusted, or worn, or
warped a little ; or if it were made in-accurately ; its four sides and two ends may not be truly
parallel or square to each other. The vee channel may be out of parallel. Constant use with the same
size cylindrical workpieces wears hollows in the vee-sides. Some of possible types of inaccuracies
discoverable in a vee-block are indicated by the dotted lines in Fig. 2.51 with a dial indicator.
2.13.1.
Cast Iron Vee Block. Brief Specifications.
The Vee Blocks are made of close grained
high quality cast iron. They are accurately ground and numbered in pairs, so that the Vee-Grooves
to the same numbers are always in alignment.
Accuracy, (a) Accurately ground to 90 degrees square.
(b) Straightness within ± 0.001 mm per 20 mm length.
(c) Symmetisation of Vs within 0.002 mm per 20 mm length.
