2.15.
These are used for checking the straightness and flatness of parts in conjunction with the
surface plates and spirit levels. These may be made of steel or cast iron. Steel straight edges are
available up to 2 m length and may be rectangular in section with bevelled edge. C.I. straight edges
are made up to 3 m length and widely used for testing machine tool slide ways. They are heavily
ribbed and bow-shaped (camel back construction) to prevent distortion. These are provided with
feet for rest when they are idle to prevent distortion. Feet are placed at points of minimum deflection.
The straight edges are classified as follows : (Refer Fig. 2.53)
(i) Tool-maker’s straight edge,
(ii) Wide-edge straight edge,
(iii) Angle straight edge,
(iv) Box straight edge.
Tool maker’s straight edges have the highest accuracy and are available with various
cross-sections, from one to four working edges and length from 75 mm to 175 mm. Straight edges
with a single edge are used for checking straightness by sight test. The test consists of applying the
straight edges along the full length of the surface (whose straightness is to be checked) against a
bright back-ground. The absence of light between the straight edges and the surface indicates the
straightness of element. Deviation of 1 or 2 microns from the straightness can be detected by the
eye with some practice.
Flatness of a surface may be tested with single-edged straight edge by applying it in different
directions at different places on the tested surface. The flatness of the surface is judged by the light
showing through. A surface can also be tested by means of three and four edges type straight edges
by applying a light coat of prussian blue on the working edges and then drawing the straight edge
across the tested surface. Traces of the marking compound are rubbed in this way on the tested
surface and due to irregularities in the surface it will be coated in spots with different density. All
the high spots are painted more densely and the low spots are partly painted. The surface is then
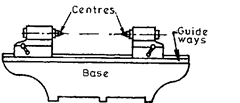
Fig. 2.52. Bench centre.
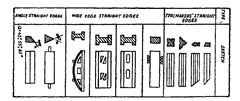
Fig. 2.53
scraped or ground until a uniform distribution of spots on the whole surface is obtained after
subsequent tests.
Straight edges with a wide working edge are used for testing large surfaces or surfaces with
large intermediate gaps or recesses. Such straight edges may have a length upto 0.6 metre, and
have a form of a rigid beam or frame in order to possess ample of rigidity to maintain the
straightness.
Angle straight edges are used for checking surfaces positioned at an angle in relation to each
other. Such straight edges have a triangular or trapezoidal cross-section and are from 250 to 1000
mm in length and usually have handles at their ends to facilitate their application. Surfaces are
usually tested with a marking compound as described above.
The recommended lengths of straight edges for bow shaped and I-section type are as follows.
(Refer Figs. 2.54 and 2.55)
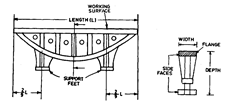
Fig. 2.54. Bow-shaped straight edge.
Lengths of bow-shaped straight edges (L): 300, 500, 1000, 2000, 4000, 6000 and 8000 mm.
Lengths of I-section straight edge (L): 300, 500, 1000, 2000, 3000, 4000 and 5000 mm
Bow-shaped straight edge has two feet of the same width as the working surface and these
are so located as to allow the straight edge to be used in 3 positions viz. resting upon the feet; with
the working surface downward ; and lying on either side. The accuracy requirements specified for
straight edge are applicable for all these three positions.

Fig. 2.55. I-section straight edge.
Usually two grades of accuracy (Grade A and Grade E) are specified. The working surface
and supporting feet of grade A straight edges are finished by scraping, and the working surfaces of
grade B and the side faces of all straight edge, are finished by smooth machining.
The proportion of bearing area of the working surface should not be less than 20% and 10%
respectively for grades A and B ; High spots should be uniformly distributed and the percentage of
bearing area should not be so high as to cause wringing. All sharp edges should be removed and
the unmachined parts painted.
The bearing area of the working surfaces should be flat to 0.001 mm per 100 mm of working
length for grade A and 0.002 mm per 100 mm of working length for grade B.
When a bow shaped straight edge rests on a flat base, the depths from working surface of
the straight edge to this base, measured immediately over each support foot, shall be equal to each
other to within the tolerances of 0.0001 mm per 100 mm of working length.
Any 300 mm length of each side face has to be flat to within 0.025 and 0.050 mm respectively
for grades A and B respectively.
The maximum tolerance on flatness over the whole length of straight edges is 0.05 mm for
grade A and 0.1 mm for grade B for lengths upto 4000 mm, and 0.1 mm and 0.2 mm (grades A and
B) respectively for lengths above 4000 mm.
The working surface and side faces have to be square to within 0.008 mm per 25 mm and
0.015 mm per 25 mm for grades A and B respectively.
2.15.1.
Accuracy.
According to IS : 2220—1962, straight edges have been divided into two
grades depending upon the accuracy of straightness (grade A and grade B). Grade A is intended to
be used for inspection purposes, and grade B for workshop purposes during manufacturing. As it
is generally more difficult to machine the ends of the straight edge accurately, it specifies two
lengths, i.e. working length and total length. The total length is greater than the working length
and the inspection is made without using the ends of the straight edge. This standard recommends
rectangular cross-section for total lengths upto 180 mm and I-section beyond total length of 340
mm. In case of I-section used for bigger lengths, the side face is slightly relieved in order to reduce
the weight. The straight edges beyond 340 mm total length are provided with drilled holes at
uniform intervals in order to reduce the weight still further. Generally the straight edges are
supported on two such points which results in the minimum natural deflection and these are at
distance of 2/9 total length of the straight edge from each end. When the straight edge is supported
at the points of best support, the error in the straightness of the working faces over its whole length
should not exceed (2 + 10L) microns for grade A and (5 + 20L) microns for grade JB ; where L is the
length in metres. In addition, the error over any length of 300 mm should not exceed five microns
for grade A and eight microns for grade B. Further the maximum error in parallelism should not
exceed 1.5 times the tolerance on their straightness. Further when the straight edge is supported
at its extreme points, then the natural deflection should not exceed 10 microns per metre of length.
It is also essential that the side faces of the straight edge be straight and parallel to each
other. The maximum error that can be tolerated in the straightness of the side faces is ten times
the error in straightness of working faces and the maximum tolerable error in the parallelism of
the two side faces is 15 times the error in straightness of the working faces. Further, the side faces
should be square also with the working faces to within one micron per millimetre of depth for grade
A and two microns per millimetre of depth for grade B straight edges.
The accuracy of straightness of the working faces of a straight edge is tested by direct
comparison with a master surface plate whose accuracy is already known. Two equal slip gauges
are placed on the surface plate just below the points of best support and straight edge on its edge
placed over the slip gauges. Then the gap between the lower working face of the straight-edge and
the surface plate is measured at various points by fitting slip gauges of appropriate length, which
gives an indication of the degree of parallelism along the length of straight edge.
2.15.2.
Tool Maker’s Straight Edges.
These are intended for very accurate work and are
available in the range of 15 to 300 mm length for tool room purposes. These have one working edge,
which is bevelled and very slightly rounded off (commonly known as a knife-edge).
These are made of suitable cast or wrought alloy steel free from defects and hardened, and
are suitably heat treated to remove the internal stresses resulting from the hardening process and
to give stability. The hardness adjacent to working edges is of the order of 650 HV.
The faces adjoining the working edges or the straight edges are ground flat. The working
face is very slightly rounded off to furnish the ‘knife-edge’. The working edges are finished by
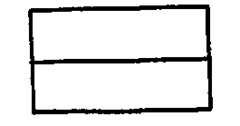
Fig. 2.56. Lengths 15 and 25 mm.
![]()
Fig. 2.57. Lengths 50 to 100 mm.
grinding and lapping and radius on the edge is made uniform from end to end. The sections of the
straight edges for length 15 and 25 mm, 50 to 100 mm and 150 to 300 mm are shown below. The
section of the straight edges for length between 25 and 50 mm can be either of shape given in Fig.
2.56 or Fig. 2.57. Similarly the sections of the straight edges for lengths between 100 mm or 150
mm can be either of shapes given in Fig. 2.57 or Fig. 2.58.

Fig. 2.58. Lengths 150 to 200 mm.
Recommended dimensions of straight edges are
| Length | Width | Thickness of flat portion |
| mm | mm | mm |
| 15 | 15 | 3 |
| 25 | 25 | 6 |
| 50 | 30 | 8 |
| 75 | 35 | 8 |
| 100 | 40 | 10 |
| 150 | 40 | 10 |
| 200 | 50 | 12 |
| 250 | 50 | 12 |
| 300 | 60 | 12 |
The accuracy of straight edge should be such that when placed against a well-illuminated
background on the tool maker’s flat or plate no white light should be visible. This applies for angle
upto 10° on either side of the normal.
For checking purposes, usually a flat back glass test plate is also provided with straight
edges.
2.15.3.
Steel or granite straight edges.
These are available in lengths of 300, 500,1000,
1500 and 2000 mm with corresponding depth and thickness varying from 40 to 125 mm and 6 to
13 mm for grade A steel straight edges, 30 to 80 mm and 5 to 12 mm for grade B steel straight
edges, and from 75 to 150 mm and 25 to 50 mm for granite straight edges.
2L
The handling slots are provided — away from each end as shown in Fig. 2.59. The side
surfaces can be slightly relieved (I-section) to reduce weight.

Fig. 2.59
Important accuracy requirements for these straight edges are:
(i) straightness tolerance of working face
(ii) tolerance on parallelism of working face
(iii) combined flatness and parallelism of side faces
(iv) squareness of side faces to working faces.
2.15.4.
Generation of Straight Edge.
A method commonly used for generation of straight
edges requires two blanks clamped together side by side and the edges machined. These edges are
then smeared with a marking compound and while still together, rubbed with a small flat block as
shown in Fig. 2.60. This reveals any high spots, which are removed. The process of marking and
correcting is continued until the edges are accurately matched. The plates are then separated and
placed edge to edge as illustrated in Fig. 2.61. Marking compound is applied to one of the edges and
the high spots located by relative sliding of the two plates. The widths of the gaps between the two
edges are equal to twice the error in straightness as shown exaggerated in Fig. 2.62, which helps
to locate the high spots more accurately. After matching in this position, they are again placed side
by side and corrected for high spots. Testing edge to edge and side by side is repeated until the
required accuracy of straightness is attained. A final check is made by reversing one of them end

Method of generating straight edges.
for end and subjecting it to be corrected by scraping. For hardened steel, a small stone or lap must
be used, the latter being preferable during the concluding stages, when only small amounts of metal
are to be removed.
2.15.5.
Box Straight Edge.
Fig. 2.63 shows a side view of box type straight edge and the
method of creating a perfect box. The Important features of such a straight edge are : rigid cross
section to minimise deflection in all directions,
a symmetry and uniformity which minimises
distortion when the straight edge is subjected
to uneven temperature distribution; a 90° form
and straightness which are self-proving both in
fabrication and in use.
For scraping the master straight edge,
first side 1 is matched to the master surface
plate (Refer Fig. 2.64). Side 2 is also matched
and, by means of a thickness check, is scraped
parallel to side 1. Inspection is done using
master surface plate as a flat datum and an
indicator stand with knife edge. Side 3 is
scraped square to sides 1 and 2. The knife edge
on the indicator stand is pressed against the
lower area of side 3. Any out-of-squareness is
revealed as half the difference of the indicator
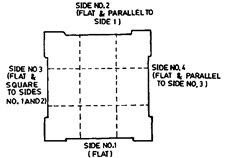
Fig. 2.63. Box straight edge.
readings when the straight edge is turned over (18°), to side 2 and compared again. For highest
accuracy and in order to avoid local flatness errors in the master surface plate, the straight edge
should be turned end-of-end, as well as through 180° so that the position of the indicator on the
surface plate is not altered.
Once 3 is completed, side 4 is scraped parallel to it, which means that side 4 is automatically
square to side 1 and 2.
Thus both straightness and squareness are developed from the surface plate.
2.15.6.
Using a Straight Edge.
In fairly coarse measuring situations the deviation of a
surface from the mean true plane can be approximately determined, as shown in Fig. 2.65. The
irregular gap between the straight edge and the surface being tested can be determined by the use
of feeler gauges as shown in Fig. 2.65.
Small components can be tested with a
precision straight edge as shown in Fig. 2.66. The
light box provides a means of uniform illumina-
tion that is independent of the angle of viewing.
Any error of flatness in the component will leave
a gap through which a strip of light will be visible
between the straight edge and the component.
With practice the error of straightness can be
estimated by the ‘quality’ of the light seen.
The colour of light is white for gap greater
than 0.002 mm and tinted for gap between 0.001
and 0.002 mm.
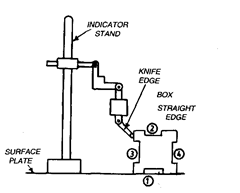
Fig. 2.64. Developing squareness using surface plate.
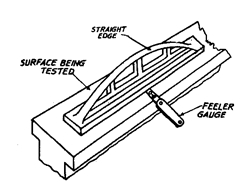
Fig. 2.65. Use of straight edge in conjunction
with feeler gauges.
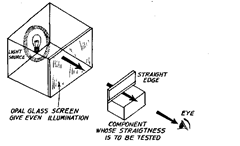
Fig. 2.66. Use of straight edge in conjunction
with light box.
