2.16.
Spirit levels are used for measuring small angle or inclinations and also enable the position
of a surface to be determined with respect to the horizontal.
A spirit level consists of a sealed glass tube, ground on its inside surface to a convex form
with a large radius of curvature R. A scale is engraved on the glass at the top of the tube. The tube

Fig. 2.67
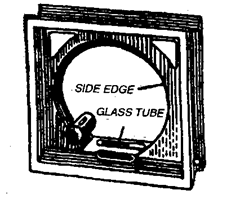
Fig. 2.68. Frame spirit level.
is nearly filled with ether such that only a small volume remains at the top part of the tube which
contains ether vapours in the form of a bubble.
The machinist’s level consists of a body with a flat base surface and the glass tube (described
above) mounted in the upper part of the body. (Refer Fig. 2.67)
For checking the vertical surfaces, a frame level shown in Fig. 2.68 is employed.
The side edges of the frame level are made strictly square with the base. A glass tube filled
with ether is mounted in the base. For checking the vertical surfaces, the side edge of the frame
level is placed into exact contact with the surface and reading of the bubble noted down. The position
of the frame level in transverse direction is checked by another less accurate tube.
2.16.1.
Principle.
The glass tube is set in the base and adjusted in such a way that when
the base is horizontal the bubble rests at the centre of the scale which is engraved on the glass.
When the base of the level is moved out of the
horizontal, the bubble tries to remain at the
highest point of the tube and thus moves along
the scale. The relations between the move-
ment of bubble and other conditions involved
are as follows :
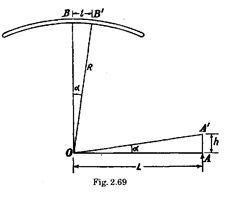
In Fig. 2.69, B is the top of the tube
radius and the position of the bubble when the
base is at OA (horizontal). If the base is tilted
through an angle a and base occupies position
OA’, the bubble will move a distance 1 to B’,
where angle BOB’ = a. If R is the radius of the
tube then
![]()
If L is the length of the base and h is
the difference in height between its ends, then
for small value of h,
![]()
(One radian equals 206,265 seconds
of an arc)
From above relation it is obvious
that the sensitivity of the level increases as
R increases.
The scale spacing or the distance
between adjacent graduation is generally
about 2 mm and thus for

The inclination of 2″ causes bubble
movement of 2 mm. This is the sensitive
spirit level and is recommended for
research laboratory.
For highly precise shop measurements, spirit levels with scale division value of 4 to 10 are
employed. For ordinary purposes, scale division values of the order of 10 to 40 are sufficient.
It may be noted that spirit levels are very sensitive to variation in the temperature of their
surroundings, since they change the tension of ether vapours in the tube. As such the spirit level
should be used in controlled temperature conditions, or else precise spirit levels equipped with
various devices that compensate for errors due to temperature changes be used.
2.16.2.
Types of Spirit levels.
According to BS 1958, three types of spirit levels are
recommended.
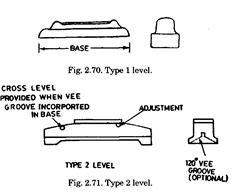
Type 1. (Refer Fig. 2.70) This type of level has an unrelieved flat base of steel, hardened and
lapped. The advantage of lapped base is that the effective length of the level can be varied by
wringing two gauge blocks on the base
at the desired distance apart. The
base length of spirit level varies be-
tween 100 to 200 mm.
Type 2 (Refer Fig. 2.71) level is
mounted in cast iron or steel body,
(with base length 250-500 mm)
having a base formed with feet bear-
ing surfaces at the two ends (middle
portion being relieved). The bearing
surface may be plain or contain a lon-
gitudinal 120° vee groove for use on
cylindrical surfaces, in which case a
short cross-level or small circular
level is provided.
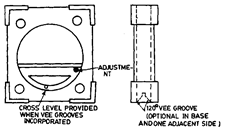
Fig. 2.72. Type 3 level.
Type 3 (Refer Fig. 2.72) level is a square block level about 200 mm square and made of cast
iron. The four bearing surfaces are flat and may have the middle portion relieved. Alternatively,
the base and one adjacent-surface may contain a longitudinal 120° vee groove for use on cylindrical
surfaces in which case a short cross-level is provided.
2.16.3.
Electrical Level.
This is a type of precision level in which the usual spirit vial is
replaced by a pendulum whose displacements are electrically amplified and shown on a separate
meter.
2.16.4.
Electronic Precision Levels with Digital Readout.
For levelling and checking
flat and cylindrical surfaces on machinery with high accuracy. Convenient manipulation. Clear and
high contrast digital display assures good readability. Large measuring range permits checking of
work even when still very much inclined. Therefore one electronic precision level will replace several
levels of conventional design having different accuracies. Levelling of machines or surface plates is
thus considerably simplified and accelerated.
Housing made of high quality, wear resistant cast iron. V-surface and flat contact surface
precision ground. With fine setting of digital display. (Refer Fig. 2.73)
Typical Specification
Length 200 mm
Numerical division 0,01 mm/m
Measuring range ± 1,99 mm/m
Digital display LCD
Stability of indication after 3 sec
Max. measuring error s + 5% of indicated measuring value
Repeatability =s 5 |xm/m
Range of zero setting . ± 1,75 mm/m
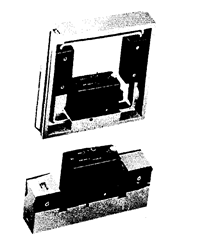
Fig. 2.73. Electronic precision level.
