16.5.
Before carrying out the alignment tests, the machine is properly levelled in accordance
with the manufacturer’s instructions. The various tests performed are :
1. Flatness of clamping surface of base. (Refer Fig. 6.17).
The test is performed by placing a straight edge on two gauge blocks on the base plate in various positions and the error is noted down by inserting the feeler gauges. This error should not exceed 0.1/1000 mm clamping surface and the surface should be concave only.
2. Flatness of clamping surface of table.
This test is performed in the same manner as test (1), but on the table. The permissible error is also same.
3. Perpendicularity of drill head guide to the base plate.
The squareness (perpendicularity) of drill head guide to the base plate is tested :
(a) in a vertical plane passing through the axes of both spindle and column, and
(b) in a plane at 90° to the plane at (a).
The test is performed by placing the frame level (with graduations from 0.03 to 0.05 mm/m) on guide
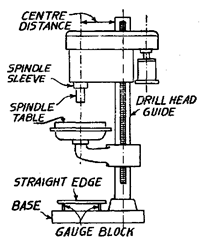
Fig. 16.17. Checking flatness of clamping surface of base.
column and base plate and the error is noted by noting the difference between the readings of the two levels. This error should not exceed 0.25/1000 mm guide column for (a) and the guide column should be inclined at the upper end towards the front only, and 0.15/1000 mm for (b).
(Please note that Fig. 16.18 shows the similar test for the squareness of drill head guide with table, the only difference being that the frame level is to be placed on the base instead of table).
4. Perpendicularity of drill head guide with table.
This test is performed exactly in the same way as (b). (Refer Fig. 16.18) and the permissible error is also same.
5. Perpendicularity of spindle sleeve with base plate.
This test is performed in both the planes specified in test (3) and in the similar manner with the difference that the frame levels are to be placed on spindle sleeve and base plate. The error (i.e., the difference between the readings of the two levels) should not exceed 0.25/1000 mm for plane (a) and the sleeve should be inclined toward column only ; and 0.15/1000 mm for plane (b).
6. True running of spindle taper.
For this test, the test mandrel is placed in the tapered hole of spindle and a dial indicator is fixed on the table and its feeler made to scan the mandrel. The spindle is rotated slowly and readings of indicator noted down. The error should not exceed 0.03/100 mm for machines with taper upto Morse No. 2 and 0.04/300 mm for machines with taper larger than Morse No. 2.
7. Parallelism of the spindle axis with its vertical movement.
This test is performed into two planes CA) and (B at right angles to each other. The test mandrel is fitted in the tapered hole of the spindle and the dial indicator is fixed on the table with its feeler touching the mandrel. The spindle is adjusted in the middle position of its travel. The readings of the dial indicator are noted when the
spindle is moved in upper and lower directions of the middle position with slow vertical feed mechanism.
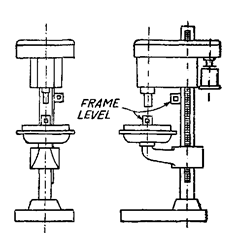
Fig. 16.18. Test for perpendicularity of drill head with table.
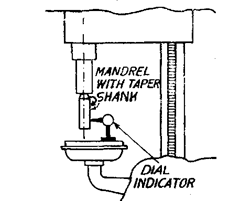
Fig. 16.19
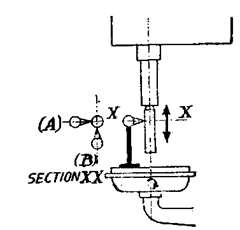
Fig. 16.20
For machines with taper upto Morse No. 2.
For machines with taper larger than Morse No. 2.

(Lower end of mandrel can be inclined towards column only).
8. Squareness of clamping surface of table to its axis.
For performing this test, the dial indicator is mounted in the tapered hole of the spindle and its feeler is made to touch the surface of table (Refer Fig. 16.21). Table is slowly rotated and the readings of dial gauge noted down, which should not exceed 0.05/300 mm diameter.
9. Squareness of spindle axis with table.
For this test a straight edge is placed in positions AA’ and BB’. Work table is arranged in the middle position of its vertical travel. The dial indicator is mounted in the spindle tapered hole and its feeler made to touch the straight edge first say at A and reading noted down. The spindle is rotated by 180° so that the feeler touches at point A’ and again reading is noted down. The difference of two readings gives the error in squareness of spindle axis with table. Similar readings are noted down by placing the straight edge in position BB’.
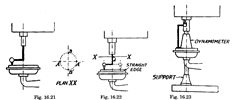
The permissible errors are 0.08/300 mm with lower end of spindle inclining towards column only for set up AA’ and 0.05/300 mm for set up BB’.
10. Total deflection.
For this test, the drill head and table are arranged in their middle position. Dial indicator is mounted on table with its feeler touching the lower machined surface part and spindle stock as shown in Fig. 16.23.
Drill spindle is loaded with the dynamometer (load gauge) placed on table and the deflection of dial indicator noted down. The drill spindle pressure is set in accordance with the table on sideways.
| Drilling Diameter in Open Hearth Steel | kg |
| 6 | 100 |
| 10 | 200 |
| 16 | 350 |
| 20 | 550 |
| 25 | 750 |
| 32 | 950 |
| 40 | 1200 |
| The permissible error is | |
| for centre distance upto | |
| and including | |
| 0.4 mm | 200 mm |
| 0.6 mm | 200-300 mm |
| 0.8 mm | 300-400 mm |
| 1.0 mm | 400 and above mm |
