Parent in Place
The Parent in Place button is an on-off switch. When activated, it lets you parent (or unparent) items (objects, lights, etc.) to other items, while preserving their keyframed positions and rotations. Parenting and unparenting with this option disabled can cause items to move in unwanted ways.
You’ll access and use these key tabs and menus often, which you’ll see as you work your way through various tutorials in this topic. First, read on to learn about the tool categories of the six main menu tabs in Layout.
Items Tab
Across the top of the Layout interface are the six key menu tabs you’ll also find yourself accessing often. The first is the Items tab (much like Modeler’s Create menu tab), which is where you can find the simple item controls, as shown in Figure 2.38. Here, you find one-click load tools, which replace, add, and delete functions. In previous versions of LightWave,it took a number of clicks to access these tools, and after a while, it became a bit annoying.
Load
The first category you see within the Items tab is labeled Load. Tools within the category let you load a scene, which is an entire project containing lights, motions, and objects. You can also just load an object into your scene with the Load Object button. Loading an object is the way to begin creating a scene. Loading new content overwrites whatever you have in Layout, so be sure to save before you load. The category also contains a button for the previously discussed Load Items from Scene command, found under the File drop-down menu, and the Object Layer button. This allows you to load just a specific layer of an object. Let’s say you create a complex living room, with 12 layers. Layer 5 contains that awesome flat panel plasma television you modeled (because your spouse won’t let you buy it!). To load it, select Object Layer and choose the object, and then choose the layer in the requester that appears.
Figure 2.38
Layout’s Items menu tab and its toolset, which allows you to load scenes and replace, add, and delete objects.
Note
When working in Layout, you’ll often reload work you’ve already created.When you apply textures to your objects, you need to be sure to use the Save All Objects command from the File drop-down menu.This saves any textures or surface settings to your objects. Saving the scene alone does not save the surfaces on objects. Saving the scene only saves motion data, light data, and whatever elements you’ve added to the scene. Colors and textures are saved with objects. Therefore, when you reload your objects, the textures and surfaces you’ve applied will load as well.
Add
With the Add category of the Items tab, you can easily add items to your scene. These items include Null objects—single points that do not show up in the render but rather help facilitate control throughout your animations—which are useful for parenting, grouping, and effects. Tools in the category also make it easy to add dynamic objects, such as particle emitters, wind, gravity, and collision items. Also within the Item’s tab’s Add category are tools with which you can mirror and clone selected items at the click of a button.
Replace
Replacing objects is easier than ever before with the Replace category under the Items menu. Perhaps you need to replace a simple stand-in object with a high-polygon model for final rendering. Not a problem; just select the item and choose Replace. Also, tools here let you rename any item, including lights, cameras, and other objects.
Delete
The Delete category within the Items tab can be used to quickly clear a selected item or group of items all at once. Use this category for quick-click deletions.
Modify Tab
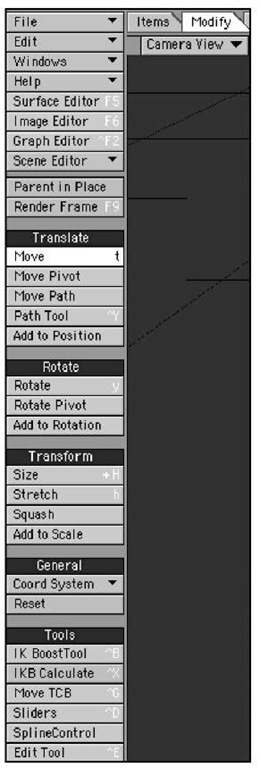
You might find that you visit the Modify tab often while working in Layout. Of course, you’ll see the same familiar eight menus at the top, starting with the File menu. But if you look further down as in Figure 2.39, you’ll see five categories of tools.
Translate
The first category, Translate, houses several Move tools. These are all translate-type functions, as in Modeler. Use them for any item in Layout from bones to objects to lights. It’s best to learn their keyboard equivalents too, such as the t key for Move.
Figure 2.39
The Modify tab contains some of Layout’s most frequently used tools.
Rotate
You’ll find the Rotate tools just below the Translate tools. You can rotate any item and specify its pivot point. You’ll learn about pivot points during the tutorials in the topic.
Transform
Not to be confused with Translate, the Transform category offers various sizing tools, including Squash and Stretch.
General
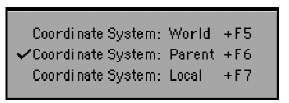
The next tool category under the Modify tab is quite important to your workflow. Although the category title says General, the options within this category are anything but! They’re more global than they are general. You’ll find options for the Coordinate System,which determines how an item in Layout is controlled in relationship to the 3D world that is Layout. Earlier in the topic, we characterized LightWave Layout as a big, invisible sphere in which you work. When you change the Coordinate System, you tell LightWave to adjust the relationship between the world’s coordinates and the items. Figure 2.40 shows the Coordinate System selections. You’ll also find the Reset but-ton.
Figure 2.40
The Coordinate System tool category within the Modify tab enables key changes used in animation.
This is handy for keeping track of your items.. Let’s say you move your camera around, and then at some point, lose track of it. This can happen with any item, even a light. If you first select Rotate (also from the Modify tab) and then click Reset, the rotation resets to the 0,0,0, setting. The same applies for Move. Keep this in mind when you’re ready to scrap what you’ve done and start again without redoing your entire scene.
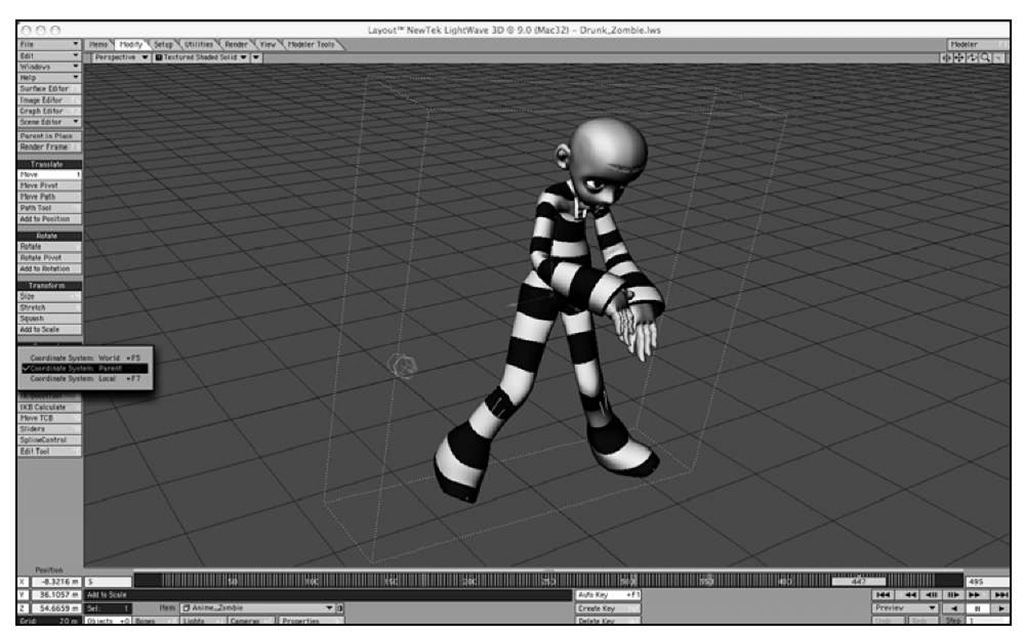
To better understand the Coordinate System, look at Figure 2.41. This is the default LightWave layout, where the X-axis is left and right, the Y-axis is up and down, and the Z-axis is forward and back.
The object in the scene, the zombie, has default coordinates set to Parent in the Modify tab. That means the object’s coordinate axes, represented by the arrow-shaped red, green and blue handles you use to move it along each axis, align with those of the overall layout. The object’s green Y-axis handle stands vertically; its red X-axis handle lies down to the side, for left and right; and its blue Z handle points toward the back of the Layout interface.
Figure 2.41 LightWave Layout, with the default Coordinate System set to Parent.
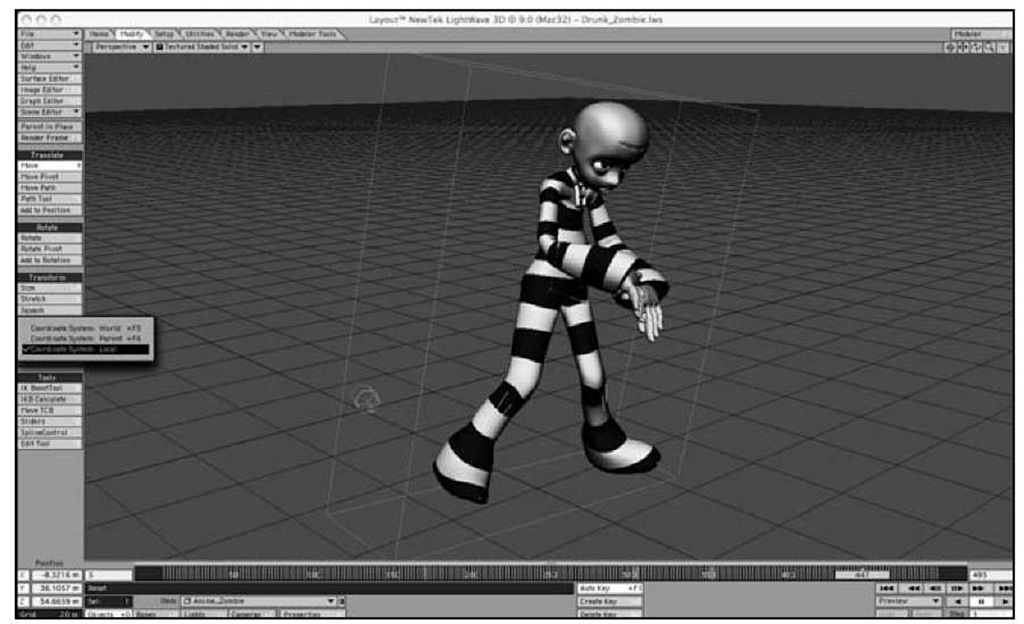
Now look at Figure 2.42. in which the Coordinate System is set to Local. This makes the object’s control handles align with its own X- Y- and Z-axes, rather than those of the scene. The zombie object is rotated so that it’s leaning forward within the scene; if you use its green Y-handle to move it upward, it will rise at an angle relative to the overall scene, rather than straight up and down.
Figure 2.42 The object is rotated, and the Coordinate System is set to Local.
You’ll use this feature often when working with bones for character animation, as well as mechanical animations. Many times, when setting up hierarchies of parented objects you’ll need to change between Parent, World, and Local. Parent and World coordinates are essentially the same thing, except that if your object is parented to another item, it takes on that item’s coordinates.
As you work through the tutorials, you’ll see how this all comes into play. But remember: As you’re setting up your animations, if something does not rotate or move the way you want it to, look to the Coordinate System in the Modify tab.
Tools
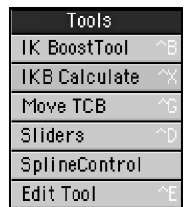
Finally, the Tools category found under the Modify tab is the location of some very powerful tools. As you can see in Figure 2.43, these tool names aren’t as self-descriptive as the Translate or Rotate tools. These commands are some of LightWave’s most important features.
Figure 2.43
The Tools category is home to the IK Boost Tool, as well as Move TCB and others.
IK Boost Tool
The "IK" in IK Boost Tool stands for inverse kinematics. It is a powerful new system primarily used for, but not limited to, character animation. What is inverse kinematics? In the simplest explanation, it is a system for determining how characters move based on the positions of their limbs and joints, much like a marionette on strings: When you move the string attached to a puppet’s hand, its arm follows, moving in a specific way based on the length of the forearm and upper arm and position of its wrist, elbow, and shoulder joints. That’s it! You’ll be setting up your own IK in the upcoming character animation topics.
The IK Boost Tool applies IK to a hierarchy of joined objects or bones, and allows you to instantly set parameters, limits, and controls for every aspect of your hierarchy.
IKB Calculate
After you’ve set up inverse kinematics and bone options with the IK Boost Tool, you can simply click the IKB Calculate button to "capture" movements generated through inverse kinematics in the form of animation keyframes. This is used for bone dynamics especially.
Move TCB Tool
The Move TCB command is sort of a new incarnation of an old feature. When you create a motion path with an object, LightWave creates a curve. Tension, Continuity, and Bias (TCB) are settings you can adjust for each keyframe on a motion curve. A common application is to set a positive tension for the keyframe at the end of a motion, to make the moving object "ease into" place. If this has always been possible in LightWave, then what’s the big deal about the Move TCB button? Up until now, you had to open the Graph Editor, select the specific channel(s) to edit, and apply the appropriate T, C, or B settings. Now, you can use the Move TCB tool directly in Layout. You can see your settings down at the bottom left of the Layout interface in the Info area. All you need to do is press Ctrl+g for the selected item to activate, then click and drag in the Layout to set Tension, hold Ctrl and drag to set Continuity, then right-click for Bias.
Sliders
The Sliders tool lets you attach slider controls to items in your scene for specific control over their behaviors. This is helpful during character animation or precise movements where you only want an item to move between two specific ranges. A slider allows you to set minimum and maximum values for a specific action or behavior. Then, as you work out the details of your animation, you can simply drag the slider to adjust the attribute within that range. This works on move, rotate, size, and so on.
Spline Control
Spline Control is a tool that, when active, allows you to see a visible and controllable motion path for a specific item. Select the item and turn on Spline Control, and you can click and drag on the control handles that appear in Layout to change the shape of the object’s motion path.
Edit Tool
Click this little bugger and you’ll find that it seems to disable any movements in Layout. But wait! It is actually a very cool little tool. Let’s say you added a particle emitter to Layout. Click the Edit Tool, and your particles will be identified numerically. You can then select any one of those particles and move it or delete! This is great for those annoying particles that won’t behave or that just don’t belong. Get rid of them, we say!
Setup Tab
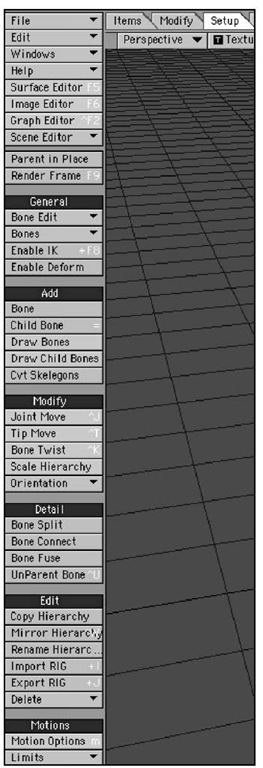
The Setup tab in Layout is your pit stop for all things skeletal—that is, this is where you find controls for bones. Figure 2.44 shows the menu with its tools.
General
Yes, there is another General category—this time it’s under the Setup tab, and we’re talking about deformation tools. The General category offers bone tools such as Bone Edit functions, and global settings for activating (or deactivating) bones and inverse kinematics.
Figure 2.44 The Setup tab in Layout is where you find all the tools needed to work with bones, LightWave’s deformation tools, and the Layout equivalent of Skelegons.
Note
Bones are deformation tools, meaning they deform your objects—not only animated characters but also such items as a curtain blowing in the wind, or the pages of a topic curling. Throughout the character animation topic, you’ll find yourself guided to these tools for adding bones, editing bones, splitting them, and much more.When you create Skelegons in Modeler for an object, they are converted to bones in Layout.You control, edit, and adjust those bones in the Setup tab.

