In This Chapter
Extracting data from drop-down lists
Managing multiple-selection lists
Getting data from check boxes
Getting information from radio groups
Validating input with regular expressions
Using character, boundary, and repetition operators
Working with pattern memory
It’s very nice to be able to get input from the user, but sometimes users make mistakes. It’d be great if some better ways existed to make the user’s job easier and prevent certain kinds of mistakes.
Of course, there are tools for exactly that purpose. In this chapter, you get the lowdown on two main strategies for improving user input: specialized input elements and pattern-matching. Together, these tools can help you ensure that the data the user enters is useful and valid.
Getting Input from a Drop-Down List
The most obvious way to ensure that the user enters something valid is to supply valid choices. The drop-down list is an obvious and easy way to do this, as you can see from Figure 7-1.
The drop-down list box approach has a lot of advantages over text-field input:
The user can input with the mouse. This is faster and easier than typing.
No spelling errors. That’s because the user doesn’t have to type the response.
All answers are available. The user knows which responses are available, because they’re in a list.
You can be sure it’s a valid answer. That’s because you supplied the possible responses.
User responses can be mapped to more complex values. For example, you can show the user “red” and have the list box return the hex value
“#FF0000″.

Figure 7-1:
The user selects from a predefined list of valid choices.
If you need a refresher on how to build a list box with the XHTML select object, please refer to Bonus Chapter 2 on either of the
Building the form
It’s best to create the HTML form first, because it defines all the elements you’ll need for the function. The code is a standard form:
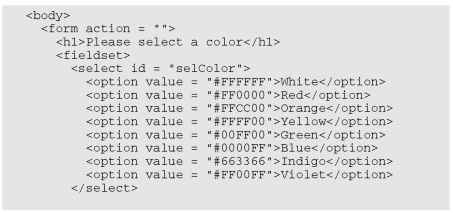

The select object’s default behavior is to provide a drop-down list. The first element on the list is displayed, but when the user clicks the list, the other options appear.
A select object that will be referred to in code should have an id field.
In this and most examples in this chapter, I added external CSS styling to clean up each form. Be sure to look over the styles on the if you want to see how styling was accomplished.
The other element in the form is a button. When the button is clicked, the changeColor() function will be triggered.
Because the only element in this form is the select object, you might want to change the background color immediately without requiring a button press. You can do this by adding an event handler directly onto the select object, like this:
![]()
This will cause the changeColor() function to be triggered as soon as the user changes the select object’s value. Typically you only do this if select is the only element in the form. If there are several elements, processing doesn’t usually happen until the user signals she’s ready by clicking a button.
Reading the list box
Fortunately, standard drop-down lists are quite easy to read. Here’s the JavaScript code:


As you can see, the process for reading the select object is much like working with a text field:
1. Create a variable to represent the select object.
The document.getElementByIdO trick works here just like it does for text fields.
2. Extract the value property of the select object.
The value property of the select object will reflect the value property of the currently selected option. So, if the user has chosen “yellow”, the value of selColor will be “#FFFF0 0″
3. Set the document’s background color.
Use the DOM mechanism to set the body’s background color to the chosen value.
Managing Multiple Selections
The select object can be used in a more powerful way: Figure 7-2 shows a page with a multiple-selection list box. To make multiple selection work, you have to make a few changes both to the HTML and the JavaScript code.
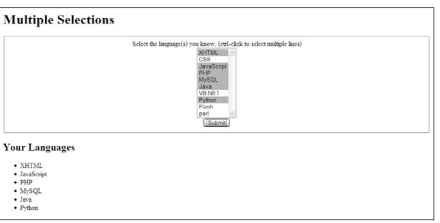
Figure 7-2:
You can pick multiple choices from this list.
Coding a multiple-selection select object
You’ll have to modify the select code in two ways to make multiple selections:
Indicate multiple selections are allowed. By default, select boxes have only one value. You’ll need to set a switch to tell the browser to allow more than one item to be selected.
Make it a multi-line select. The standard drop-down behavior doesn’t make sense when you want multiple selections, because the user has to see all the options at once. Most browsers switch into a multi-line mode automatically — but you should control the process directly just to be sure.
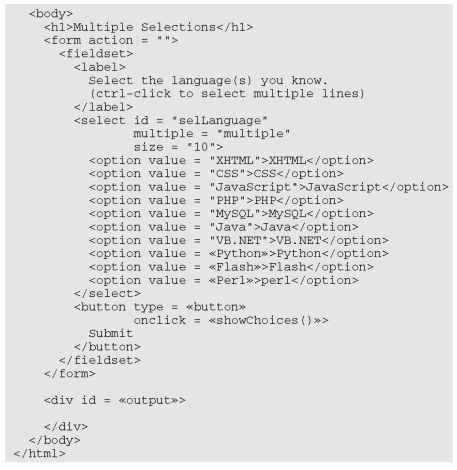
The XHTML code for multiSelect.html is similar to the drop-downList page, but note a couple of changes:
The code isn’t shocking, but it does have some important features to recognize:
The select object is called selLanguage. As usual, the form elements need an id attribute so you can read it in the JavaScript.
Add the multiple = “multiple” attribute to your select object. This tells the browser to accept multiple inputs using Shift-click (for contiguous selections) or Control-click (for more precise selection).
Set the size to 10. The size indicates the number of lines that will be displayed. I set the size to 10 because I have 10 options in the list.
Make a button. With multiple selection, you probably won’t want to trigger the action until the user has finished making selections. A separate button is the easiest way to do this.
Create an output div. Something has to hold the response.
Writing the JavaScript code
The JavaScript code for reading a multiple-selection list box is a bit different than the standard selection code. The value property will only return one value, but a multiple-selection list box will often return more than one result.
The key is to recognize that a list of option objects inside a select object is really a kind of array. You can look more closely at the list of objects to see which ones are selected. That’s essentially what the showChoices() function does:
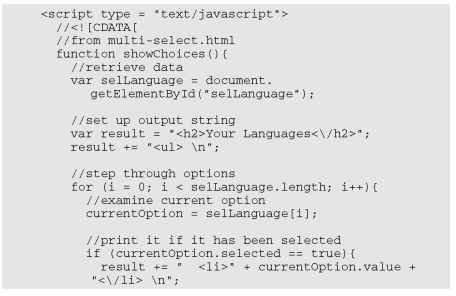
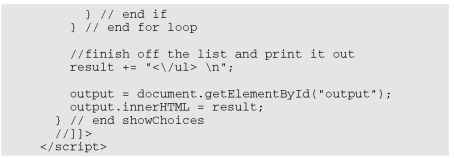
At first the code seems intimidating, but if you break it down, it’s not too tricky.
1. Create a variable to represent the entire select object.
The standard document.getElementByIdO technique works fine:
![]()
2. Create a string variable to hold the output.
When you’re building complex HTML output, it’s much easier to work with a string variable than to directly write code to the element:
![]()
3. Build an unordered list to display the results.
An unordered list is a good way to spit out the results, so I create one in my result variable:
![]()
4. Step through selLanguage as if it were an array.
Use a for loop to examine the list box line by line:
![]()
Note that selLanguage has a length property like an array.
5. Assign the current element to a temporary variable.
The currentOption variable will hold a reference to the each option element in the original select object as the loop progresses:
![]()
6. Check to see if the current element has been selected.
Here currentOption is an object, and it has a selected property. This property tells you if the object has been highlighted by the user. selected is a Boolean property, so the only possible values are true or false.
![]()
7. If the element has been selected, add an entry to the output list.
If the user has highlighted this object, create an entry in the unordered list housed in the result variable:
![]()
8. Close up the list.
When the loop has finished cycling through all the objects, you can close up the unordered list you’ve been building:
![]()
9. Print results to the output div.
The innerHTML property of the output div is a perfect place to print out the unordered list:
![]()
There’s something strange going on here. The options of a select box act like an array. An unordered list is a lot like an array, which is a lot like a select box. Bingo! They are arrays, just in different forms. Any listed data can be thought of as an array. Sometimes you organize it like a list (for display), sometimes like an array (for storage in memory,) and sometimes it’s a select group (for user input). Now you’re starting to think like a programmer!
Check, Please — Reading Check Boxes
Check boxes fulfill another useful data-input function: They’re useful any time you have Boolean data. If some value can be true or false, a check box is a good tool. Figure 7-3 illustrates a page responding to check boxes.
It’s important to understand that check boxes are independent of each other. Although they are often found in groups, any check box can be checked or unchecked regardless of the status of its neighbors.
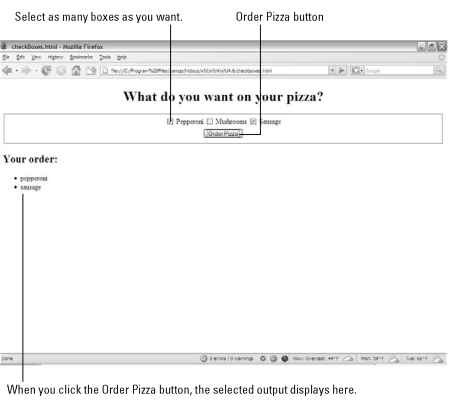
Figure 7-3:
You can pick your toppings here. Choose as many as you like.
Building the checkbox page
As usual, start by looking at the HTML:
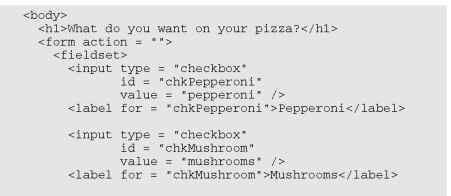
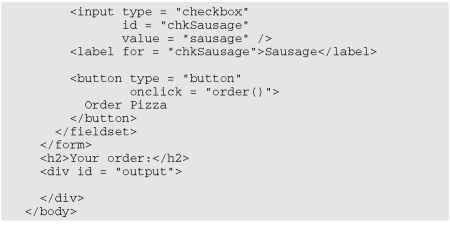
Each check box is an individual input element. Note that checkbox values are not displayed. Instead, a label (or similar text) is usually placed after the check box. A button calls an order() function.
Look at the labels. They each have the for attribute set to tie the label to the corresponding check box. Although this is not required, it’s a nice touch, because then the user can click the entire label to activate the check box.
Responding to the check boxes
Check boxes don’t require a lot of care and feeding. When you extract a checkbox object, it has two critical properties:
The value property: Like other input elements, the value property can be used to store a value associated with the check box.
The checked property: This property is a Boolean value, indicating whether the check box is currently checked.
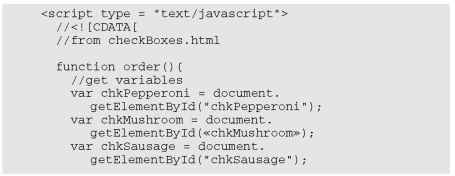
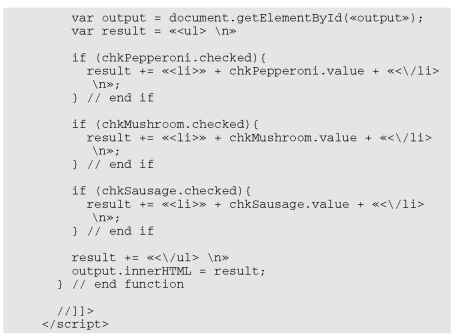
The code for the order() function shows how it’s done:
For each check box, make sure you use both of its properties:
1. Determine whether the check box is checked.
Use the checked property as a condition.
2. If the box is checked, return the value property associated with the check box.
Often in practice the value property is left out. The important thing is whether the check box is checked. It’s pretty obvious that if chkMushroom is checked, the user wants mushrooms, so you may not need to explicitly store that data in the checkbox itself.
Working with Radio Buttons
Radio-button groups appear to be pretty simple, but they are more complex than they seem. Figure 7-4 shows a page using radio-button selection.
The most important rule about radio buttons is that — like wildebeests and power-walkers — they must be in groups. Each group of radio buttons will have only one button active. The group should be set up so one button is active at the very beginning, so there is always exactly one active button in the group.

Figure 7-4:
One and only one member of a radio group can be selected at once.
You specify the radio button group in the XHTML code. Each element of the group can have an id attribute (although the IDs aren’t really necessary in this application). What’s more important here is the name attribute. Look over the code and you’ll notice something interesting: All the radio buttons have the same name!
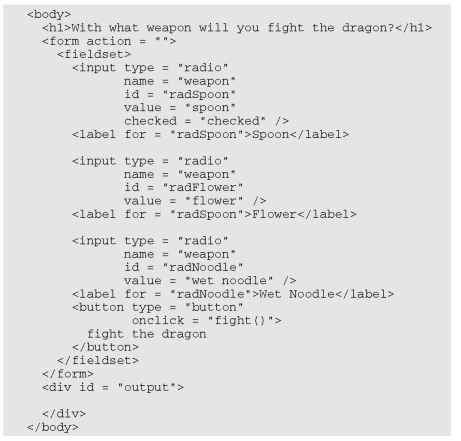
It seems a little odd to have a name attribute when everything else has an id, but there’s a good reason. The name attribute is used to indicate the group of radio buttons. Because all the buttons in this group have the same name . . .
All these buttons are related, and only one of them will be selected.
The browser recognizes this behavior, and automatically deselects the other buttons in the group whenever one is selected.
I added a label to describe what each radio button means. (Very handy for human beings such as users and troubleshooters.) Labels also improve usability because now the user can click the label or the button to activate the button.
It’s important to preset one of the radio buttons to true with the checked = “checked” attribute. If you fail to do so, you’ll have to add code to account for the possibility that there is no answer at all.
Interpreting radio buttons
Getting information from a group of radio buttons requires a slightly different technique from what you’d use for most form elements. Unlike the select object, in this case there’s no container object that can return a simple value. You also can’t just go through every radio button on the page, because there could be more than one group. (Imagine, for example, a page with a multiple-choice test.)
This is where the name attribute comes in. Although ids must be unique, multiple elements on a page can have the same name. If they do, these elements can be treated as an array.
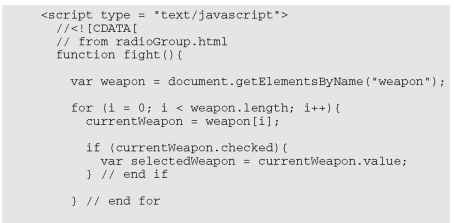
Look over the code and I show how it works:
This code looks much like other code in this chapter, but it has a sneaky difference that emerges in these steps:
1. Use getElementsByName to retrieve an array of elements with this name.
Now that you’re comfortable with getElementByld, I throw a monkey wrench in the works. Note that it’s plural =— getElementsByName (Elements with an s) — because this tool is used to extract an array of elements. It will return an array of elements (in this case, all the radio buttons in the weapon group).
2. Treat the result as an array.
The resulting variable (weapon in this example) is an array. As usual, the most common thing to do with arrays is process them with loops. Use a for loop to step through each element in the array.
3. Assign each element of the array to currentWeapon. This variable holds a reference to the current radio button.
4. Check to see whether the current weapon is checked.
The checked property indicates whether any radio button is currently checked.
5. If the current weapon is checked, retain the value of the radio button.
If the current radio button is checked, its value will be the current value of the group, so store it in a variable for later use.
6. Output the results.
You can now process the results as you would with data from any other resource.
Working with Regular Expressions
Having the right kinds of form elements can be very helpful, but things can still go wrong. Sometimes you have to let the user type things in, and that information must be in a particular format. As an example, take a look at Figure 7-5.
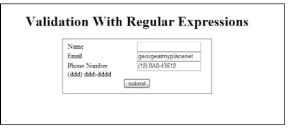
Figure 7-5:
This page is a mess.
No user name, and it’s not a valid e-mail or phone number.
It would be great to have some mechanism for checking input from a form to see if it’s in the right format. This can be done with string functions, but that can be really messy. Imagine how many if statements and string methods it would take to enforce the following rules on this page:
1. There must be an entry in each field.
This one is reasonably easy: Just check for non-null values.
2. The e-mail must be in a valid format.
That is, it must consist of a few characters, an ampersand (), a few more characters, a period, and a domain name of two to four characters. That would be a real pain to check for.
3. The phone number must also be in a valid format.
There are multiple formats, but assume you require an area code in parentheses, followed by an optional space, followed by three digits, a dash, and four digits. All digits must be entered as numeric characters (seems obvious, but you’d be surprised).
Although it’s possible to enforce these rules, it would be extremely difficult to do so using ordinary string manipulation tools.
JavaScript strings have a match method, which helps find a substring inside a larger string. This is good, but we’re not simply looking for specific text, but patterns of text. For example, we want to know if something’s an e-mail address (text, an , more text, a period, and two to four more characters).
Imagine how difficult that code would be to write . . . and then take a look at the code for the validate.html page:

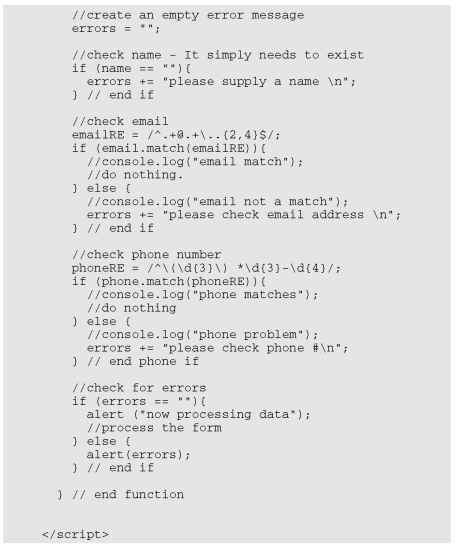
I’m only showing the JavaScript code here, to save space. Look on the Web site to see how the HTML and CSS are written.
Surprise! The code isn’t really all that difficult! Here’s what’s going on:
1. Let the code extract data from the form in the usual way.
2. Create a variable to hold error messages.
The error variable begins empty (because there are no errors to begin with). As I check the code, I’ll add any error text to this variable. If there are no errors, the error variable will remain empty.
3. Do the name check.
That should be very simple; the only way this can go wrong is to have no name.
4. If the name is wrong, add a helpful reminder to the error variable.
If the name isn’t there, just add a message to the error variable. We’ll report this problem (along with any others) to the user later on.
5. Build a pattern.
All this seems pretty simple — until you look at the line that contains the emailRE = /A.+.+\..{2,4}$/,- business. It looks like a cursing cartoonist in there. It’s a pattern that indicates whether it’s a legal e-mail address or not. I explain in the next section how to build it, but for now just take it on faith so you can see the big picture.
6. Notice we’re trying to match the e-mail to emailRE.
Whatever emailRE is (and I promise I’ll explain that soon), the next line makes it clear that we’re trying to match the e-mail address to that thing. This turns out to be a Boolean operation. If it’s true, the e-mail matches the pattern.
7. Do nothing if the pattern is matched.
If the e-mail address is valid, go on with the other processing. (Note that I originally put a console log command for debugging purposes, but I commented that code out.)
8. If the pattern match was unsuccessful, add another error message.
The error variable accumulates all the error messages. If the match was unsuccessful, that means the e-mail address is not in a valid format, so we’ll add the appropriate hint to the error variable.
9. Check the phone number.
When again, the phone number check is simple except the phoneRE business, which is just as mysterious: / \(\d{3}\) *\d{3}-\d{4}/. (Seriously, who makes this stuff up?) Again, if the match is successful, do nothing, but if there’s a problem, add a report to the error variable.
10. If everything worked, process the form.
The status of the error variable indicates whether there were any problems. If the error variable is still empty, all the input is valid, so it’s time to process the form.
11. Report any errors if necessary.
If you wrote anything to the error variable, the form should not be processed. Instead, display the contents of the error variable to the user.
Frequently you’ll do validation in JavaScript before you pass information to a program on the server. This way your server program will already know the data is valid by the time it gets there, which reduces congestion on the server. JavaScript programs normally pass information to the server through the AJAX mechanism, which is the focus of part three of this topic.
Introducing regular expressions
Of course, the secret is to decode the mystical expressions used in the match statements. They aren’t really strings at all, but very powerful text manipulation techniques called regular expression parsing. Regular expressions have migrated from the Unix world into many programming languages, including JavaScript. A regular expression is a powerful mini-language for searching and replacing — text patterns in particular — even complex ones. It’s a weird-looking language, but it has a certain charm after you get used to reading the arcane-looking expressions.
Regular expressions are normally used with the string match() method in JavaScript, but they can also be used with the replace() method and a few other places.
Table 7-1 summarizes the main operators in JavaScript regular expressions.
| Table 7-1 | JavaScript Main Operators | |||
| Operator | Description | Sample pattern | Matches | Doesn’t match |
| . (period) | Any single character except newline | E | \n | |
| Beginning of string | apple | banana | ||
| $ | End of string | a$ | banana | apple |
| [characters] | Any of a list of characters in braces |
[abcABC] | AD | |
| [char range] | Any character in the range | [a-zA-Z] | F9 | |
| d | Any single numerical digit | \d\d\d-\d\ d\d\d |
123-4567 | The-thing |
| b | A word boundary | \bthe\b | the | theater |
| Operator | Description | Sample pattern | Matches | Doesn’t match |
| One or more occurrences of the previous character | \d+ | 1234 | text | |
| Zero or more occurrences of the previous character | [a-zA-Z]\d* | B17, g | 7 | |
| {digit} | Repeat preceding character digit times | \d{3}-\d{4} | 123-4567 | 999-99-9999 |
| {min, max} | Repeat preceding character at least min but not more than max times | {2,4} | ca, com, info | watermelon |
| (pattern segment) | Store results in pattern memory returned with code | A(.).*\1$ | gig, wallow |
Bobby |
Don’t memorize this table! I explain, in the rest of this chapter, exactly how it works. Just keep this page handy as a reference.
To see an example of how this works, take a look at regex.html in Figure 7-6.
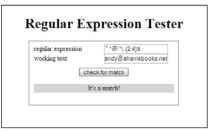
Figure 7-6:
This tool allows you to test regular expressions.
The top textbox element accepts a regular expression, and the second text field contains text you will examine. Practice the following examples to see how regular expressions work. They are really quite useful when you get the hang of them. As you walk through the examples, try them out in this tester. (I’ve included it on the Web page for you, but I don’t reproduce the code here.)
Characters in regular expressions
The main thing you do with a regular expression is search for text. Say you work for the bigCorp company and you ask for employee e-mail addresses. You might make a form that only accepts e-mail addresses with the term bigCorp in them. You could do that with the following code:

This is the simplest type of match. I’m simply looking for the existence of the needle (bigCorp) in a haystack (the e-mail address stored in email) If the text bigCorp is found anywhere in the text, then the match is true and I can do what I want (usually I process the form on the server). More often, you’ll want to trap for an error, and remind the user of what needs to be fixed.
Notice that the text inside the match() method is encased in forward slashes (/) rather than quotes. This is important, because the text “bigCorp” is not really meant to be a string value here. The slashes indicate that the text is to be treated as a regular expression, which requires extra processing by the interpreter.
If you accidentally enclose a regular expression in quotes instead of slashes, the expression will still work most of the time. JavaScript tries to quietly convert the text into a regular expression for you. However, this process does not always work as planned. Do not rely on the automatic conversion process, but instead enclose all regular expressions in slashes rather than quotes.
Marking the beginning and end of the line
You might want to improve the search, because what you really want is addresses that end with “bigCorp.com”. You can put a special character inside the match string to indicate where the end of the line should be:

The dollar sign at the end of the match string indicates that this part of the text should occur at the end of the search string, so would match, but not “bigCorp.com announces a new Web site”.
If you’re already an ace with regular expressions, you know this example has a minor problem, but it’s pretty picky; I’ll explain it in a moment. For now, just appreciate that you can include the end of the string as a search parameter.
Likewise, you can use the caret character (A) to indicate the beginning of a string.
If you want to ensure that a text field contains only the phrase oogie boogie (and why wouldn’t you?), you can tack on the beginning and ending markers. /Aoogie boogie$/ will only be a true match if there is nothing else in the phrase.
Working with Special Characters
In addition to ordinary text, you can use a bunch of special character symbols for more flexible matching.
Matching a character with the period
The most powerful character is the period (.), which represents a single character. Any single character except the newline (\n) will match against the period.
This may seem silly, but it’s actually quite powerful. The expression /b.g/ will match big, bag, and bug. In fact, it will match any phrase that contains b followed by any single character then g, so bxg, b g, and b9g would also be matches.
Using a character class
You can specify a list of characters in square braces, and JavaScript will match if any one of those characters matches. This list of characters is sometimes called a character class. For example, b[aeiou]g will match on bag, beg, big, bog, or bug. This is a really quick way to check a lot of potential matches.
You can also specify a character class with a range. For example, the range [a-zA-Z] checks all the letters but no punctuation or numerals.
Specifying digits
One of the most common tricks is to look for numbers. The special character \d represents a number (an integer digit from 0 to 9). You can check for a U.S. phone number (without the area code — yet) using this pattern:
\d\d\d-\d\d\d\d
This looks for three digits, a dash, and four digits.
Marking punctuation characters
You can tell that regular expressions use a lot of funky characters, like periods and braces. What if you’re searching for one of these characters? Just use a backslash (\) to indicate you’re looking for the actual character, not using it as a modifier. For example, the e-mail address would be better searched with /bigCorp\.com/, because this specifies there must be a period. If you don’t use the backslash, the regular expression tool interprets the period as “any character” and would allow something like bigCorpucom. Use the backslash trick for most punctuation, like parentheses, braces, periods, and slashes.
If you want to include an area code with parentheses, just use backslashes to
indicate the parentheses: /\(\d\d\d\) \d\d\d-\d\d\d\d/.
Finding word boundaries
Sometimes you want to know if something is a word. Say you’re searching for the word “the,” but you don’t want a false positive on “breathe” or “theater.” The \b character means “the edge of a word,” so /\bthe\b/ will match on “the” but not on words containing “the” inside them.
Repetition Operations
All the character modifiers refer to one particular character at a time. Sometimes you want to deal with several characters at a time. There are several operators that help you with this process.
Finding one or more elements
The plus sign (+) indicates “one or more” of the preceding character, so the pattern /ab+c/ will match on abc, abbbbbbc, or abbbbbbbc, but not on ac (there must be at least one b) or on afc (it’s gotta be b).
Matching zero or more elements
The asterisk means “zero or more” of the preceding character. So /I’m .* happy/ will match on I’m happy (zero occurrences of any character between I’m and happy). It will also match on I’m not happy (because there are characters in between).
The .* combination is especially useful, because you can use it to improve matches like e-mail addresses: /A.*bigCorp\.com$/ will do a pretty good job of matching e-mail addresses in our fictional company.
Specifying the number of matches
You can use braces ({} ) to indicate the specific number of times the preceding character should be repeated. For example, you can re-write the phone number pattern like this: /\(\d{3}\) *\d{3}-\d{4}/. This means “three digits in parentheses, followed by any number of spaces (zero or more), then three digits, a dash, and four digits. Using this pattern, you’ll be able to tell if the user has entered the phone number in a valid format.
You can also specify a minimum and maximum number of matches, so / [aeiou]{1, 3}/ means “at least one and no more than three vowels.”
Now you can improve the e-mail pattern so it includes any number of characters, an sign, and ends with a period and two to four letters: /A.*.*\.. {2,4}$/.
Working with Pattern Memory
Sometimes you’ll want to “remember” a piece of your pattern and re-use it. The parentheses are used to group a chunk of the pattern and remember it. For example, / (foo){2}/ doesn’t match on foo, but it does on foofoo. It’s the entire segment that’s repeated twice.
Recalling your memories
You can also refer to a stored pattern later in the expression. The pattern /A(.).*\1$/ matches any word that begins and ends with the same character. The \1 symbol represents the first pattern in the string, \2 represents the second, and so on.
Using patterns stored in memory
When you’ve finished a pattern match, the remembered patterns are still available in special variables. $1 is the first, $2 is the second, and so on. You can use this trick to look for HTML tags and report what tag was found: Match /A<(.*)>.*<\/\1>$ / and then print out $1 to see what the tag was.
There’s much more to learn about regular expressions, but this basic overview should give you enough to write some powerful and useful patterns.
