Now that you have your iPhone charged, with a clean screen, registered, and decked out with a new protective case, let’s take a look at some of the basics to help you get around with the software.
Powering On/Off and Sleep/Wake
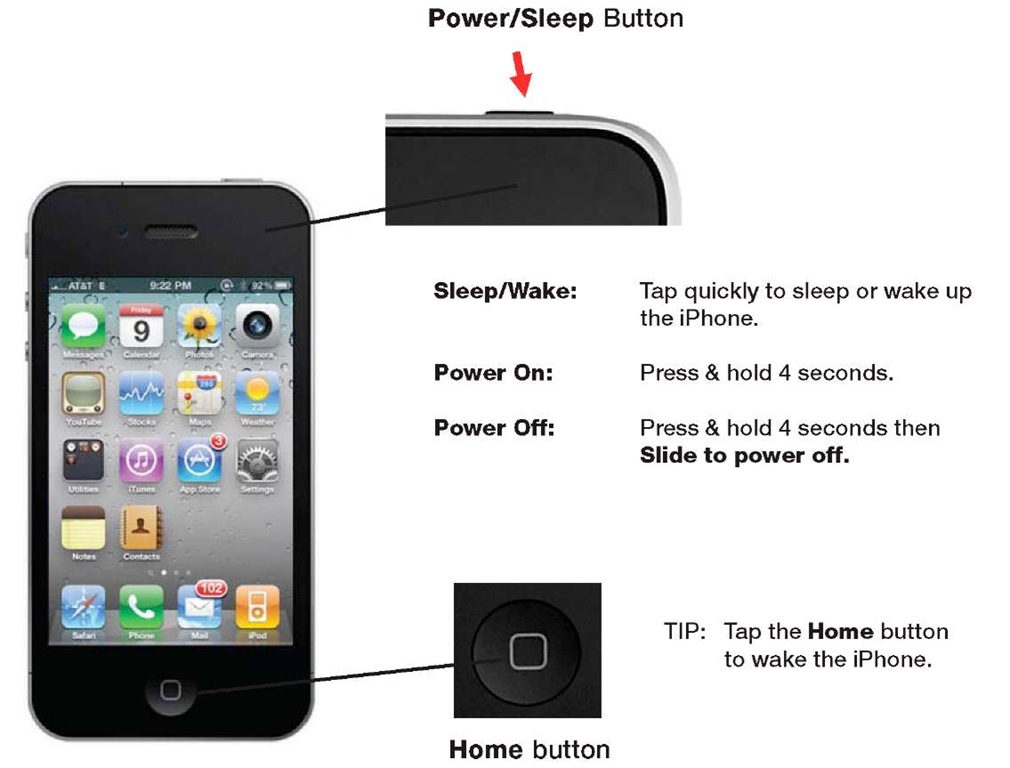
To power on your iPhone, press and hold the Power/Sleep button on the top edge of the iPhone for a few seconds (Figure 1-14). Simply tapping this button quickly won’t power on the iPhone if it is completely off—you really need to hold it until you see the iPhone power on.
When you are no longer using your iPhone, you have two options: you can either put it into sleep mode or turn it off completely.
Figure 1-14. Power/Sleep button and Home button
The advantage of sleep mode is that when you want to use your iPhone again, just a quick tap of the Power/Sleep button or the Home button will bring your iPhone back awake. According to Apple, the iPhone has up to a month of stand-by power.
If you want to maximize your battery or if you know you won’t be using your iPhone for quite some time—say when you go to sleep—you should turn it off completely. The way to do this is to press and hold the Power/Sleep button until you see the Slide to Power Off bar appear. Just slide the bar to the right and the iPhone will power off.
Moving Around Inside Apps and Your Settings Screens
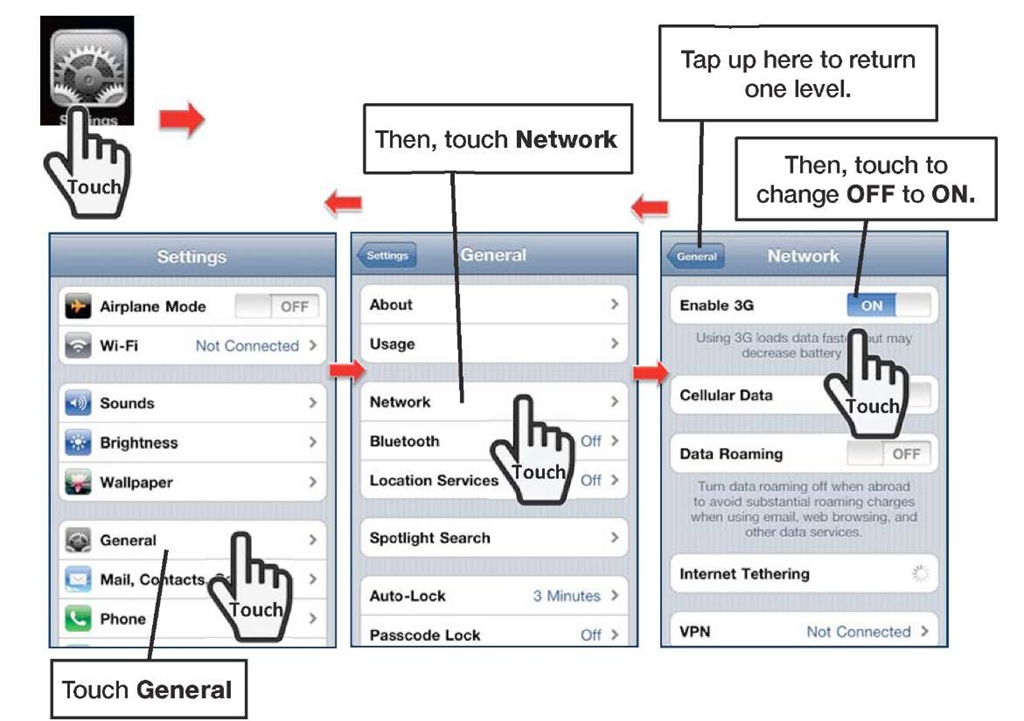
Getting around the screens inside the apps on your iPhone is as simple as tapping on the screen. See Figure 1-15.
1. Tap any icon to start the app. Tap the Settings icon to start the Settings app.
2. Touch General to see the General settings.
3. Touch Network to see Network settings.
4. Any switch is set by tapping it. So, next to Data Roaming, touch the OFF switch to turn it On.
5. To go back a level in the screens, you touch the button in the upper left corner. In this case you would touch the General button to get out of the Network Settings screen.
Figure 1-15. Navigating around icons and settings screens
The Home Button
The button you will use most often is your Home button (Figure 1-14). This button will begin everything you do with your iPhone and also jump out of every app back to your Home screen. If your iPhone is sleeping, press the Home button once to wake up your iPhone (assuming it is in sleep mode).
Pressing the Home button will take you out of any application program and bring you back to your Home screen.
TIP: Double-tapping your Home button launches the fast app switcher. If the phone is locked and playing music, a double tap will launch the iPod controls.
Multitask by Double-Clicking the Home Button
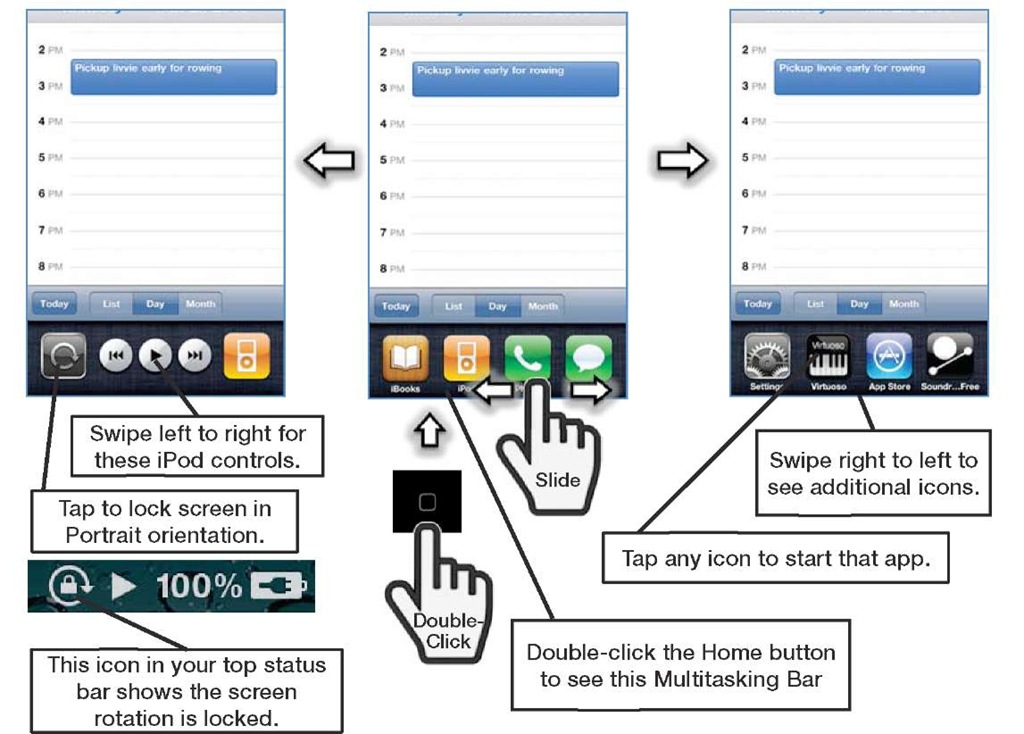
To multitask, you simply double-click the Home button.
TIP: We have more details on multitasking in topic 8, "Multitasking and Voice Control."
1. While in any app or from the Home screen, try double-clicking the Home button. See Figure 1-16.
2. You will see a small bar of icons appear in the bottom row. These represent the apps that you have started since you powered on your iPhone.
3. Tap any icon to return to that app.
4. Swipe your finger left or right to see more icons.
5. Swipe all the way to the left to see an additional set of controls for the iPod and to lock the screen in Portrait (vertical) orientation.
5. Swipe all the way to the left to see an additional set of controls for the iPod and to lock the screen in Portrait (vertical) orientation.
Figure 1-16. Double-clicking the Home button to see the multitasking bar
Volume Keys for Ringer and Audio/Video Playback
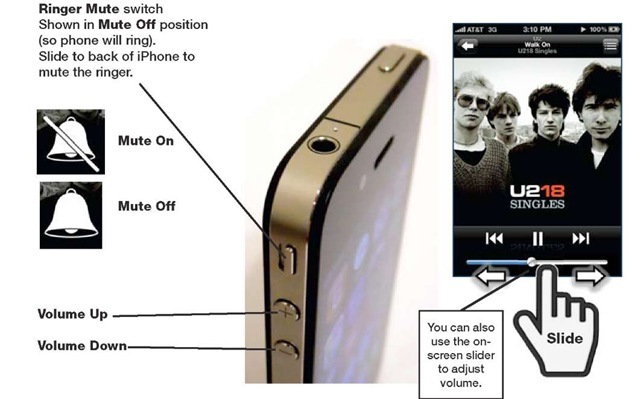
Located on the upper left-hand side of the iPhone (Figure 1-17), these are simple Volume Up/Volume Down keys that you will find very handy.
Ringer Volume
If you are not playing a song, video, or other content, pressing these Volume keys will adjust the volume of your phone ringer.
Muting the Phone Ringer
You have a switch just above the Volume keys on the left side of your iPhone. Slide the Ringer Mute switch to the back of the iPhone to turn it on. You will see a little orange next to the switch when the mute is on. To turn off the mute, simply slide the switch back toward the front of the iPhone. See Figure 1-17.
Adjusting Playback or Phone Voice Volume
When you are listening to music, video, or other content, or when you are on a phone call, you can use the Volume keys to raise or lower the volume. When listening to music or videos, you can also use the on-screen slider bar to adjust volume. See Figure 1-17.
Figure 1-17. Adjusting the volume on your iPhone or muting the phone ringer
Locking Your Screen in Portrait (Vertical) Orientation
As you tilt your iPhone on its side, in some apps, you will notice that the iPhone screen rotates to horizontal or landscape orientation. You might want this in order to get the larger landscape keyboard for typing. There may be times when you don’t want your screen to rotate from portrait orientation when you turn your iPhone on its side. For these occasions, you can lock the screen in portrait orientation. See Figure 1-16.
1. Double-click the Home button.
2. Swipe left to right to see the iPod and screen lock controls.
3. Touch the Portrait Orientation Lock button in the left end of icons.
4. To disable the lock, tap the same button again.
TIP: This is a great way to read iBooks in bed. If you prefer the larger page view in portrait mode, enable Portrait Orientation Lock. This way when you set your iPhone on your lap or hold it almost flat, the screen will not accidentally rotate to landscape mode. Check out topic 14, "iBooks and e-Books," for more.
Adjust or Disable the Auto-Lock Time-Out Feature
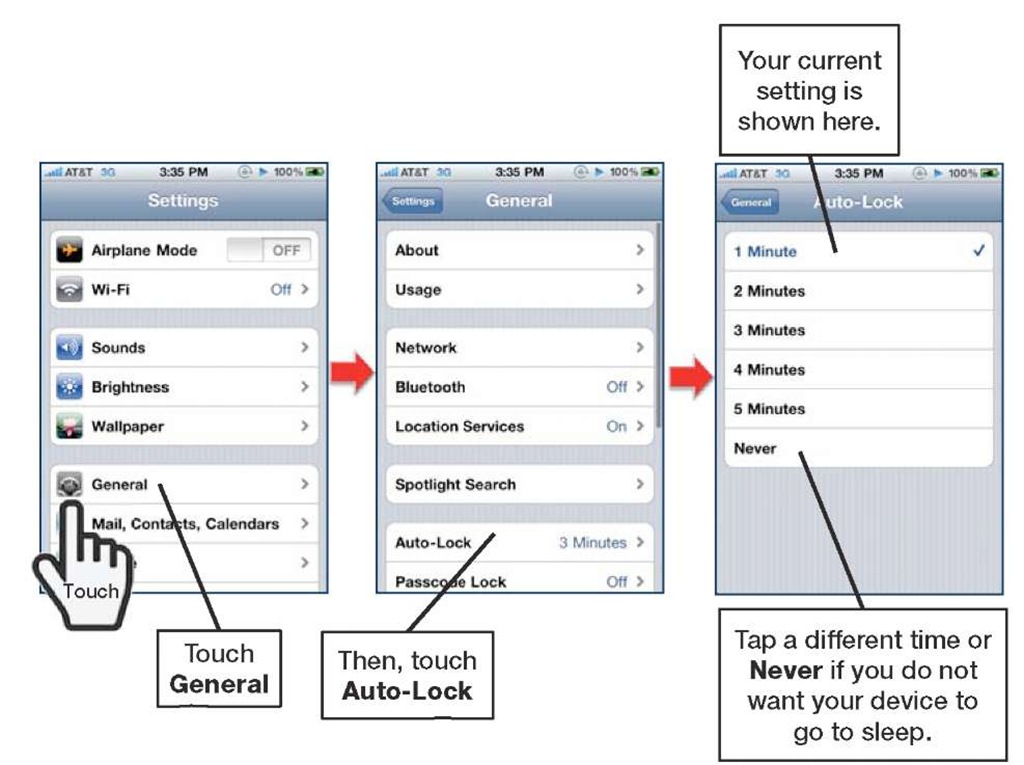
You will notice that your iPhone will auto-lock and go into sleep mode with the screen blank after a short amount of time. You can change this time or even disable this feature altogether inside the Settings icon.
1. Touch the Settings icon from your Home screen.
2. Touch General.
3. Touch Auto-Lock.
4. You will see your current Auto-Lock setting next to Auto-Lock on this page.The default setting is that the iPhone locks after 3 minutes of sitting idle (to save battery life.) You can change this to 1, 2, 3, 4, 5 minutes, or Never.
Figure 1-18. Settings to adjust or remove the time-out for the Auto-Lock feature
5. Touch the desired setting to select it—you know it’s selected when you see the checkmark next to it.
6. Then, touch the General button in the upper left-hand corner to get back to the General screen. You should see your change now reflected next to Auto-Lock.
BATTERY LIFE TIP:
Setting the Auto-Lock shorter (e.g., 1 minute) will help you save battery life.
Adjusting the Date, Time, Time Zone, and 24-Hour Format
Usually, the date and time is either set for you or adjusts when you connect your iPhone to your computer, which we cover in topic 3, "Sync Your iPhone with iTunes." You can, however, manually adjust your date and time quite easily. You may want to do this when you are traveling with your iPhone and need to adjust the time zone when you land.
1. Touch the Settings icon.
2. Touch General.
3. Scroll down and touch Date & Time to see the Date & Time settings screen.
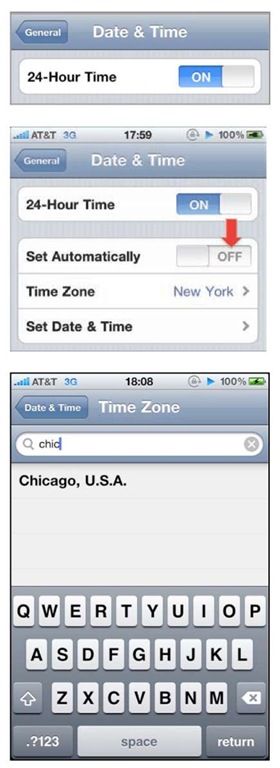
4. If you prefer to see 09:30 and 14:30 instead of 9:30 AM and 2:30 PM, respectively, then tap the 24-Hour Time setting switch to On.
5. To set the date and time manually, you have to turn off the automatic time setting feature. Tap the switch next to Set Automatically and set it to Off.
6. To set your time zone, tap Time Zone and type in the name of a major city in your time zone. The iPhone will show you matching city names as you type.
7. When you see the correct city in your time zone, tap it to select it. In the image here, we typed the first few letters of Chicago until we saw it appear. Then we tapped Chicago, U.S.A. to select it.
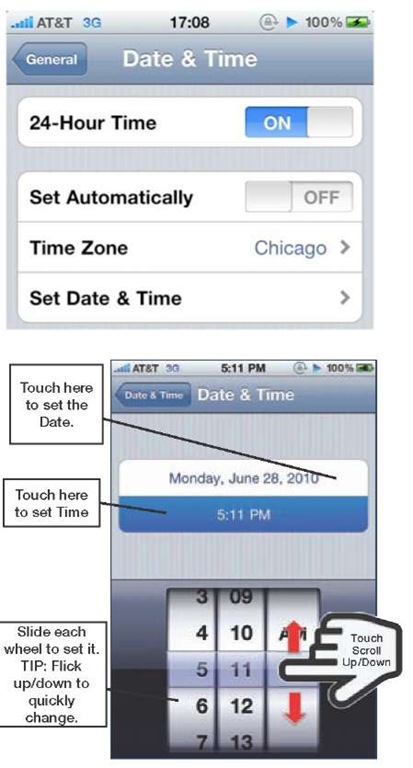
8. After selecting the city, you are brought back to the main Date & Time screen with your selected city shown next to Time Zone.
9. Tap Set Date & Time to adjust your date and time.
10. On this screen you can set the date and time.
11. To adjust the date, tap the date at the top of the screen.
12. To adjust the time, tap the time at the top of the screen.
13. Adjusting the date and time is then done by touching and sliding the wheels up or down as shown in the image here.
14. When you are done, tap the Date & Time button in the upper left corner.
Adjusting the Brightness
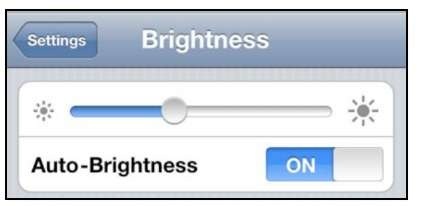
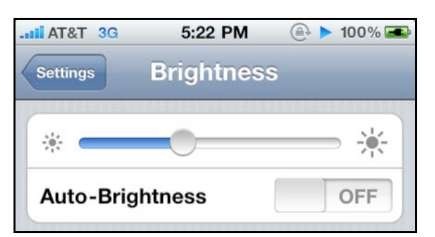
Your iPhone has an Auto-Brightness control available, which is turned on by default. This uses the built-in light sensor to adjust the brightness of the screen. When it is darker outside or nighttime, then the auto-brightness control will dim the screen. When it is bright and sunny, the screen will be automatically brightened so it is easier to read. Generally, we advise that you keep this set to On.
If you want to adjust the brightness, use the controls in your Settings app.
1. From your Home screen, touch the Settings icon.
2. Then touch Brightness.
3. Move the slider control to adjust the brightness.
4. Set the switch next to Auto-Brightness to turn it On or Off.
TIP: Setting the brightness lower will help you save battery life. A little less than halfway across seems to work fine.
