At the beginning of this topic, we mentioned the new Xcode 4 interface and highlighted the single-window interface. Interface Builder is a graphical environment tool built into Xcode 4. Whenever you write an Xcode project, it includes a MainWin-dow.xib file that contains Interface Builder definitions for where graphical objects are placed. Every Xcode template comes with different objects prebuilt this way. Some of them have multiple, linked .xib files, with one file representing each separate screen of information.
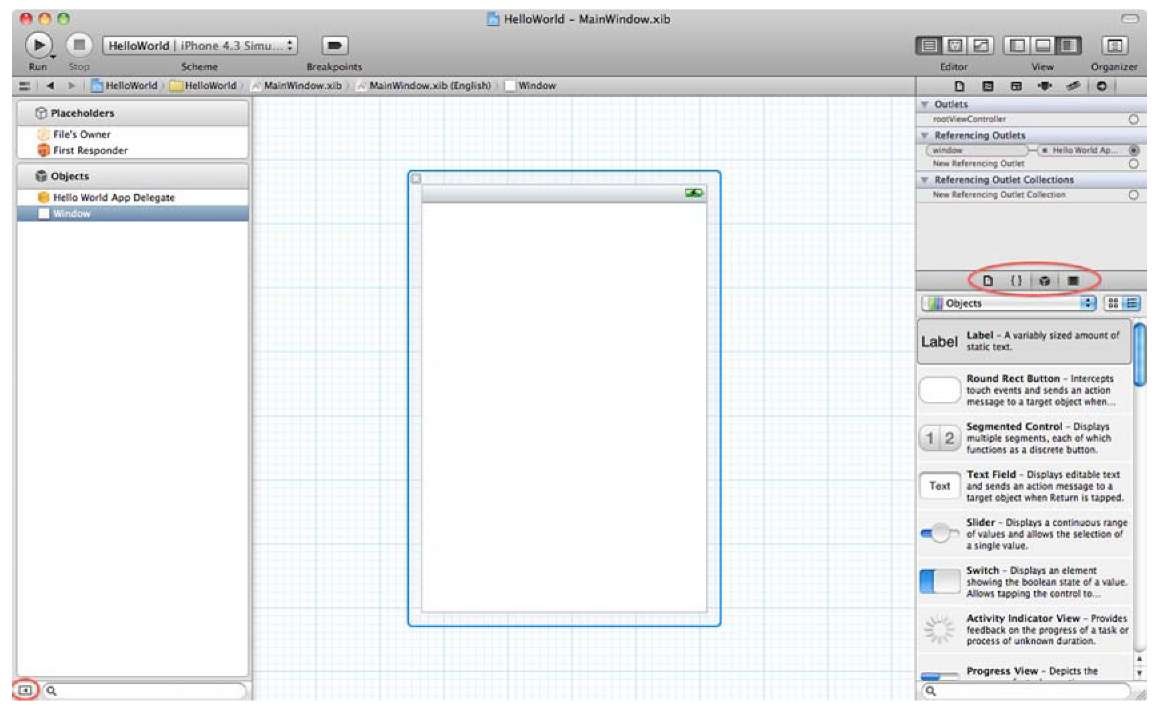
In the project navigator, find the nib file MainWindow.xib. Click MainWindow.xib to open the document in the Interface Builder Editor pane. In the Xcode menu bar, choose View > Navigators > Hide Navigator to narrow the focus of the workspace. If the dock on the left doesn’t look like the one in figure 3.9, click the button in the lower-left corner to switch the dock to outline view. In the Xcode menu, choose View > Utilities to show the Utility area on the right pane.
Figure 3.9 Interface Builder displaying the MainWindow.xib file. A few fundamental displays In Interface Builder are the nib document window (left), the main Editor pane in the middle, together with the Library pane (right bottom), and the Inspector pane (right top).
Let’s look at what’s inside Interface Builder and then quickly look at how to mock up Interface Builder objects.
The anatomy of Interface Builder
You usually access Interface Builder by selecting a .xib file in your project under Navigator area. The default .xib file is generally called MainWindow.xib. Clicking it brings up the MainWindow on the Canvas inside the Interface Builder window, showing how default objects have been designed visually, as shown in figure 3.9.
NIB VERSUS .XIB
You’ll see both terms .xib files and nib files in this and later topics. They’re pretty much the same thing: a nib file is a compiled .xib file. (.xib files express the same data as nib files but in a text-based XML format.) They appear as .xib files in Xcode, but some methods call them nib files, as you’ll see later in this topic. Apple documents refer to a nib document window in Interface Builder; we’ve done the same here.
INTERFACE BUILDER
As you can see in figure 3.9, when you select a nib file or .xib file, the Interface Builder window will become the focus of the editor view automatically; all the files stay in the same window with your source code. Interface Builder contains a couple of important windows: the nib document dock on the left and the main Editor pane (Canvas) in the middle.
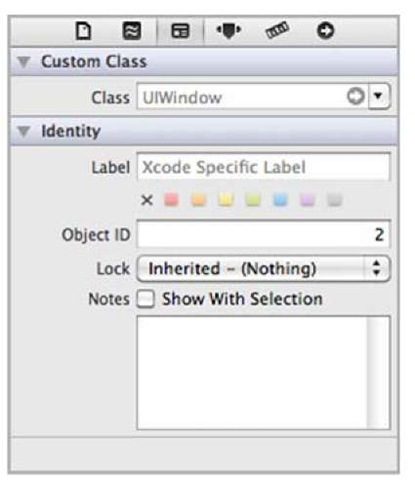
Turn on the utility view on the right panel view by selecting View > Utilities > Show Utilities or by clicking the utility view button on the top-right window. Utility view has two parts: the Inspector pane and the Library pane. The top part contains the Inspector window; and the third tab starting from the left is the Identity tab, followed by Object Attributes tab, Size tab, and Connections tab, as shown in figure 3.10. The Inspector window gives you access to a wide variety of information about an object and lets you change it.
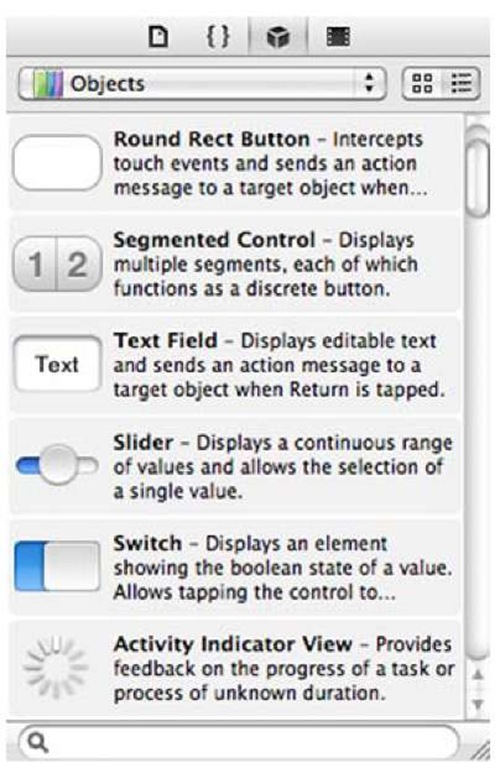
The bottom part contains the Objects library available for Interface Builder. It’s the third tab from the left on the bottom toolbar, as shown in figure 3.11. The Library window is where you can find all the UI elements that you may want to add to your program. You can start exploring the library by selecting the submenu under the Objects drop-down menu. You’ll see four main classes of UI elements:
■ Controllers give you different ways to manage your views.
■ Data Views give you different ways to display data.
■ Inputs & Values give you a variety of simple input mechanisms.
Figure 3.10 Inspector pane with Identity tab selected
■ Windows, Views & Bars give you the core window and view objects, plus a variety of other elements.
Interface Builder is one of the most important editors within Xcode 4, so you may want to spend more time digging out the features under each tab and objects. It will definitely make your future design much smoother.
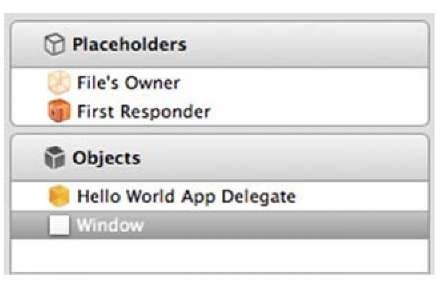
So, what’s inside the nib file? Taking a closer look under the MainWindow.nib file (see figure 3.12), you find two categories: Objects and Placeholders. Interface objects are the objects that are created when the nib file is loaded. Placeholders refer to files that live outside the nib file but are connected to the contents of the nib file.
Under Placeholders in the nib file, you can see File’s Owner and First Responder. The File’s Owner placeholder is the main bridge between your application and the contents of the nib file.
Figure 3.11 Library pane
The File’s Owner object is the owner of this nib file. The First Responder placeholder object represents the first object in the responder chain, which is determined dynamically at runtime by the UIKit frameworks. Don’t worry if you find the concept difficult for now because we’ll cover events and actions in detail in topic 6.
A default MainWindow.xib file includes one window object. The window object is the one real object you can see on the Canvas here; you can play with it in the Editor pane on the Canvas. As you’d expect, this is the window object that was created by default in the templates you’ve used so far.
The Canvas in the center shows what the.xib file currently looks like. Because you used the Window-Based Application template in Xcode, there’s nothing here yet. If you’d used one of the other templates, you’d see tab bars or other prebuilt elements. In any case, this is where you arrange your user interface elements as you create them.
Before you start using Interface Builder to create an application, though, we want to introduce two additional core concepts: IBOutlets and IBActions.
Figure 3.12 Contents of the MainWindow.nib file shown on the dock
IBOUTLET AND IBACTION
In order for Interface Builder-created objects to be useful, Xcode must be able to access their properties and respond to actions sent to them. This is done with IBOutlet and IBAction.
You saw an IBOutlet in listing 3.2, as part of the app delegate header file for your first project:
An IBOutlet provides a link to an Interface Builder-created object. It’s what you use to access that object’s properties and methods. You won’t see an IBAction until we get to topic 6, where we’ll deal with events and actions, but it’s similar. You declare a method in your class, including IBAction as its return:
An IBAction is a message that’s executed when a specific action is applied to an Interface Builder-created object, such as when a slider moves or a button is clicked.
With the overview of Interface Builder out of the way, you’re ready to create a simple application that will show a web view atop a background image.
Building the AppleStock application
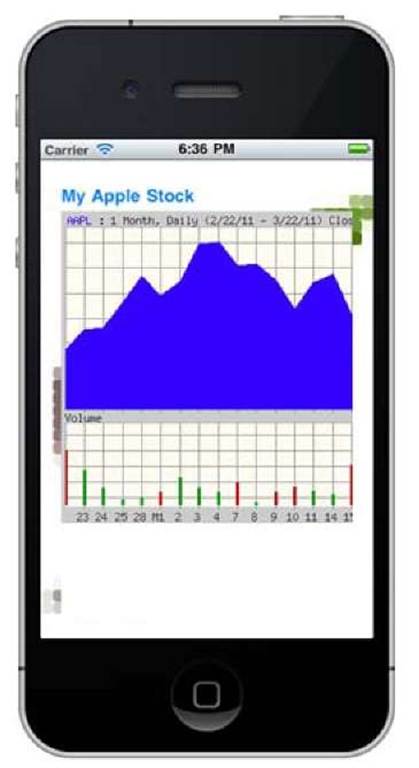
Now let’s build the AppleStock application. In this section, we’ll look at how to create new objects, manipulate them graphically, and use the Inspector window. You can follow the step-by-step instructions to get familiar with the new tool. To give you a preview of the result, figure 3.13 shows what the AppleStock application will look like when it’s finished.
CREATING A WINDOW-BASED APPLICATION
Go to Xcode 4, select File > New > New Project, and select Window-Based Application. When the prompt for the project name appears, enter AppleStock and your company or your own name as the project identifier. In the example, this topic’s name is used as the identifier, so the final project will be uniquely identified in the app store as com.iOS4inAction.AppleStock. Under Device Family, choose iPhone. The rest of the options are similar to when you created the Hel-loWorld application, as shown in figure 3.3.
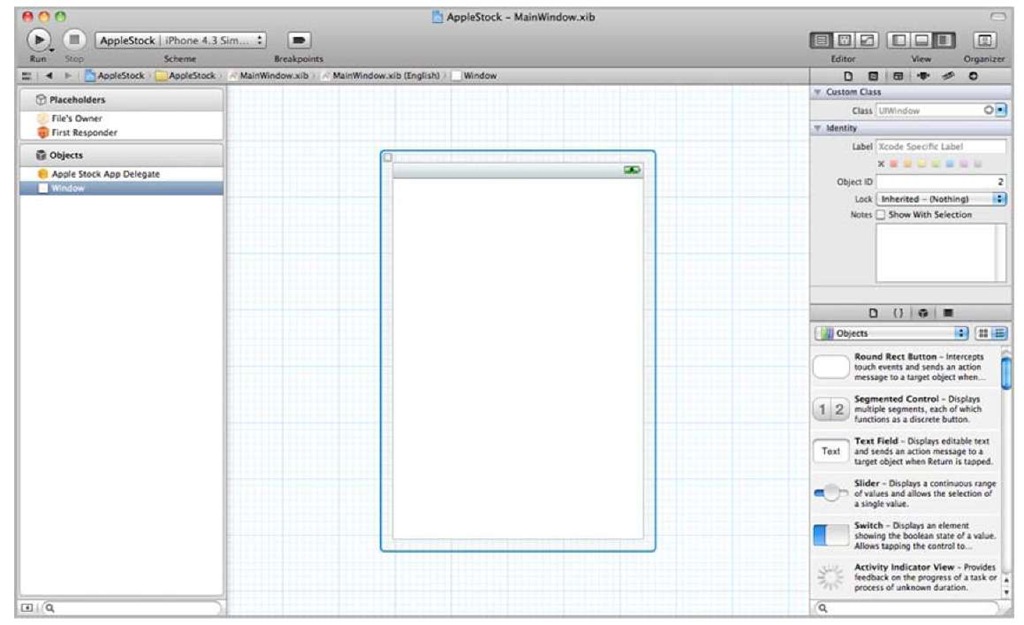
Once the project is created under the workspace, under the project navigator on the left panel, go to the Resources folder and click the MainWindow.xib file to bring up the Interface Builder window under the Editor focus, as shown in figure 3.14.
Figure 3.13 The AppleStock application in the iOS Simulator, running with a web view atop a background image
Figure 3.14 MainWindow.xib under Interface Builder
Make sure your utilities view is shown. You’re now ready to create new objects on the blank Canvas in the center.
CREATING NEW OBJECTS IN INTERFACE BUILDER
Imagine a program that uses an image as a background, sets up a web view on top of that, and has a label running above everything. We’ll show you how easy it is to create those entirely usable objects in Interface Builder.
You’ll find the Image View object under Data Views in the Objects Library on the bottom of the utility view. Drag it over to your window in the center, and it quickly resizes to suggest a full-screen layout. You should be able to arrange it to fit exactly over the screen, and then release your mouse button to let it go. One object created!
The Web View object will be near the Image View. Drag it over to the main window. If you move it toward the center of the view, dashed lines appear: they’re intended to help you center your object. If you mouse over the middle of the screen, a dashed line appears in each direction, forming a sort of crosshairs. When that happens, release the mouse button—you now have a web view in the middle of the screen. Two objects created!
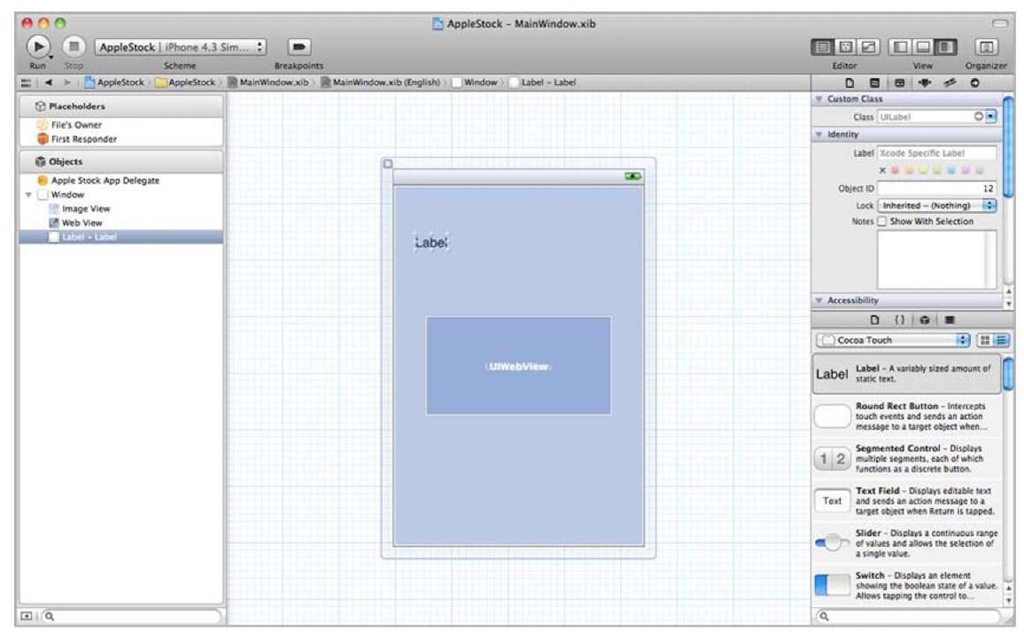
Finally, select Label, which is under Inputs & Values. Drag it toward the top left of your screen, and let go. You’re finished! You now have three objects laid out in Interface Builder, as shown in figure 3.15.
Figure 3.15 MainWindow.xib file in the center with an image view on the bottom and web view and label added.
Notice that when you mouse over and select the object in the library, a quick helper window pops up; it’s helpful when you’re not so familiar with all the objects at the beginning.
USING THE INSPECTOR WINDOW
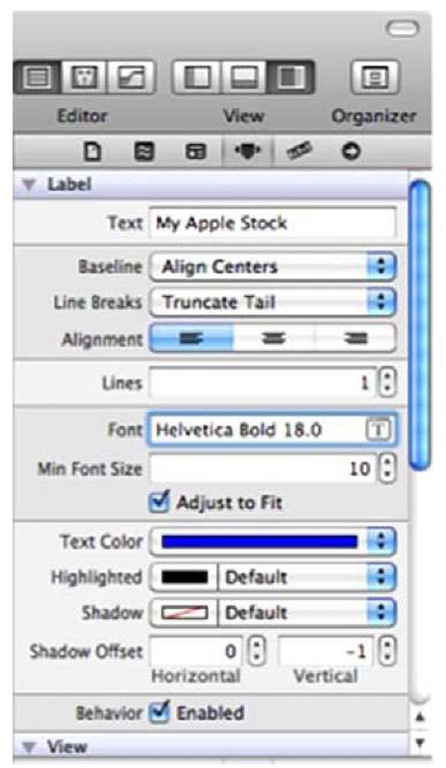
Let’s spend some time here to make the graphic interface look pretty. Interface Builder is an editor that focuses primarily on user interface design, so it makes sense that you can do some simple manipulation of your objects graphically. For example, if you want to change the text of your label, double-click it; then you’re given the option to fill in your own text. To adjust the font color and the font size of the label, navigate to the Attributes tab under the Inspector pane on the top of the utility view, as show in figure 3.16.
Double-click the label, and type My Apple Stock. Don’t forget to press Enter to finish the change. When you manipulated the label graphically, you changed the text to My Apple Stock for reasons that will become obvious shortly. You can see that this change has already been made in the label’s attributes. You can set a lot of other properties via this single window, with no programming required.
Figure 3.16 Using the inspector to update the label’s text, font color, font size, and so on
Do you want your text to be a nice blue? No problem: click the Text Color box. Doing so leads you to a window that offers several ways to set colors. Choose the tab that allows selection by name, and find blue on the list. You can also set shadows, alignments, font size, and a number of other text options from this panel.
In addition to the label options, the Attributes tab contains several options that relate to the view—they’re the UIView properties that most graphical objects inherit. You can change alpha transparency, background color, and a number of other elements. For now, you can stop after having changed the color of the text and having generally seen what the Attributes tab can do.
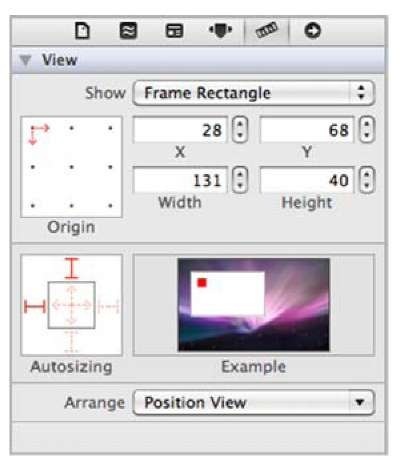
Figure 3.17 Size tab under the Inspector pane. You can change an object’s position and size from the Size tab.
The Attributes tab is available to all Interface Builder objects, but it has different contents depending on the object in question. If you look at the attributes for the web view and image view objects you created, you’ll see that you can set them in specific ways as well, but we’ll save those for later. For now,we’re concentrating on that label.
You can use the Size tab to adjust the size and position of an object. Figure 3.17 shows the options you can change here.
This tab leads off with values for size and position. Not only can you change an object’s starting point, but you can also define where that starting point is, relative to the object, using the grid at the upper left. Width and height are available here too.
The Autosizing box controls how your object resizes its subviews when it resizes. For now, leave it as is; it’ll be of more importance when we talk about basic view controllers in topic 5.
Finally, the Arrange section lets you align your current object.
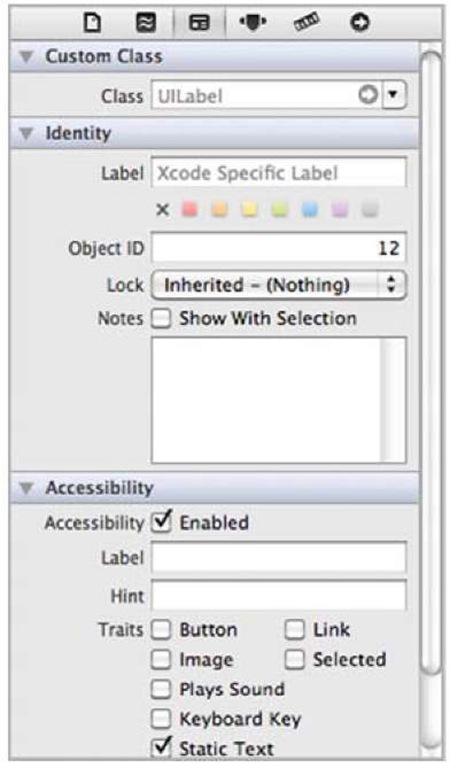
The Identity tab is of little use for this label, but we cover its functionality for the sake of completeness. Figure 3.18 shows what it looks like. For simple Interface Builder objects (like this example label), you use only the Interface Builder Identity section at the bottom of the Identity tab. This lets you name your object, which makes it easier to see what you’re accessing in Interface Builder. It’s strictly for your own use.
Figure 3.18 Identity tab under the Inspector window
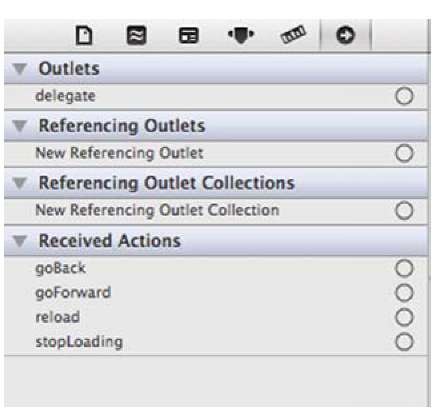
The Connections tab shows an object’s IBOutlets and IBActions, as shown in figure 3.19. The example label doesn’t have an IBOut-let, which means it can’t be accessed from Xcode yet. But this is fine; we’re happy with how the label is set up in Interface Builder, and you won’t need to adjust it during runtime for this example.
The Class Actions and Class Outlets sections show IBAction and IBOutlet declarations that you’ve made in your object’s header file. For example, the app delegate object has a window IBOutlet (which you’ve seen several times), and the web view object has a few system-defined actions, as shown in figure 3.19. These are the things to which you can build connections.
Figure 3.19 Connection tab showing a web view’s IBOutlets and IBActions
For now, leave them alone. They’re not required for the label. But you have two more objects to work with in Interface Builder: the image view and the web view.
We promised you that we were going to introduce a totally new object in this section: the image view. As with web views, we’ll get more into the guts of images several topics down the line; for now, we want to show how easy it is to work with an unfamiliar object type—like the image view—in Interface Builder.
