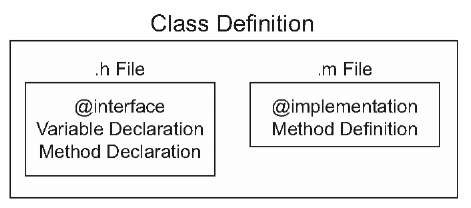
As we’ve noted, each class tends to be represented by a matched pair of files: a header file and a source code file. To define a class, each of these files must contain a special compiler directive, which is always marked in Objective-C with an @ symbol.
First, you define the interface for the class, which is a simple declaration of its public variables and methods. You do this in the header (.h) file. Next, you define the implementation for the class, which is the content of all its methods; this is done in a source (.m) file.
Figure 2.1 shows this bifurcation graphically; we’ll look at the headers and implementation files in more depth in the next few sections.
Figure 2.1 Headers and source code files contain distinctive parts of your Objective-C classes.
The interface
Interfaces begin with an @interface directive and finish with an @end directive. They contain instance variable declarations in curly brackets and then method declarations. The following listing shows an example of their usage. It’s the first of several examples that we offer in this section that depict a fake class, AppleTree.
Listing 2.1 Defining the class of Appletree
You begin the interface command with the @interface directive and end it with the @end directive. Note that the @interface directive includes not only the class name but also the name of its superclass, following a colon. It could also include a list of protocols, a topic we’ll return to later in this section.
The variable declaration is entirely normal. NSString is a type that you’ll meet when we look at iOS later in this topic. Note that you don’t have to declare all your variables in your @interface—those instance variables that you want to be accessible outside a particular method. You’ll declare variables that are used within only individual methods inside those methods, as you’d expect.
The method declaration contains a typed description of a method with one argument, matching the syntax you’ve seen for messages. It also contains one other new element: it starts with a hyphen (-). That means this is an instance method, which is a method that can only be used by an instance object. Its opposite number, which is marked with a plus sign (+), is the class method, which is used by a class object. Class methods can’t make use of instance variables or call install methods, because they’re accessible only from an instantiated object.
The id type used as the return of growFruit: is another Objective-C innovation. Objective-C allows for dynamic typing, where type is decided at runtime. To support this, it includes the weak type of id, which can be a pointer to any object.
Before we finish our discussion of method declarations, we’d like to mention that, as with variables, you only have to declare those methods that can be called externally. Methods that remain internal to a class can remain hidden if you desire.
The implementation
After you’ve declared a class with an @interface, you can then define it with the ©implementation directive. The following listing provides a brief example of what the implementation might look like for the AppleTree class, including a single example method.
Listing 2.2 Implementation file for the AppleTree class
The code starts with the #import directive. This is Objective-C’s variant for the #include macro. It includes the file unless it’s already been included, and it’s the preferred alternative when using Objective-C. In this case, you include AppleTree.h, which should contain the interface described in the code snippet in listing 2.1. Without including it, you’d need to redefine all the instance variables and include the superclass in the (^implementation statement. The #import helps you avoid redundant code. You also include the Apple.h file so that you can create an Apple.
As with the interface, the implementation code begins with a directive and ends with @end. In between, you describe what the method does, which includes sending a message to the Apple class object.
Object instantiation
You now have two parts of a puzzle: how to create new classes of objects and how to send messages among instantiated objects. What you’re missing is how to instantiate an object from a class.
Generally, object instantiation follows the same pattern. First, you allocate memory for the object, and then you initiate any variables and perform any other setup. The precise manner in which this is done can vary from class to class. A framework usually decides how object creation works—which for our purposes means iOS. As you’ll see later in this topic, iOS specifies two methods for object instantiation: the alloc-init method and the class (or factory) method. You’ll meet each of these soon, when we talk about iOS, but first let’s finish up with the core syntax of Objective-C.


