COMPOSITING
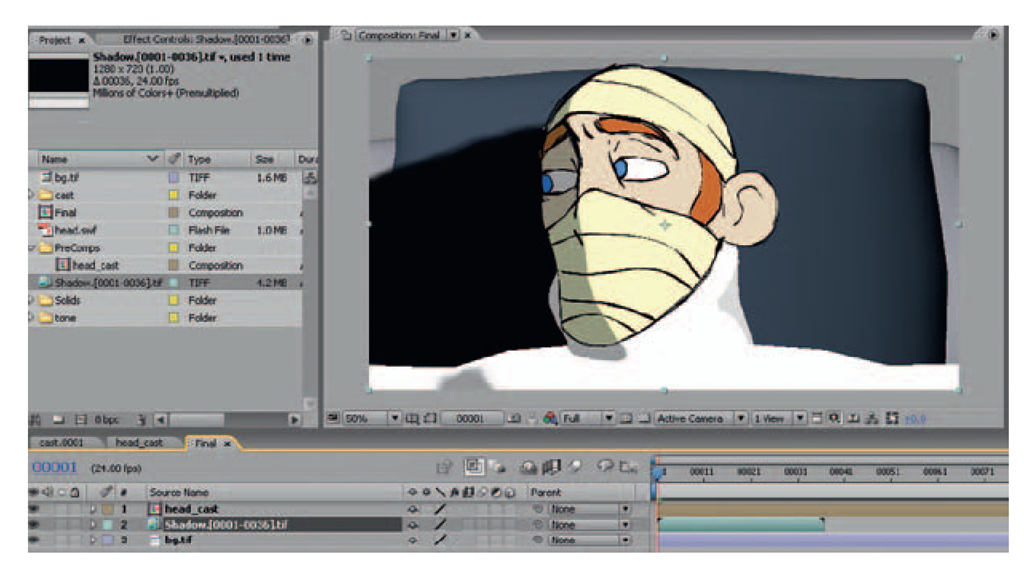
We’ll bring the shadows into our After Effects composite. Here is a different way to bring in images. Previously we dropped them in as single images. This makes it easy to pull out an image should you need to reuse just one. For these shadows, we’ll bring all of them in as one piece of footage.
1. Click File > Import > File.
2. Select the first image in the sequence.
3. Make sure that Interpret as Footage is selected.
4. This will bring all of the images in as a footage clip. You can see them listed as one piece of footage in the project tab.
Once the footage has been brought into After Effects, you can drag the shadow layer between the head and the bg layers. See Figure 6.58 for an example. It doesn’t matter if the shadow is bigger than what you need because the character will cover it. However, if there are any gaps where the shadow does not quite meet the character, you will need to extend the shadow in Photoshop or a painting package. In the image on the companion website, the shadow area (the white area) has been extended and simplified.
FIGURE 6.58 A shadow image placed between the character and the background.
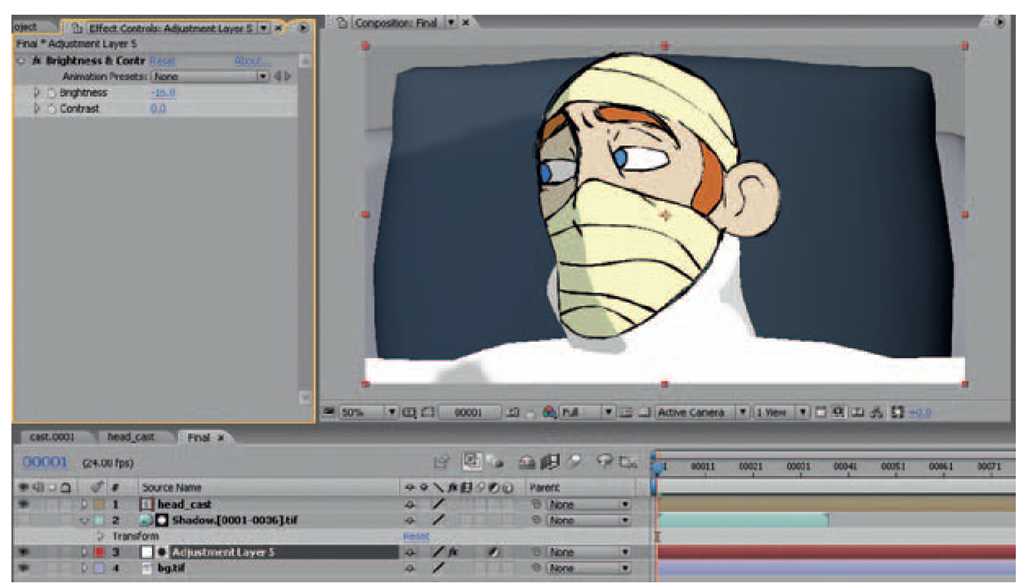
Depending on your art direction, you could simply adjust the opacity of the shadow layer and call this shot finished. However, just adding a black shadow does not give you a rich color palate. Instead, we will use the same method that we used previously for the tone to use the shadow as a matte to adjust the color of the background image(s):
1. Right-click in the timeline and add a New > Adjustment Layer above the background level.
2. Drag the shadow layer above the adjustment layer.
3. Because this is truly an alpha channel that we are using, select the Adjustment Layer and from the top menu click Layer > Track Matte > Alpha Matte.
4. Right-click on the Adjustment Layer and add EFFECT > Color Correction > Color Balance (HLS), Brightness and Contrast or whatever color correction method you desire.
5. Adjust the color correction settings until you receive the correct shadow level.
FIGURE 6.59 Final composite in After Effects.
3D TONES IN SHAKE
To carry on our tradition of using multiple types of software to achieve the same look, let’s take a look at how to achieve this composite in a node-based compositor. We’ll use Shake. As we have pointed out, node-based compositors are somewhat similar. You’ll be able to apply the same ideas to the software of your choice.
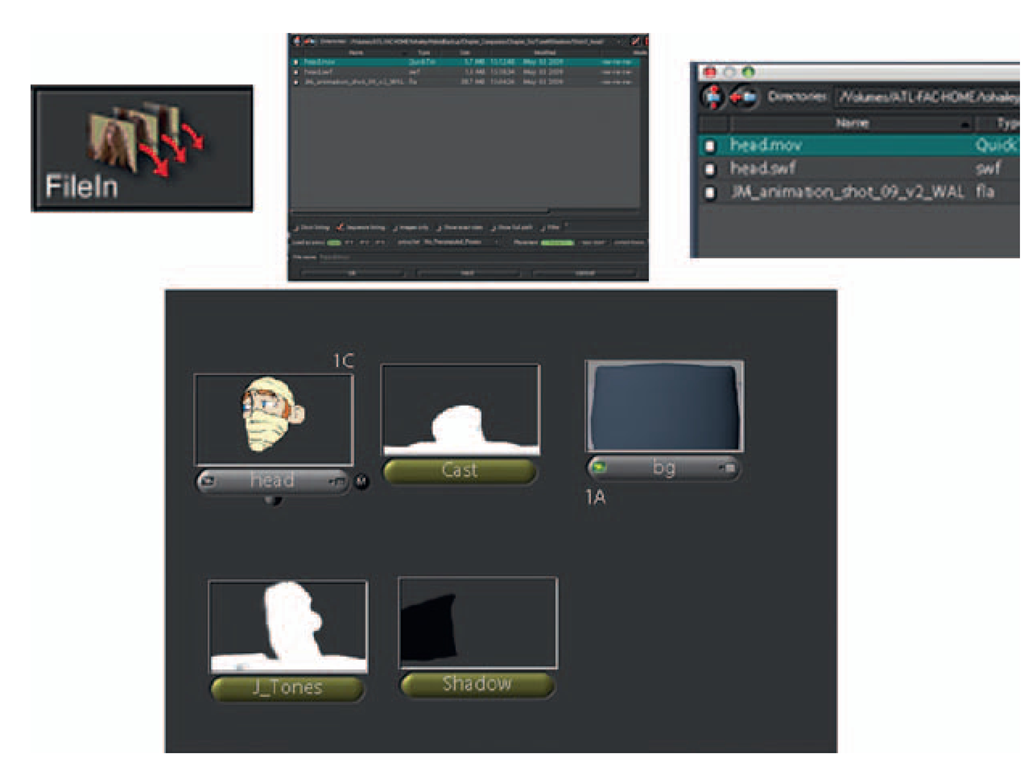
1. Locate the File In button in the Image tab and load in the assets. In this example, the following image sequences were loaded:
|
a. |
bg.tif, |
Maya Render |
|
b. |
shadow[1-81].tif, |
Maya Shadow Pass |
|
c. |
J_tone[1-81].tif |
Maya Two Tone Shader (RGB) |
|
d. |
cast[1-81].tif, |
Maya Render |
|
e. |
head.mov |
Flash swf converted to mov (Animation settings) |
You’ll note that the head.swf file we used in After Effects does not read into Shake. Therefore, the raw movie file or an image sequence needed to be used. In Figure 6.60, the images were loaded and show up in the node view tab.
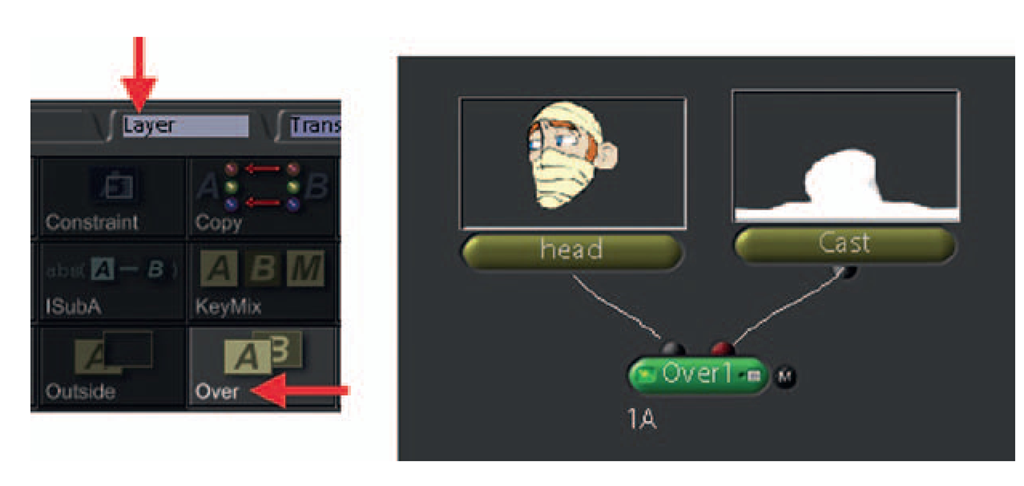
2. First we’ll composite the head overtop of the cast by locating the Layer tab and selecting an Over node (A over B).
3. Next, drag a connector line from the bottom of the cast image and hook into the top right of the Over node. Drag a connector line from the bottom of the head image and hook it into the top left of the Over node.
FIGURE 6.60 Shot assets loaded using multiple File In nodes.
FIGURE 6.61 Compositing the head over the cast.
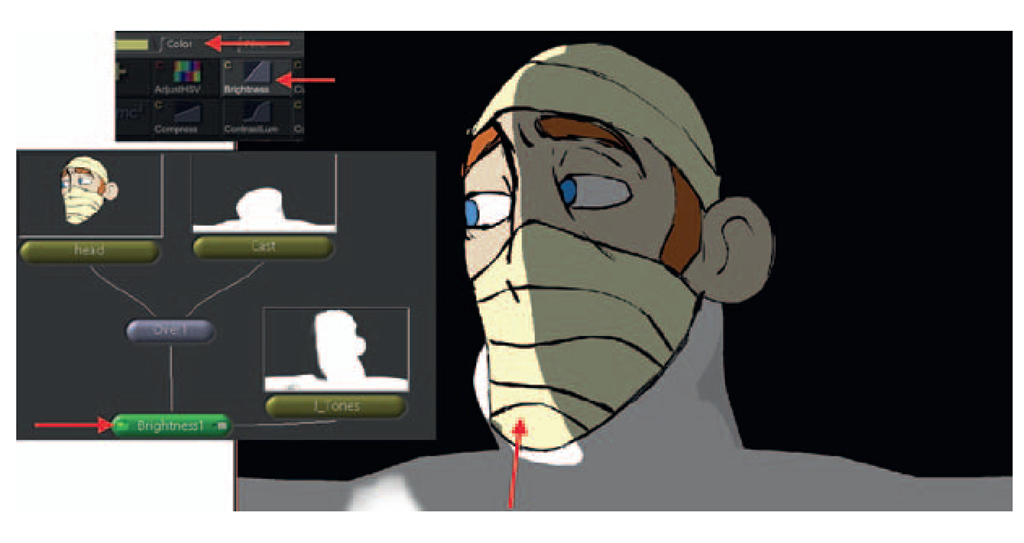
4. Locate the Color tab and select a Brightness node. Hook up the output of the Overl node (we should have named those— it would have been easier) to the new Brightness node. This will give an overall brightness to the head/cast composite.
5. To limit the composite to only the tone area, hook the output of the Tones image node to the right side of the Brightness node. This is where mattes are hooked in.
6. You’ll note in Figure 6.62 that the tone matte is working but it is giving the opposite effect. Anyone know why? Look back at the hint located in the listing of assets (step 1). Do you see it? The tone is in RGB, which means its alpha is actually the opposite of what we want to use. Mattes use the alpha channel.
FIGURE 6.62 Tone matte used to brighten the head/cast. This tone was created in RGB. The alpha is what the matte input uses.
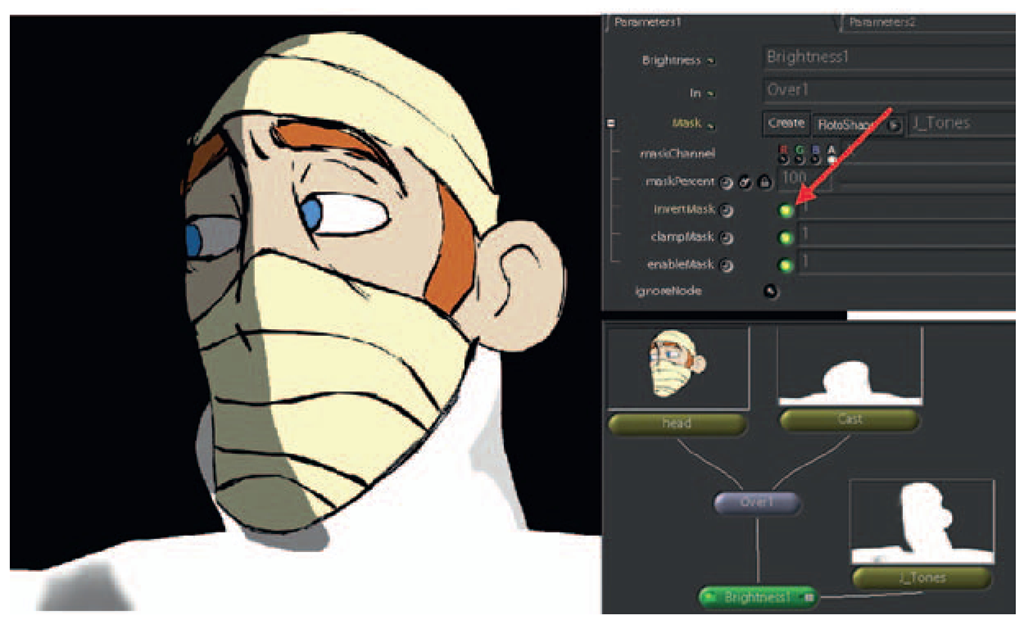
7. To correct the issue, double-click on the Brightness node in the node view tab. This will load the preview image into the preview tab (if it wasn’t already there) and load the adjustable parameters into the parameter tab.
8. Click on the little plus sign next to the Mask option. This will open more parameters. Click on the InvertMask radio button to turn it on. It will turn green. As you can see in Figure 6.63, the area that is being darkened is the correct area.
FIGURE 6.63 Inverting the tone mask.
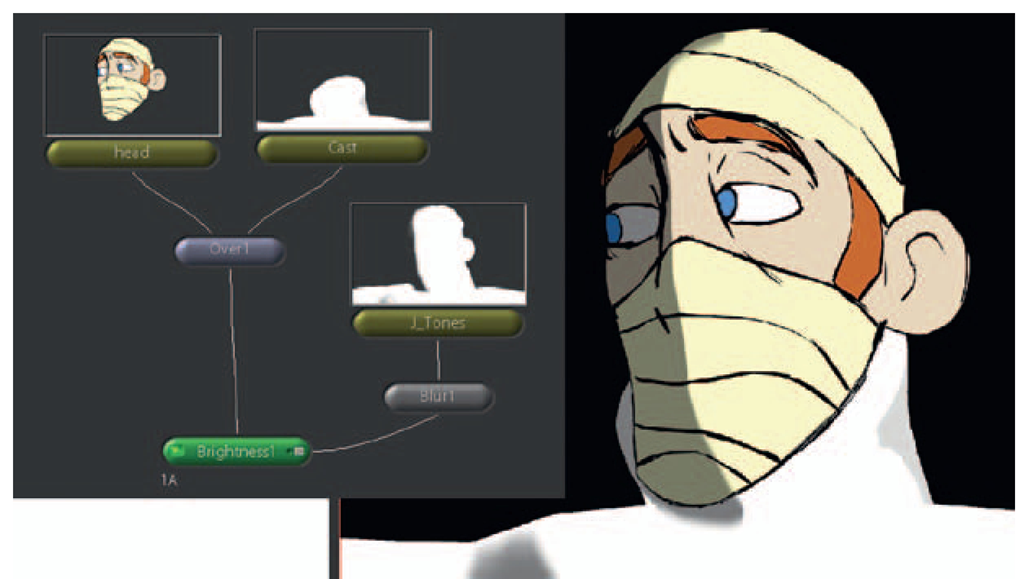
9. If you want to add a blur (or anything else) to adjust the matte, you can add that to the node network ahead of the Brightness node. In Figure 6.64, you can see the addition of a Blur node.
FIGURE 6.64 Blur node added to the matte before the Brightness node.
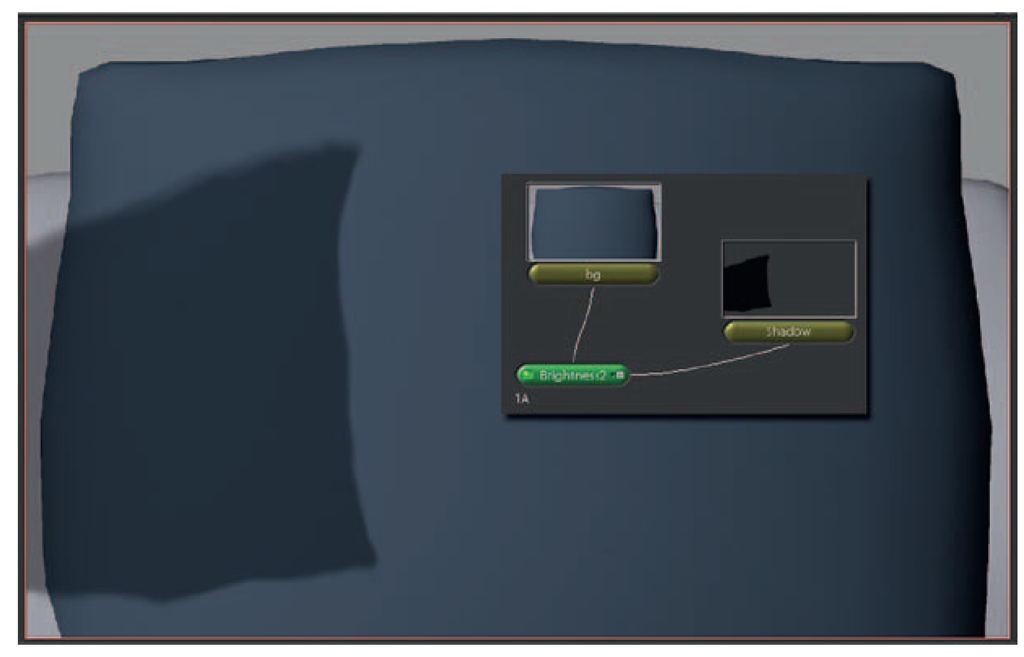
10. Continuing to the background area of this composite, select a Brightness node (found in the Color tab). Hook the background to the top of the Brightness node and the shadow to the right side of the Brightness node. This will use the shadow as a matte. Because the shadow pass was rendered out as an alpha channel, it will work as intended without any additional button clicks (Figure 6.65).
FIGURE 6.65 Shadow matte used to darken the background image.
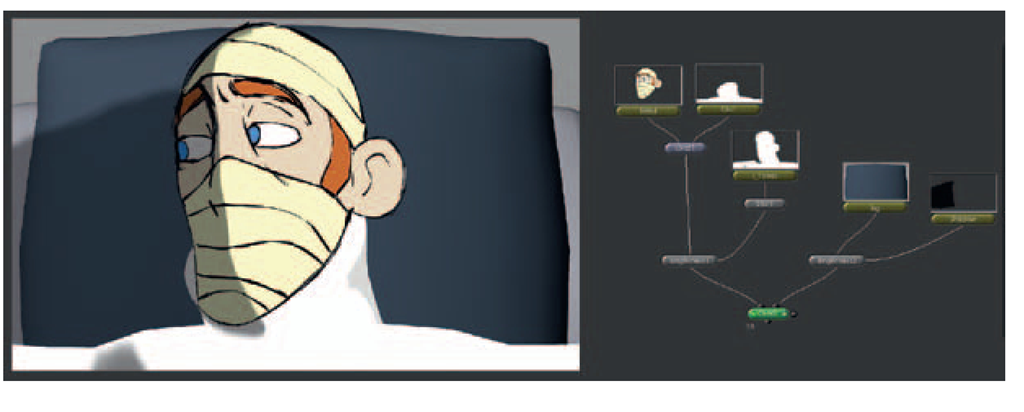
11. The last step is to put the two parts together. Select an Over node from the Layer tab. Hook up the output of the Bright-ness2 (the background and shadow precomp) to the right side of the Over node. Hook up the output of the Brightnessl (the head/tone precomp) to the left side of the Over node.
Double-click on this last Over node to see the preview in the preview tab (Figure 6.66).
FIGURE 6.66 Final Composite Tree in Shake.
12. To export your final movie file, you add a FileOut node to the last node in the tree. Actually you can put a FileOut node anywhere if needed. In the Image tab, click on the FileOut node. Take the output of your last node in the composite tree, Ours is called Over2. Hook it to the top of the FileOut node.
FIGURE 6.67 A FileOut node.
13. In the FileOut node’s parameters, add the path and file name of your final output (for example, JM_shot6_Final.mov).
14. To kick off the final render, make sure that the FileOut node is selected (it should be green) and click Render > Render Node.
