Understanding the Screens and Controls
The process of giving commands to the GeoExplorer consists of selecting choices from a "Main Menu" and its submenus, and then pressing the CMD key. In other words, you may freely press the arrow keys without changing anything but the display. And you may "escape" from whatever menu you are viewing to a higher-level menu by pressing "Esc." When you press the CMD key you are selecting from a menu. Sometimes this simply brings up new choices. But sometimes it changes the configuration or action of the receiver.
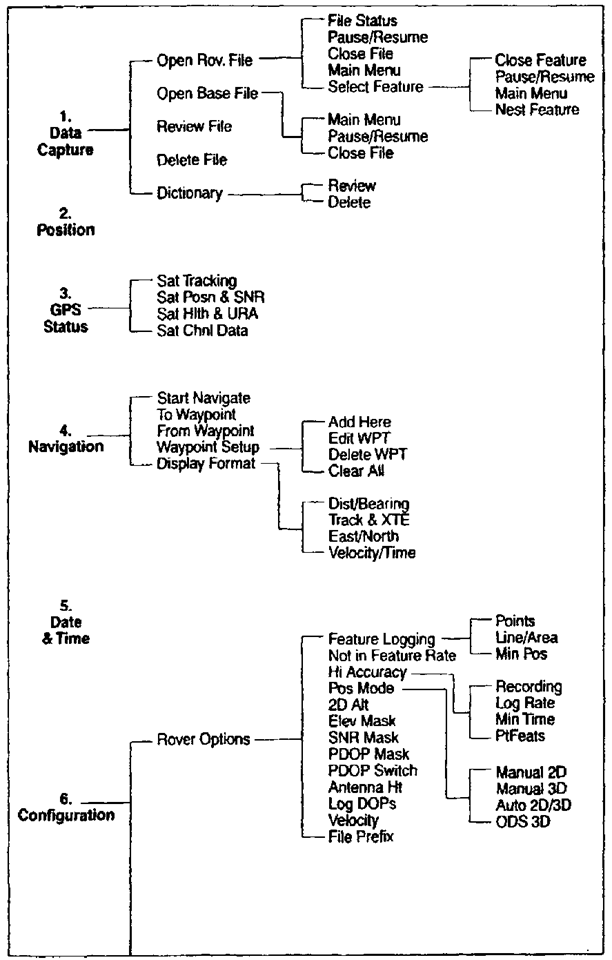
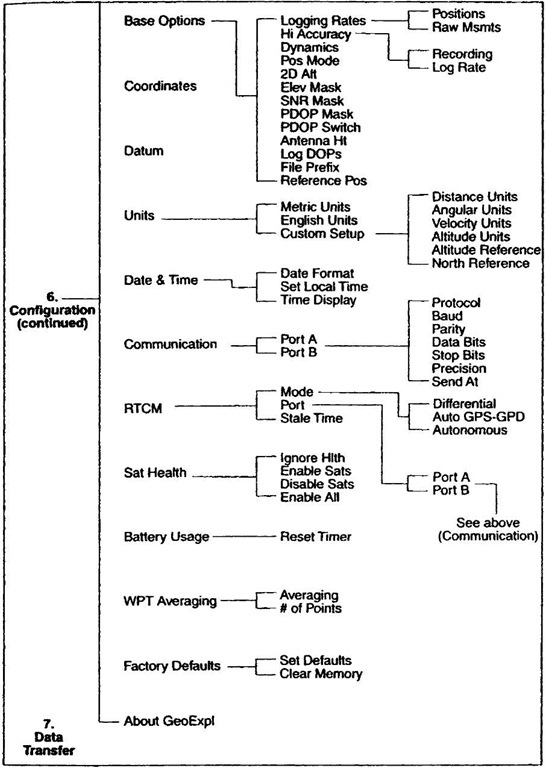
The menu structure of the GeoExplorer is strictly hierarchical. Figure 1—5 describes it.
The menu system for the Geo3 is explained on the CD-ROM tutorial that came with the unit. There are several routes to get to menu items on the Geo3—the menu system is not strictly hierarchical as it is in the GeoExplorer. The approach I will suggest in these boxes is to display the overall menu first by pressing Fn & OPTION. Then use the arrow keys to pick up the submenu you want.
To get to a particular menu item from the main menu, you simply select the appropriate menu items that lead to it. We first practice this by returning the receiver to its factory defaults.
{_} Make sure the GeoExplorer is on. Press "Esc" until "Main Menu" appears on the top line. On the third line of the screen you will notice a sequence of dark rectangles—flashing on and off. This is a highlight that identifies a field which may be either modified or selected by pressing buttons on the GeoExplorer.
{_} Press and hold the "down" key. Note that the main menu "scrolls" quickly, allowing you to find the item you want without repeatedly pressing the button.
{_} Press the "down" key until the highlight appears over menu item "6. Configuration." Press "CMD."
{_} Navigate through the menu system so you can reset the receiver to the "Factory Default" settings. To do this, press "CMD," then highlight "12.Fact Defaults." Press "CMD."
{_} You are presented with a screen that will allow you to either "Set Defaults" or "Clear Memory." If you didn’t want to do either, you could press "Esc" to return to the previous menu. Instead, use the arrow keys to make sure that highlight is over "Set Defaults." Press "CMD." Resetting the receiver in this way is a fairly serious step, so the GeoExplorer gives you a last chance to back out.
Figure 1-5. GeoExplorer menu structure.
Figure 1-5.GeoExplorer menu structure.
Double-check that you are not about to clear the memory, then press "CMD." The message should indicate that the receiver has been reset to its defaults. Press "Esc."14
|
- Configuration - |
|
1 .Rover Options |
|
2.Base Options |
|
3.Coordinates |
|
4.Datum |
|
5.Units |
|
6. Date & Time |
|
7.Communication |
|
8.RTCM |
|
9.Sat Health |
|
lO.Battery Usage |
|
11 .WPT Averaging |
|
12.Fact.Defaults |
|
13.About GeoExpl |
|
DAY mm/dd/yy |
|
hh:mm:ss UTC |
|
GPS Week: nnn |
|
Local – UTC:+00:00 |
To reset the Geo3 to factory defaults; press Fn, then OPTION, use the arrow keys to navigate to the Setup tab, press ENTER, navigate to the Reset box, press Enter, navigate to the Factory defaults box, press Enter, navigate to the Yes box, press Enter. From now on we will use a shorthand notation for a process like this. Since there is little room for confusion between buttons and displayed options the shorthand would be: Fn & OPTION ~ Setup ~ Reset ~ Factory defaults ~ Yes.
{__} Return the unit to the "Main Menu." Highlight and select "5. Date & Time." A screen something like this will appear:
On the top line you see the current day and date (actually, it’s the current day and date in Greenwich, England). The world’s time standard was previously called Greenwich Mean Time (GMT). The name for it now is Coordinated Universal Time, abbreviated UTC15 and it appears on the second line of the screen. UTC is based on a 24-hour clock. The third line shows the "GPS Week."
What is it?_. The GPS week counter starts at zero, then goes up to 1023 and then resets to zero. This resetting happened once, in August of 1999. Given the GPS week you wrote down above, about how many years would you say have elapsed since the official start of the NAVSTAR GPS project? _________ . In what year was the original GPS Week number zero? ____ . The fourth line is a formula which declares that "Local minus UTC time is zero." Unless you are in England, that is clearly a lie.
{__ } To correct the receiver so it shows true local time, and to practice some more with menus, navigate to:
Configuration ~ Date & Time ~ Set Local Time16
Note the fourth line of the screen:
Local—UTC: 00:00 with a highlight flashing over the rightmost two digits. Use the "down" key to make the formula read: Local— UTC: -05:00 (This says: "Local time minus UTC time is negative five hours. Note the two negative signs.) This sets the local time to Eastern Standard Time (EST). You may reason as follows: EST is five hours earlier than UTC time. For example, when it is 11 A.M. in Greenwich it is 6 A.M. in the eastern United States. Six minus eleven equals negative five.
Greenwich time does not change when daylight savings time begins. So the difference between EDT (Eastern Daylight Time) and UTC is four hours.
{__ } Using the facts above, and knowing the difference between your local time and Eastern Time, set up the correct formula on the screen. Press "CMD."
{_} Move to "3. Time Display." Select Local 12 Hours. Press "CMD."
{__ } Return to "Date & Time" on the Main Menu to verify that they are set correctly. The time shown on this screen should be the correct local time, assuming your receiver has taken data from the satellites recently. If the receiver has been indoors for some time, the time shown may be off by a few seconds. If the receiver’s time differs from your local time by a large amount (fifteen minutes or more), you need to rethink the formula you entered under "Configuration."
To set the proper time zone on the Geo3: Fn & OPTION ~ Setup ~ Configurations ~ Formats ~ Time Zone. Put in the hours difference between UTC and your time zone (remember the sign), using the arrow keys. Press ENTER. While you are in this part of the menu system you can also set the clock to 12 or 24 hours. (And, if you like, you may choose a language other than English. Take your pick of German, Spanish, French, Portuguese, or Russian. Actually, you ought to do this—say Russian—just for fun. But remember the steps (and where the displayed items are so you can get back to English, or, worst case, to Factory defaults.) When done, press CLOSE a couple of times to get back to the main Setup tab options.
{_} Write down the information under "Configuration ~ About GeoExpl."
Compare this information with your notes from the screens that appeared when you turned on the GPS receiver.
To get the general information about the Geo3: Fn & OPTION ~ Setup ~ About.
Setting Vital Parameters
Several settings under "Configuration" must be made correctly; if not, data collection may be hampered or nullified.
{_} Go to "Configuration ~ Rover17 Options." This is a long menu, but many of the items will not apply to your data collection at this time.
{_} Highlight the field associated with "Points" under "Feature Logging" and press "CMD." Set the logging rate to 5 seconds. Use the "up" and "down" keys to change the value, and finally press "CMD." (We won’t use this in the early part of the text and we’d prefer to turn it off, but we can’t, so we are setting it to an arbitrary value.)
|
Rover Options - |
|
Feature Logging |
|
Points |
|
Line/Area |
|
Min Posn |
|
Not in Feature |
|
Rate |
|
High Accuracy |
|
Recording |
|
Log Rate |
|
Min Time |
|
PtFeats |
|
Dynamics |
|
Pos Mode |
|
2D Alt |
|
Elev Mask |
|
SNR Mask |
|
PDOP Mask |
|
PDOP Switch |
|
Antenna Ht |
|
Log DOPs |
|
Velocity |
|
File Prefix |
{_} Highlight the field associated with "Line/Area" under "Feature Logging" and press "CMD." Set the logging rate to "Off." (We also won’t use this in the early part of the text so we turn it off.) Press CMD.
{__ } Highlight the field associated with "Min Posn" (meaning "Minimum Positions" under "Feature Logging" and press "CMD." Set this value to "Off." As you have figured out by now, you press "CMD" to set the value.
{__ } Highlight the field associated with "Rate" under "Not in Feature" and press "CMD." Set this value to "Off."
{__ } Moving on down the menu, set the High Accuracy Recording rate to "Off."
{__ } Highlight the field associated with "Dynamics." Select "Sea" and note the results. Now change the dynamics to "Land" mode. The dynamics selection affects the way the receiver tracks satellites. For example, in "LAND" mode it is expected that the receiver will move more slowly than in "AIR" mode. A more complete description is provided later.
The Geo3 does not have a Dynamics setting.
{__} Make sure the "Pos Mode" is set to "Manual 3D." This "position fix mode" should always, repeat, always, be set to "Manual 3D" unless you have enough knowledge and a particular need to set it to something else.
{__ } Ignore the 2D Alt setting.
{__ } Make sure the "Elev Mask" is set to "15." The elevation mask dictates that no satellite below the number of degrees (measured with the horizon considered as 0° and the zenith considered as 90°) specified will make a contribution to finding a position. For a roving receiver, as this one will be when you get it outside, a good value is 15°.
In general, a "mask" is a user set value. The receiver compares a given mask with another value that is automatically computed by the receiver. Based on the outcome of the comparison, the receiver uses (or doesn’t use) a satellite (or a set of satellites called a "constellation") in calculating a position fix. That is, a mask "blinds" the receiver to certain satellites whose signals or positions do not meet the proper criteria for good position finding.
{_} Select the "SNR Mask." Each satellite used to compute a position should have a "Signal-to-Noise Ratio" (sometimes referred to as signal strength) of four or greater. Verify or set this parameter correctly.
{__ } Set the PDOP Mask to "6."
We will explain the "PDOP" (Position Dilution Of Precision) term later. For now, just be aware that any PDOP over eight is unacceptable, and four is a figure to use for really precise positioning finding.
{__ } Ignore the PDOP Switch.
{__ } Set the Antenna Ht (antenna height) at one meter, since that is about how far you will be holding the antenna over the point whose position you are trying to determine.
{__ } Ignore Log DOPs, Velocity, and File Prefix.
The Geo3 allows you to set most of the options described above. Getting to the right menu items is, of course, done in a different way. Basically, you want to go: Fn & OPTION ~ Configurations. Some of the various settings may be made under Fn & OPTION— Configurations ~ Data. Others are made under Fn & OPTION—GPS ~ OPTION—Advanced mode. The CLOSE key will come in handy at times.


