PROJECT 2B
Taking Data Along a Path
In this project you will again use the receiver to take fixes and record the coordinates in the datalogger. The difference between this and the previous project (2A) is that you will move the receiver antenna through space in order to record data points along a track. This capability allows you to generate the more interesting features of a GIS: arcs and polygons, rather than simply points.
You may select one of three ways to move the antenna: by foot, bicycle, or automobile. Read the sections below to decide how you want to take data. (In the event that you cannot take moving data, several data files are provided on the CD-ROM that accompanies this topic, so you may process those files. Files found there include those taken by automobile, bicycle, airplane, helicopter, sailplane, cruise ship, and sailboat. I have no data presently from a hot air balloon; if you generate some, please feel free to send it in.)
Generating a series of points while moving provides some challenges.
• Accuracy. We indicated that 180 fixes at a single location provided a reasonable approximation of the position of the antenna. In collecting data while moving, of course, you will collect only one fix at each location, with the concomitant loss of accuracy.
• Constellation Vacillation. When you set up the receiver at a single point, you can try to optimize the view of the satellites by staying away from obstructions. While moving, you have little opportunity to pick the points at which the receiver calculates a position. As the antenna moves along the path to different positions, the receiver, by simply trying to pick the best set of four satellites to calculate positions, may choose different constellations of four satellites, due to signal obstruction caused by tree canopy, buildings, overpasses, or tunnels. Because of the various errors, which are different from satellite to satellite, a position fix reported by the receiver using a new constellation may be different from where it would have been had the previous constellation been retained. Thus, the position fixes may not follow a clean line, but may jump from side to side of the true path. A second consideration in taking data along a path is that each change in constellation increases the amount of memory necessary to store data.
• Multipath. Substantial errors may occur if a given radio signal follows two paths to the receiver antenna. This can happen if a part of the signal is bounced off an object, such as a building. The arrival of two or more parts of the signal at different times can confuse the receiver and produce a false reading. (You may have seen the results of multipath on the screen of a television set receiving signals from an antenna [not from cable]; it appears as "ghosting"—a doubling or tripling of an image.) Many GPS receivers are programmed to disregard the second signal. But a problem can occur if the direct signal is blocked but the related bounced signal is seen by the antenna and recorded.
Taking Data on Foot
While walking, you need to be careful to keep the antenna high enough so that no part of your body impedes the signal. With the first version of the GeoExplorer, this means holding it high, well out in front of you, so that the internal antenna can have a clear "view" of the sky. With the GeoExplorer II with the external antenna, it is probably also a good idea not to wave the antenna around any more than is absolutely necessary. A pole, with the unit or antenna affixed to it, attached to a backpack is a nice solution.
Set the interval between logged points based on time, not distance, although you might think that taking a point every so many feet or meters would seem like a good idea. The problem is that the receiver will record almost all spurious points that occur, because it is set to record a point that is more than "d" distance away from the last point. If "d" is, say, set to 20 feet, and errors creates a point 25 feet away from the last point, this spurious point will be recorded. (Recall that the receiver actually generates points at more than one per second.) If, instead, you are recording points, say, every four seconds, then there is a better chance that a spurious point may be ignored. You may certainly try this both ways, but you will probably get a ragged path with many spikes in it by using distance as the logging interval while walking.
A brisk walking speed is about five feet per second, so you can set the time interval accordingly, depending on the point spacing you want. For this project, if you are walking, select a path, preferably closed, of a mile or two.
Collecting Data by Bicycle
An economical way to collect data over significant distances along a linear path is to use a bicycle. But there are a number of pitfalls, in addition to the general dangers all bicyclists face, mostly from automobiles. The principal problem relates to the line-of-sight requirement: unless the antenna is positioned far away from your body, or above it, the receiver will consistently lose its lock on one satellite or another.
One solution—not recommended—is to attach the antenna to the highest point on the "you+bicycle" combination, but bicycle helmets are pretty nerdy-looking appliances anyway; when you duct-tape a GPS antenna to the top of it the effect is, well, startling —to the point that neighbors come out with cameras to capture the image. One solution is to "shoot the moon" as it were, to give up any pretense of self-respect, and clothe the antenna in one of those "propeller beanies." Some other solutions:
• have a special bracket made for a surveying pole with the antenna affixed,
• wear a backpack containing the receiver with the antenna on a pole
• ride a tandem bike (a bicycle built for two), and attach the antenna to the second seat. The effect is still pretty ridiculous but let’s face it: you aren’t going to collect GPS data on a bicycle while maintaining a significant level of dignity anyway.
Collecting Data by Automobile
To collect data by automobile you should ideally use the remote antenna, available for the GeoExplorer II, with a magnetic mount. Place the antenna on top of the car and run the antenna lead through a window, preferably in a rear door. Some safety tips:6
• Put a thin pad of cloth between the magnetic mount and the car roof to prevent scratching the car’s finish.
• If you want to roll up the car’s window be careful not to crimp the antenna wire between the glass and the frame; this is especially easy to do with power windows.
• Do not open the door through which the antenna lead is threaded.
• Leave enough slack in the antenna lead outside the window so that when you do accidentally open the "antenna lead" door you don’t drag the antenna across the roof.
If you are not using a remote antenna, place the GeoExplorer as far forward on the dashboard, under the windshield, as you can, so that metal of the car’s roof blocks signals as little as possible.
One advantage to collecting data by car is that you can use the power supply from the vehicle. However, remember not to start or stop the enginewith the receiver attached to the car’s power supply. The proper order of events is:
1. Start the car engine,
2. Connect the plug to the car’s auxiliary power (cigarette lighter) receptacle,
3. Turn on the receiver,
4. When you are ready, start recording data.
When you are through, undo the steps above, inreverseorder.
With automobile data collection, you may use either time or distance as the logging interval. While errors may still be a problem, the distance you set between logged points is going to be much greater with the car than while walking. Thus, the chance of a point being generated by a multipath event that is greater than the logging interval is reduced considerably.
While riding as a passenger in the auto (the driver is supposed to keep eyes on the road) examine the navigation screen occasionally. You will notice that it gives the car’s speed within a mile per hour or so, and the direction as well. (You may set the units of display so as to get miles per hour; changing units will not affect data collection, although pulling the receiver back from its place at the front of the dash may.)
Actual Data Collection
{_} Fill out the initial portions of the Data Collection Parameter Sheet.
{_} Choose a method of transporting the antenna.
{_} Choose a route—perhaps a closed loop.
{_} Check and set the parameters under "Configuration ~ Rover Options."
{_} Decide on a recording interval.
{_} Start the data recording process.
{_} Take a minimum of 200 points.
{_} Stop recording data.
{_} Complete the Data Collection Parameter Form.
{_} Shut off the receiver.
PROJECT 2C
Back Inside
{_} If you have not already done so, finish filling out the data collection parameter sheet(s) for the PROJECT 2A (and 2B) data collection session(s).
{_} Compare the memory used and the number of fixes collected.
How many bytes did the average fix require? _. If this is much larger than 25 then it may be that the unit had to repeatedly change constellations, and hence store more data, to maintain the set of four satellites with the best PDOP. While any extended data collection session will involve constellation changes—after all, each satellite is only visible from a given point of the earth for a few hours a day—you will get the best data if you are careful not to force constellation changes by obstructing the signals.
With the Geo3 you can get some information about the files you just took by: Fn & OPTION ~ File ~ OPTION ~ File info. Then select the file you want infomation about with the up and down arrow keys. Here you are told about the number of positions in files, but not their size. If you want to know the file size you can use the Delete menu item rather than File info. Don’t hit ENTER. You needn’t delete the file to have a look at it. Use CLOSE.
At this point you have recorded spatial data, but it is essentially locked away in the datalogger. Copying it from the datalogger into a personal computer (PC) is the next undertaking. This process is sometimes called uploading data.
{_} The first step in transferring data is to make a physical connection between the receiver/datalogger and the PC. Your instructor will have paved the way for this. Probably all you will have to do is connect the datalogger to a cable with a round plug, the other end of which is connected to the computer.7 It is very important that you use care in connecting the cable. First, be careful that you merely open the rubber grommet assembly on the back of the GeoExplorer; don’t pull the whole assembly out of the unit. Second, the cable will fit into the GeoExplorer plug in only one way—unless you force it, in which case you can bend the delicate pins on the cable plug. Hold the unit with your left hand, out in front of you, top side up, with the back facing you. Take the cable in your right hand and, with the cord going off to your right, make the connection. The proper configuration is with the plug on the left side of the unit and the cable stretching horizontally across the back of the unit, to the right.
Connecting the Geo3 to a computer can be done in a couple of ways. The simplest is to connect the cradle that came with the Geo3 to both the computer and an AC power supply. Probably this will have been done for you. All that remains is to put the Geo3 in the cradle and turn it on.
Execute the Pathfinder Office Software
{_} Start the Pathfinder Office Software: I’m assuming that you have a passing familiarity with Windows 95, Windows 98, Windows NT, Windows 2000, or their successors. If not, a crash course or some tutoring is in order. Your instructor will have given you some directions on how to log onto the computer you will use and to invoke Pathfinder Office. Follow those directions now.
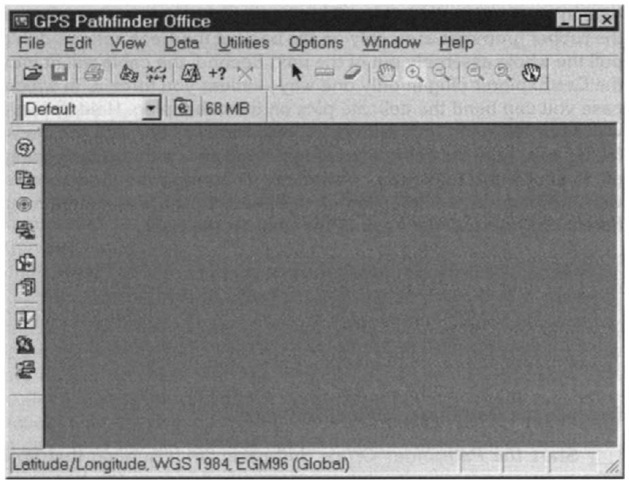
{_} If a Select Project window came up when Pathfinder Office started, dismiss it (by clicking the "X" in the upper right of that window). The results should look something like Figure 2—10, perhaps missing a toolbar or two; we’ll fix that. If the Pathfinder Office window does not occupy the full screen, double-click on its title bar.
"Project" is one of those annoying English words that subsume two distinctly different pronunciations and meanings under a single spelling.8 As a verb, it can mean, for example, shine light through film onto a screen, or "project" a piece of the Earth’s surface to make a map—that is, make a geographic "projection." But "project," as a noun, can mean a focus of activity, time, data, money, and so on, so as to accomplish some goal, as in to "launch a project."
Figure 2-10. The main window of GPS Pathfinder Office.
In the case of Pathfinder Office, it means the latter, although, since the subject in general is geographic data, no one could complain had you guessed otherwise. In any event, the function of the "Project" is to serve as a closet for the files you will work with.
A Project in Pathfinder Office has several components. First is the Project Name. This name points to a primary folder (preferably with the same name, but that is not required). The primary folder usually contains data files plus three subfolders, named backup, base, and export.
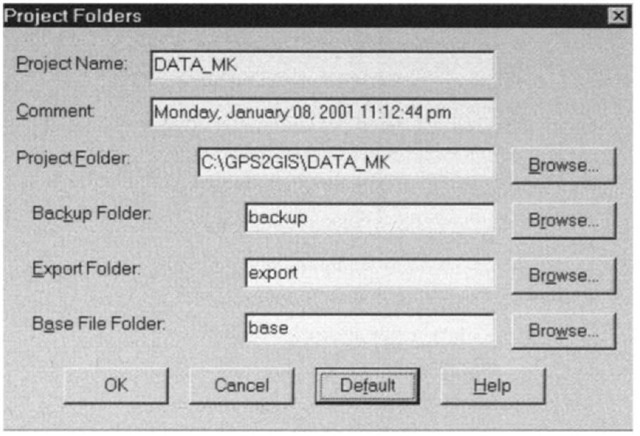
{_} Make a new Project with its associated folders: In the File menu click Projects. (From now on I may indicate a sequence of actions like this by File ~ Projects.) Click "New" in the Select Project window.
Figure 2-11. Setting up the Project and its folders.
A "Project Folders" window will appear. You will make a project with the name DATA_yis, where "yis" indicates Your InitialS (in capital letters, up to three). For example: DATA_MK.
If you click OK the window will disappear and the Select Project window will again become active.
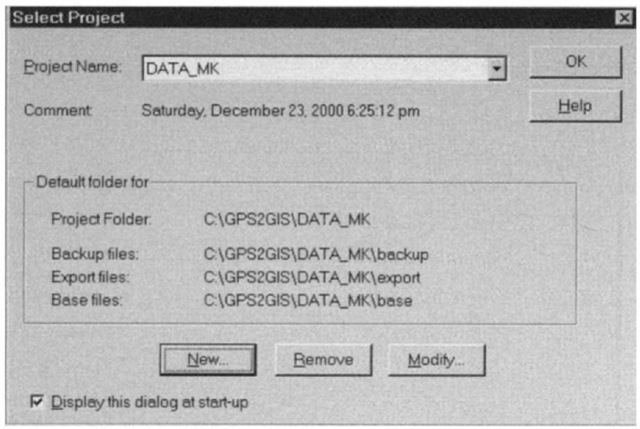
{__ } Examine the Select Project window. It should look about like Figure 2—12. If it does, okay the window. You have now set up Pathfinder Office so it will install your files in the proper places.
Figure 2-12. Selecting a Project.
You have established a main folder for your data, and three sub-folders under it for functions that will be explained later.
{_} Select Options ~ Toolbars to make sure that checks appear next to all toolbar selections: Standard, Project, Mouse, and Utility. Also make sure a check appears next to the Status Bar menu item.
{_} Check that the Project name appears on the Project toolbar.
Also on this toolbar will be the amount of disk space remaining on the associated disk drive. You should also see a folder icon. Click on it. You will see the contents of the folder for the project. It will contain three folders: backup, base, and export. Dismiss the project folder.
To transfer data from one device to another, they have to speak in the same dialect, as it were. This means the communication parameters on each device must be set to the same values. A common protocol is called XMODEM. A commonly used rate of transfer is 9600 bits per second (called "baud"10) which results in about 1200 bytes, or characters per second.11 Parameters of Parity,
|
- Comm Port A - |
|
1 .Protocol XMDM |
|
2.Baud 9600 |
|
3. Parity None |
|
4.Data Bits 8 |
|
5.Stop Bits 1 |
Data Bits, and Stop Bits relate to the configuration of bits in each byte sent.
{_} Set the communication parameters in the GeoExplorer: Turn on the GeoExplorer Receiver/Datalogger. Pick "Configuration ~ Com munication ~ Port A." The screen will probably appear as shown below. If not, change the parameters so it does, unless your instructor has indicated otherwise.
Probably your PC has been configured to accept data in this form. The local convention may be different, however. If things don’t seem to be working, check with your instructor.
{__ } From the main menu on the receiver, select "7. Data Transfer." The receiver should tell you that "Comm is Idle."
To set the communication parameters on the Geo3, pick up the unit from the cradle and simply: Fn & OPTION ~ Setup ~ Configurations ~ COMMS ~ Enter. For Data transfer choose "Support module." Skip over RCTM input and NMEA output. Set the Port settings to those shown above for the GeoExplorer. Press CLOSE a couple of times. Return the Geo3 to the cradle.
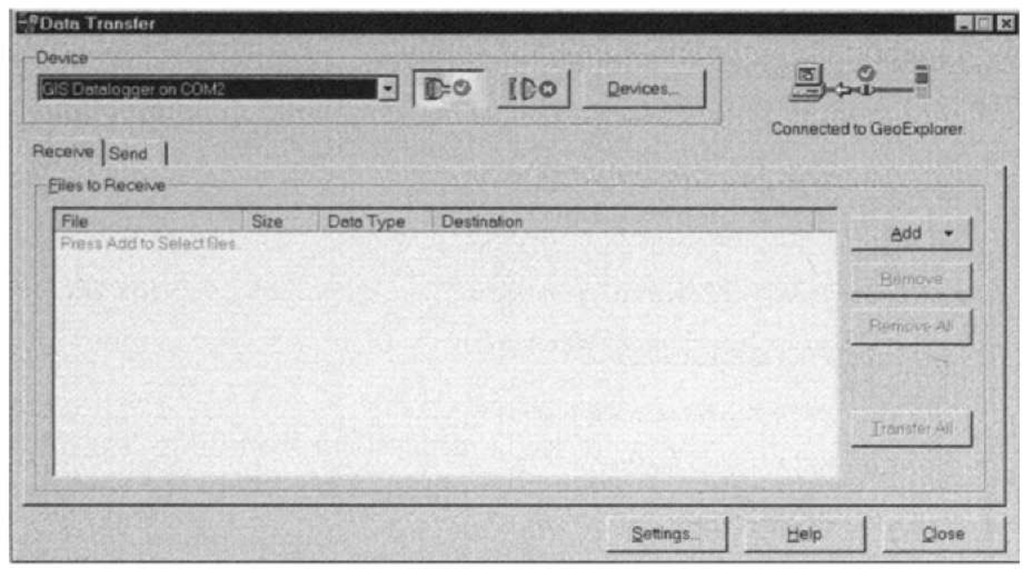
{__} Prepare to ship the files you collected to the PC: In Pathfinder Office select Utilities, then Data Transfer.12 Shortly a Data Transfer window should appear, as in Figure 2—13.
The Device field in the upper left should confirm that you are connected to a GIS datalogger; the port name should be given. On the right side of the window it will indicate the type of device, e.g. GeoExplorer or Geo3. The Receive and Send buttons refer to the primary direction of dataflow. In this case you want the PC to receive data.
Figure 2-13. Connection to GeoExplorer prior to file transfer.
If you press the Settings button you can (1) say whether you should be told if you are about to overwrite a file already on the computer (you should), (2) whether you want backup copies of the files made on the PC (yes), and (3) whether the files on your GeoExplorer or Geo3 should be deleted after they are transferred (not a good idea).
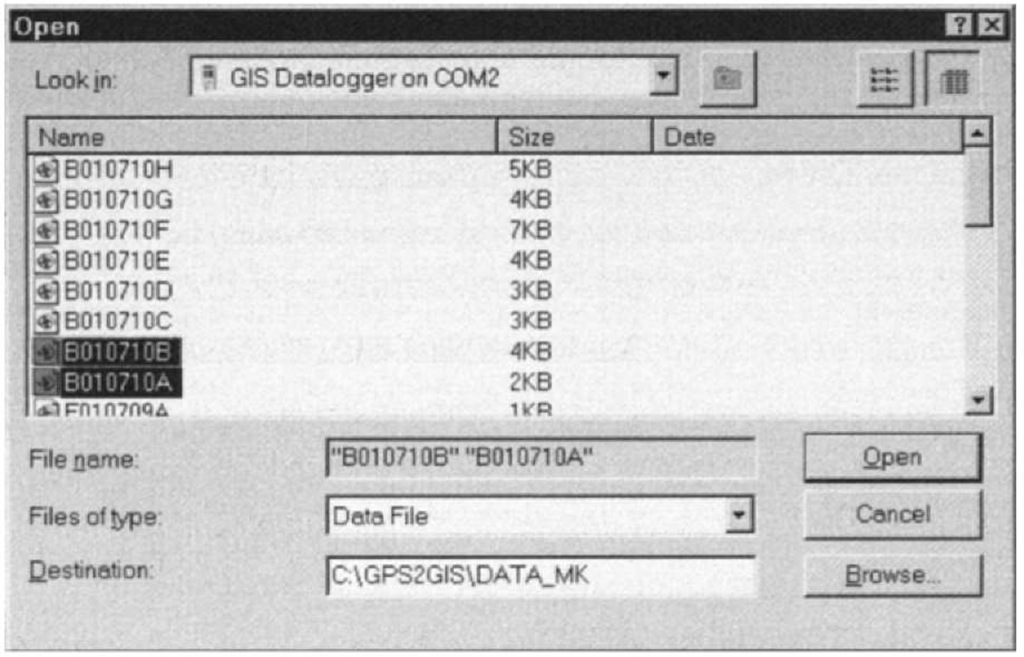
{__} Press the "Add" button and pick Data File. An "Open" window will appear; within it you will see the list of data files that reside within the datalogger. Please see Figure 2—14. Move your mouse cursor over the buttons on the upper right of the window. Press the one that says "Details." Depending on the datalogger you will get different amounts of information.
{__ } Select, by clicking with the mouse on the file name, one of the files you want to add to the Data Transfer window. If you want more than one file added, hold down the Shift key and click on the other file names. (If you need to start over in selecting files, click in a blank area of the window.) Examine the Destination field to make certain the files are going where you want them to. Click Open. The "Open" window will disappear and the files you selected will appear in the Data Transfer window.
Figure 2-14. Transferring files from the GeoExplorer to the PC.
{__ } Pick up the datalogger [unless it is a Geo3 in the cradle] and hold it so that you can see both it and the PC screen. Press the "Transfer All" button and observe. The datalogger will indicate that it is sending a file (the bar graph will decrease); the PC will show a window (Receiving) indicating that a file is being received (its bar graph will increase). This may all go by pretty fast for small files. (If the process should stop because of a communication error, just press the Transfer All button again. The transfer should proceed from where it halted.)
{__ } After the transfer stops you can ask for More Details. Read, then dismiss that window. Click Close on the Transfer Completed window.
{__ } While the Data Transfer window is still open, repeat the process. Note the warning you get about overwriting files. You can do this as many times as you want to get the feel for how to transfer data.) When through, click Close on the Data Transfer window.
{_} On the Project Toolbar is a folder icon with a blue-green logo.
When you press it, up will come a window with the main project folder: _:\GPS2GIS\DATA_yis. Note that your files, with the extension "SSF"13—meaning standard storage format—are located in that folder. There is also a "Log" file giving the details of the transfer. Note also the three subdirectories or folders in _: \GPS2GIS\DATA_yis. Both the export and the base folders will be empty, but if you double-click the backup folder you will see that it contains not only copies of the SSF files you just transferred, but also RAW (raw data) files that constitute intermediate steps in the construction of the SSF files. You may never need these files, but then again you might—long after the data have been cleared out of the receiver. Dismiss the window. Exit Pathfinder Office.
{__ } Before you disconnect the GeoExplorer from the PC, do Exercise 2—1.
Exercise—Transfer the Almanac
Exercise 2.1: A NAVSTAR almanac provides a description of approximately where the satellites are at any given moment in time. Collected by and retained in the GPS receiver, the almanac tells the receiver which satellites it will be able to see during a data collection session. That is, the almanac helps in the initial phases of outdoor data collection. So the receiver automatically collects an almanac every time it is turned on, if it can. To collect an almanac, the receiver needs to be picking up the signal from at least one satellite for about 15 minutes. Almanacs are available from the satellites, all day, every day, and usually have validity for up to three months. Of course, if a new satellite is put up, or the existing ones are rearranged in their orbits, the almanac becomes less useful immediately.
The almanac may be copied from the receiver to the PC using Pathfinder Office. Having an almanac on the PC is not necessary in order to use the data you have collected, but later you will see that it is useful for planning a data collection session. For example, when used with a Pathfinder Office module called QuickPlan, it can tell you how many satellites are available at any time during the day, and what DOP values you can expect. Furthermore, copying an almanac to the PC is illustrative of the communication process, so we do it for practice.
{__ } With the GeoExplorer still connected, restart Pathfinder Office. Using the knowledge you gained from transferring files, set up Pathfinder Office to transfer the almanac to your PC. You will use the data type "Almanac." The path and Output File will appear by default as
C:\Program Files\Common Files\TrimbIe\Almanacs \Almanac.ssf.14
Change the Almanac name to Almanac_yis and store it in __ : \GPS2GIS\DATA_yis. (You can store the almanac on the PC by any name and in any place. However, unless told otherwise, QuickPlan will look for the latest almanac with the name "Almanac" in the default location.) When you press Transfer All the GeoExplorer and Pathfinder Office will both correctly claim that the almanac is being transferred.
{__ } When the transfer is done, close the Data Transfer window and exit Pathfinder Office. Turn off the GeoExplorer, disconnect it from the battery or other power source, and carefully disconnect the upload cable.
You have completed uploading your data files and the current almanac. (You were asked to put the almanac in your own folder since others might want to use the "official" almanac in
C:\Program Files\Common Files\Trimble\Almanacs \Almanac.ssf, which might have been collected at a later time.) In the next topic you look at several sample data files with Pathfinder office, and then at your own files.
