In This Chapter
Using add-ins: What a concept!
Knowing why you might want to create your own add-ins
Creating custom add-ins
One of the slickest features of Excel — at least in my mind — is the capability to create add-ins. In this chapter, I explain why this feature is so slick and show you how to create add-ins by using only the tools built into Excel.
Okay… So What’s an Add-In?
What’s an add-in? Glad you asked. An Excel add-in is something you add to enhance Excel’s functionality. Some add-ins provide new worksheet functions you can use in formulas; other add-ins provide new commands or utilities. If the add-in is designed properly, the new features blend in well with the original interface, so they appear to be part of the program.
Excel ships with several add-ins. Some of the more popular include the Analysis ToolPak, Conditional Sum Wizard, and Solver. You can also get Excel add-ins from third-party suppliers or as shareware; my Power Utility Pak is an example.
Any knowledgeable user can create add-ins (but VBA programming skills are required). An Excel add-in is basically a different form of an XLS workbook file. More specifically, an add-in is a normal XLS workbook with the following differences:
The IsAddin property of the Workbook is True.
The workbook window is hidden and can’t be unhidden using the Window Unhide command.
The workbook is not a member of the Workbooks collection.
You can convert any XLS file into an add-in. Because add-ins are always hidden, you can’t display worksheets or chart sheets contained in an add-in. However, you can access an add-in’s VBA Sub and Function procedures and display dialog boxes contained on UserForms.
Excel add-ins usually have an XLA file extension to distinguish them from XLS worksheet files. However, this is not a strict requirement. An add-in can have any extension that you want.
Why Create Add-Ins?
You might decide to convert your XLS application into an add-in for any of the following reasons:
Make it more difficult to access your code. When you distribute an application as an add-in (and you protect it), casual users can’t view the sheets in the workbook. If you use proprietary techniques in your VBA code, you can make it more difficult for others to copy the code. Excel’s protection features aren’t perfect, and password-cracking utilities are available.
Avoid confusion. If a user loads your application as an add-in, the file is invisible and therefore less likely to confuse novice users or get in the way. Unlike a hidden XLS workbook, an add-in can’t be revealed.
Simplify access to worksheet functions. Custom worksheet functions that you store in an add-in don’t require the workbook name qualifier. For example, if you store a custom function named MOVAVG in a workbook named NEWFUNC.XLS, you must use syntax like the following to use this function in a different workbook:
![]()
But if this function is stored in an add-in file that’s open, you can use much simpler syntax because you don’t need to include the file reference:
![]()
Provide easier access for users. After you identify the location of your add-in, it appears in the Add-Ins dialog box, with a friendly name and a description of what it does.
Gain better control over loading. Add-ins can be opened automatically when Excel starts, regardless of the directory in which they are stored.
Avoid displaying prompts when unloading. When an add-in is closed, the user never sees the Save change in…? prompt.
Working with Add-ins
The most efficient way to load and unload add-ins is by choosing ToolsO Add-Ins. This command displays the Add-Ins dialog box shown in Figure 22-1. The list box contains the names of all add-ins that Excel knows about. In this list, check marks identify any currently open add-ins. You can open and close add-ins from the Add-Ins dialog box by selecting or deselecting the check boxes.
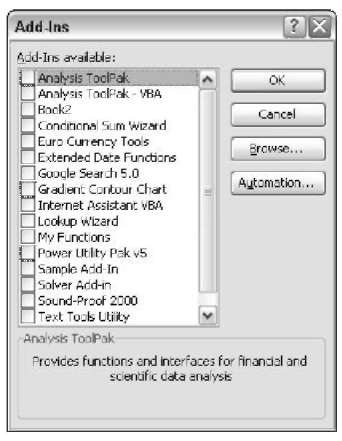
Figure 22-1:
The Add-Ins dialog box lists all of the add-ins known to Excel.
You can open most add-in files also by choosing the File pen command. However, you can’t close an open add-in by choosing File Close. You can remove the add-in only by exiting and restarting Excel or by writing a macro to close the add-in.
When you open an add-in, you may or may not notice anything different. In many cases, however, the menu changes in some way — Excel displays either a new menu or one or more new items on an existing menu. For example, when opening the Analysis ToolPak add-in gives you a new menu item on the Tools menu: Data Analysis. If the add-in contains only custom worksheet functions, the new functions appears in the Insert Function dialog box.
Add-in Basics
Although you can convert any workbook to an add-in, not all workbooks benefit from this conversion. Workbooks that consist only of worksheets (and no macros) become unusable because the add-ins are hidden; you are unable to access the worksheets.
In fact, the only types of workbooks that benefit from being converted to an add-in are those with macros. For example, a workbook that consists of general-purpose macros (Sub and Function procedures) makes an ideal add-in.
Creating an add-in is simple. Use the following steps to create an add-in from a normal workbook file:
1. Develop your application and make sure that everything works properly.
Don’t forget to include a method for executing the macro or macros. You might want to add a new menu item to the Tools menu or create a custom toolbar. See Chapter 20 for details on customizing the menus and Chapter 19 for a discussion of custom toolbars.
2. Test the application by executing it when a different workbook is active.
Doing so simulates the application’s behavior when it’s used as an add-in because an add-in is never the active workbook.
3. Activate the VBE and select the workbook in the Project window; choose Tools VBAProject Properties and click the Protection tab; select the Lock Project for Viewing check box and enter a password (twice); click OK.
This step is necessary only if you want to prevent others from viewing or modifying your macros or UserForms.
4. In Excel, choose File Properties.
5. Click the Summary tab.
6. Enter a brief descriptive title in the Title field and a longer description in the Comments field. Click OK.
Steps 4 through 6 are not required but make the add-in easier to use.
7. Choose Excel’s File Save As.
8. In the Save As dialog box, select Microsoft Office Excel add-in (*.xla) from the Save as Type drop-down list.
9. Specify the folder that will store the add-in.
Excel proposes a folder named AddIns, but you can save the file in any folder you like.
10. Click Save.
You’ve just created an add-in! A copy of your workbook is converted to an add-in and saved with an XLA extension. Your original workbook remains open.
An Add-in Example
In this section I discuss the basic steps involved in creating a useful add-in. The example uses the ChangeCase text conversion utility that I describe in Chapter 16.
The XLS version of this example is available at this topic’s Web site. You can create an add-in from this workbook.
Setting up the Workbook
The workbook consists of one blank worksheet, a VBA module, and a UserForm. In addition, I added code to the This Workbook object that creates a new menu item on the Tools menu.
This Workbook object
The following code, located in the Code window for the This Workbook object, is executed when the workbook (soon to be an add-in) is opened. This procedure creates a new menu item (Change Case of Text) on the Tools menu. (See Chapter 20 for details on working with menus.) This menu item executes the Change Case macro, which is listed in the next section.
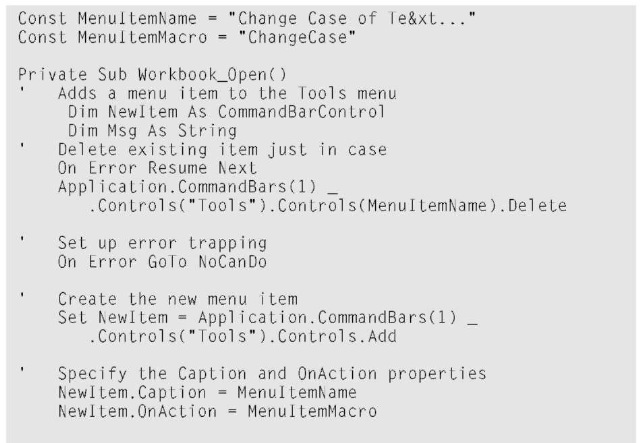
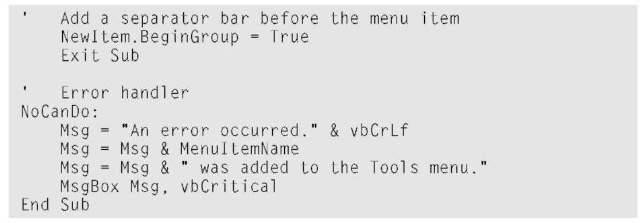
The following procedure is executed before the workbook is closed. This procedure removes the menu item from the Tools menu.

Module! module
The VBA module contains a short macro named ChangeCase that serves as the entry point. This procedure makes sure that a range is selected. If so, the UserForm is displayed.

UserForm
Figure 22-2 shows UserForm1. It consists of three OptionButtons, named OptionUpper, OptionLower, and OptionProper. These OptionButtons are inside a Frame control. In addition, the UserForm has a Cancel button (named CancelButton) and an OK button (named OKButton).
The code executed when the Cancel button is clicked shows up next. This procedure simply unloads the UserForm with no action:

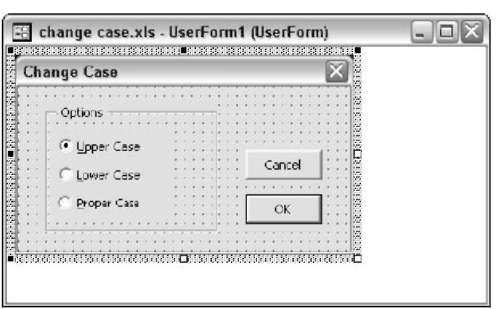
Figure 22-2:
The UserForm for the Change Case add-in.
The code executed when the OK button is clicked follows. This code does all the work:
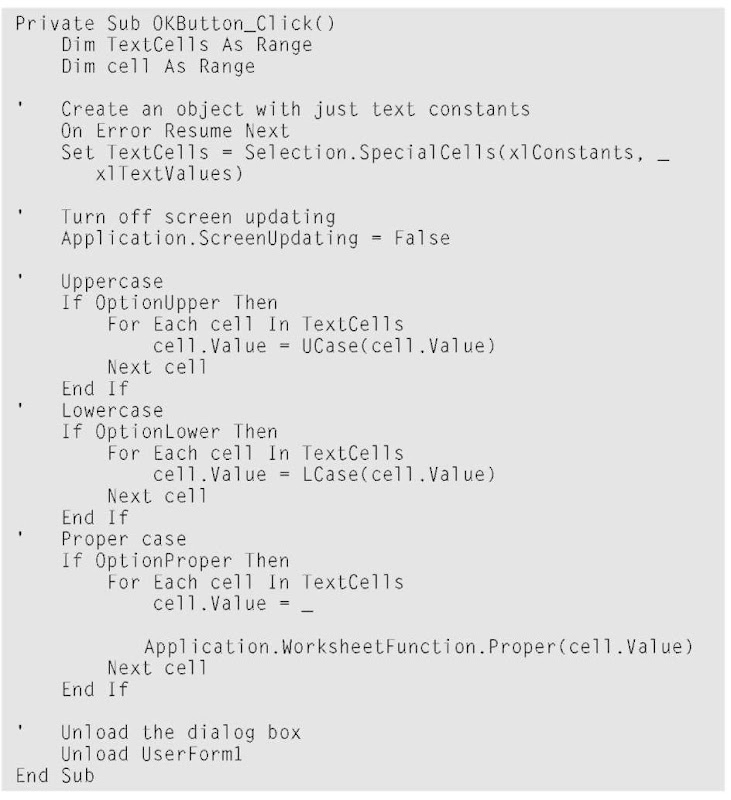
This version of ChangeCase differs from the version in Chapter 16. For this example, I use the SpecialCells method to create an object variable consisting of only those cells in the selection that contain constants (not formulas) or text. This makes the routine run a bit faster if the selection contains lots of formula cells. See Chapter 14 for more information on this technique.
Testing the Workbook
Test the add-in before converting this workbook. To simulate what happens when the workbook is an add-in, you should test the workbook when a different workbook is active. Remember, an add-in is never the active sheet, so testing it when a different workbook is open may help you identify some potential errors. Because this workbook has a Workbook_Open procedure (to add a menu item), save the workbook as an XLS file, close it, and then reopen it to ensure that this procedure is working correctly.
1. Open a new workbook and enter information into some cells.
For testing purposes, enter various types of information, including text, values, and formulas. Or just open an existing workbook and use it for your tests.
2. Select one or more cells (or entire rows and columns).
3. Execute the Change Case macro by choosing the new Tools Change Case of Text command.
I find that this method works just fine.
If the Change Case of Text command doesn’t appear on your Tools menu, the most likely reason is that you did not enable macros when you opened the change case.xls workbook. Close the workbook and then reopen it — and make sure that you enable macros.
Adding descriptive information
I recommend entering a description of your add-in, but this isn’t required.
1. Activate the change case.xls workbook.
2. Choose the File Properties command. The Properties dialog box opens.
3. Click the Summary tab, as shown in Figure 22-3.
4. Enter a title for the add-in in the Title field.
This text appears in the Add-Ins dialog box.
5. In the Comments field, enter a description.
This information appears at the bottom of the Add-Ins dialog box when the add-in is selected.
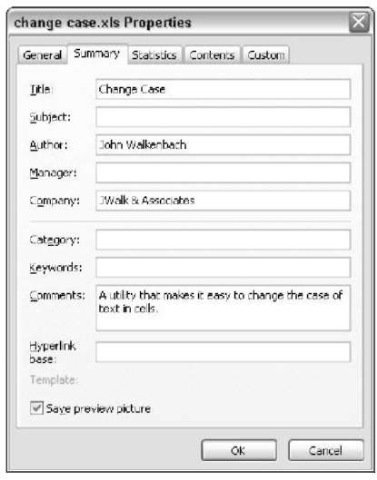
Figure 22-3:
Use the Properties dialog box to enter descriptive information about your add-in.
Creating the add-in
At this point, you’ve tested the change case.xls file, and it’s working correctly. The next step is to create the add-in:
1. Activate the VBE and select the change case.xls workbook in the Project window.
2. Choose Tools VBA Project Properties and click the Protection tab.
3. Select the Lock Project for Viewing check box and enter a password (twice).
4. Click OK.
5. Save the workbook.
6. Reactivate Excel.
7. Activate the change case.xls workbook and choose FileOSave As. Excel displays its Save As dialog box.
8. In the Save as Type drop-down, select Microsoft Excel Add-In (*.xla).
9. Click Save.
A new add-in file (with an XLA extension) is created, and the original XLS version remains open.
Opening the add-in
To avoid confusion, close the XLS workbook before opening the add-in created from that workbook.
Open the add-in with these steps:
1. Choose Tools Add-Ins.
Excel displays the Add-Ins dialog box. The Tools Add-Ins command is not available if no workbooks are open, so you may need to open a workbook or create a new workbook.
2. Click the Browse button.
3. Locate and select the add-in you just created.
4. Click OK to close the Browse dialog box.
After you find your new add-in, the Add-Ins dialog box lists the add-in. As shown in Figure 22-4, the Add-Ins dialog box also displays the descriptive information you provided in the Properties dialog box.
5. Click OK to close the dialog box and open the add-in.
The Tools menu displays the new menu item that executes the Change Case macro in the add-in.
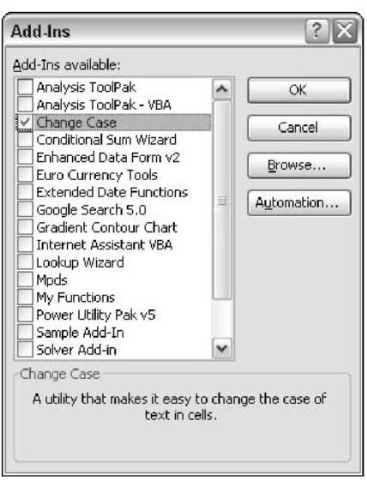
Figure 22-4:
The Add-Ins dialog box has the new add-in selected.
Distributing the add-in
You can distribute this add-in to other Excel users by simply giving them a copy of the XLA file; they don’t need the XLS version. When they open the add-in, the new Change Case of Text command appears on the Tools menu. Because you locked the file with a password, your macro code cannot be viewed by others (unless they know the password).
Modifying the add-in
If you want to modify the add-in, you need to unlock it:
1. Open your XLA file if it’s not already open.
2. Activate the VBE.
3. Double-click the project’s name in the Project window.
You are prompted for the password.
4. Enter your password and click OK.
5. Make your changes to the code.
6. Save the file from the VBE by choosing File Save.
If you create an add-in that stores information in a worksheet, you must set the workbook’s IsAddIn property to False to view the workbook. You do this in the Property window when the This Workbook objects is selected; see Figure 22-5. After you’ve made your changes, make sure that you set the IsAddIn property back to True before you save the file.
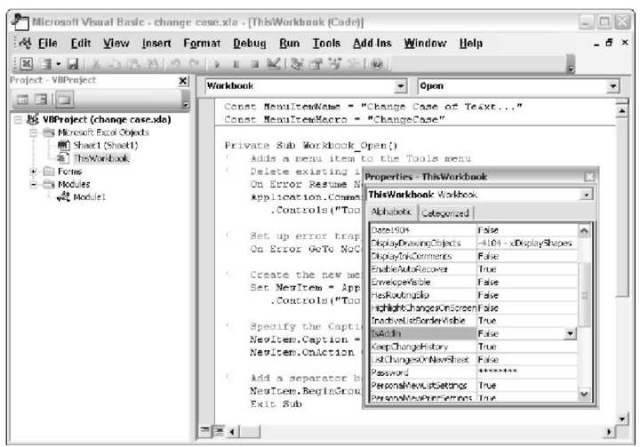
Figure 22-5:
Making an add-in not an add-in.
You now know how to work with add-ins and why you might want to create your own add-ins. One example in this chapter shows you the steps for creating an add-in that changes the case of text in selected cells. The best way to discover more about add-ins is by creating some.
