What is a network? A network is a way to connect computers so that they can communicate with each other – as if they were one giant computer with different terminals. The best part is that a network enables high-speed Internet connection sharing, as well as the sharing of printers and other peripherals. By setting up a computer network, one computer may run bookkeeping, another can run a graphics server, and others may be used as personal PCs for different users. From each networked computer, programs and files on all other networked computers can be accessed.
Today’s technologies allow you to perform this same miracle on the home network. You can connect as many computers as you like, and run your business from anywhere in your home – you can even hook up your laptop from the bedroom if you don’t feel like getting out of bed.
Now for the whys of a home network. A network is a convenient way to run a business. All big companies use a network, and so should you. You can print your postage, for example, on one printer from any computer in your home or office. You can extend your DSL line or Internet cable connection so that you can use it anywhere in your home – as well as in your office.
In a network, you can set certain directories in each computer to be shared. That way, other computers on the network can access those directories. You can also password-protect certain files and directories to prevent others -your children or your employees – from accessing them.
We devote the rest of this appendix to a quick and dirty discussion of home networks installed on Windows-based PCs. We give you a lesson on what we know works for most people. At this point, we want to remind you that we’re not techno-whizzes (just like we’re not lawyers or accountants). For more information about home networking, see Home Networking Kathy Ivens.
What we know about home networks, we’ve found out the hard way – from the school of hard knocks. A lot of research went into this appendix as well, so humour us and read on.
Variations of a Home Network
You have a choice of four types of home network: Ethernet, powerline, home phoneline, and wireless. See Table B-1 for a quick rundown of some pros and cons of each.
| Table B-1 | Types of Network Pros and Cons | |
| Type | Pros | Cons |
| Traditional Ethernet* | Fast, cheap, and easy set-up | Computers and printers must be hardwired; cables run everywhere |
| Home phoneline | Fast; runs over your home phone lines | Old wiring or not enough phone jacks may be a drawback |
| Powerline | Fast; your home is already pre-wired with outlets | Electrical interference may degrade the signal |
| Wireless network** | Pretty fast; wireless (no ugly cords to deal with) | Expensive; may not be reliable because of interference from home electrical devices |
The home phoneline network is fading in popularity because people don’t have enough phone jacks in their house to make it an easy proposition.
The wireless network is currently the hot ticket and highly touted by the geek gurus. However, the wireless signal may experience interference because the network runs with the same 2.4 GHz technology as some home wireless telephones. We have a wireless network as a secondary network, and it works, sort of. Our primary network is a hybrid, combining Ethernet, home phone-line, and wireless.
With broadband over powerline, you get high-speed Internet directly into your home electrical system. Just plug in your powerline boxes (see the section ‘Powerline network’, later in this appendix) and you’re up and running!
All networks need the following two devices:
Router: A router allows you to share a single Internet IP address among multiple computers. A router does exactly what its name implies; it routes signals and data to the different computers on your network. If you have one computer, the router can act as a firewall or even a network device leading to a print server (a gizmo that attaches to your router and allows you to print directly to a printer without having another computer on).
Modem: You need a modem for Internet connection. You get one from your cable or phone company and plug it into an outlet with cable (just like your TV) or into a special phone jack if you have DSL. The modem connects to your router with an Ethernet cable.
If you have broadband, you don’t even need to have a main computer turned on to access the connection anywhere in your house. If you keep a printer turned on (and have a print server), you can also connect that to your router and print from your laptop in another room – right through the network.
Before touching your network card or opening your computer to install anything, touch a grounded metal object to free yourself of static electricity. Otherwise, a spark could go from your hand to the delicate components on the network card or another card, thereby rendering the card useless. Better yet, go to an electronics shop and purchase a wrist-grounding strap that has a cord with a gator clip, which you clip to a metal part of the computer before touching anything inside for safety.
Powerline network
An ingenious invention, a powerline network uses your existing home power-lines to carry your network and your high-speed Internet connection. You access the network by plugging a powerline adapter from your computer into an electrical outlet on the wall. Powerline networks have been around for a while and are in the second round of technological advances.
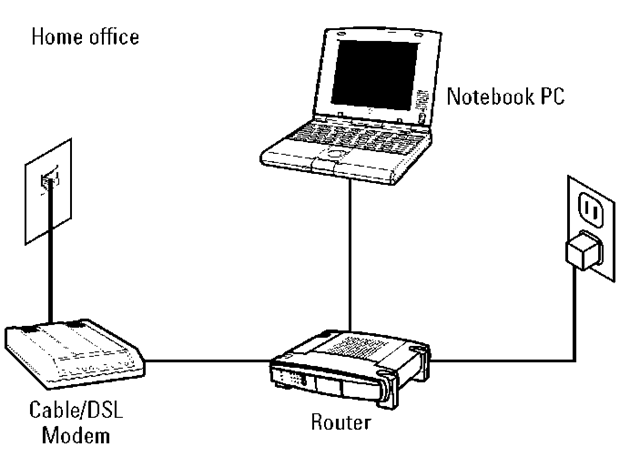
Hooking up a powerline network is incredibly easy. Most installations work immediately straight out of the box. Figure B-1 shows you the base set-up. Computers in any other rooms need only a powerline bridge adapter with an Ethernet cable to a network card.

Figure B-1:
Tha main computer setup for a powerline network.
To set up a powerline network, you need the following (in addition to a router and modem):
Electrical outlets: We bet you have more than one in each room of your house.
An Ethernet card for each computer: Many new computers already have an Ethernet card. If your computer doesn’t, you can get inexpensive Ethernet cards for around £10.
Powerline Ethernet bridge for each computer: You plug an Ethernet cable from your computer into the powerline Ethernet bridge, and then plug Netgear’s Ethernet bridge into a wall outlet.
Hooking up the powerline network goes like this:
1. The high-speed connection comes in through your DSL or cable line.
2. Plug the cable line (or phoneline for DSL) into your modem.
3. Connect one ‘in’ Ethernet cable from your modem to a router.
4. Connect one ‘out’ Ethernet cable from the router to a local computer.
5. Connect another ‘out’ Ethernet cable to the powerline adapter.
6. Plug the powerline box into a convenient wall outlet.
Home phoneline
Wall telephone cabling in the average home contains four wires, and your telephone uses only a portion of two. Plenty more room exists in the cable
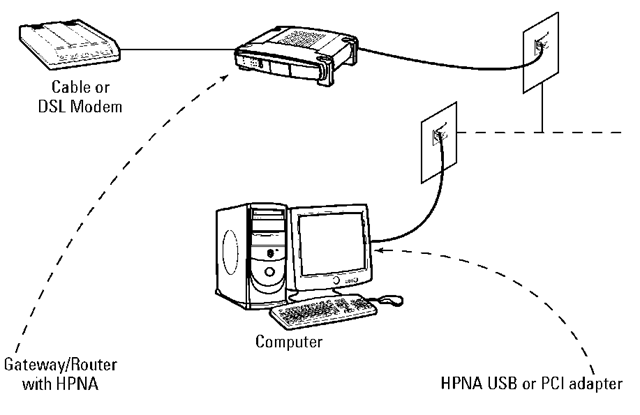
for your network. Figure B-2 shows you what the typical home phoneline setup looks like.

Figure B-2:
A broadband sharing home phoneline setup.
The phoneline network sends data at a speedy 10MB per second (the same speed as a regular Ethernet network) and can operate with computers or other equipment placed as far as 1,000 feet apart and will work in homes as large as 10,000 square feet. Best of all, you can talk on the same phoneline without causing any interference.
To set up your network to carry files and your high-speed connection throughout your house, you need some extra hardware:
Bridge: A device that connects your Ethernet (router connection) with your powerline network. You can get a device that combines the router and the bridge.
HPNA network adapter for each computer: You need an adapter that enables your computer to become one with other computers on the network. These adapters are available also as a USB device, eliminating the need to install a card in your computer.
Phone jacks: Pretty essential for plugging in the phone wire from the adapter.
To install a home phoneline network, just follow these steps (but follow your manufacturer’s instructions if they vary from this information).
If you’re installing a USB (universal serial bus) adapter, don’t bother trying to open your computer. Just plug in the adapter to an available USB port and proceed to Step 5.
1. Turn off your computer and disconnect its power cord.
2. Open the cover of your computer.
3. Install the network card in an available slot.
Touch the card only by the metal part on its outside edge. When installing the card, press firmly down on the top of the card with your thumb to properly seat the card in the slot. Fasten the card to the chassis by tightening the screw on the metal edge.
4. Replace the cover on your PC and reconnect the power cord.
5. Connect one end of the (RJ-11) telephone cord that came with your network card to the port labelled To Wall on the card, and plug the other end into a convenient wall telephone jack.
If you have a telephone that needs to use that wall jack, connect the cord to the port labelled To Phone; your phone will work through the network card.
6. Power up your computer.
If you’re lucky, your computer will see the new hardware and ask you to install the driver. If you’re not lucky, check the instructions (as a last-ditch effort, you can always read the instructions!) for troubleshooting tips.
7. When asked, insert the CD or the disk that came with the card (containing those tricky drivers) and follow the on-screen instructions.
As you go through the instructions, decide on a name for each computer that you want to install on the network.
8. Set up directories that you want shared on the network.
Go to My Computer, select the directories (denoted by folder icons) that you want to share, right-click, and indicate that you want to share these directories with other computers on the network. Do the same with your local printers.
9. Repeat Steps 1-8 on each computer.
As you add a computer, double-check that it can communicate with the other computers that you’ve already installed on the network by trying to open a shared directory on a remote computer and printing a test page on a remote printer.
10. If your network is not functioning properly after you complete all recommended steps, call technical support as many times as necessary to get your network up and running.
When your network connection is flying and working flawlessly, you can add your broadband.
11. To install the broadband connection, take the Ethernet cable from the modem and connect it to the back of your router. Then connect another Ethernet cable from the router to the phoneline network bridge.
12. Connect the phoneline that comes with your bridge from the bridge to a telephone wall jack.
Hey presto – you should be able to go with your Internet connection on all the computers in your network.
The wall connectors each have an outlet for a telephone cord that you plug into your wall jack. (You can also cheat in one room and connect two computers to one phone jack with a splitter that makes two jacks out of one.)
Hooking up With Wireless
Wireless networking – also known as WiFi or, to the more technically inclined, IEEE 802.11 – is the hot new technology for all kinds of networks. Wireless networking is an impressive system when it works, with no cables or connectors to bog you down.
If you’re concerned about your next-door neighbour hacking into your computer through your wireless connection – stop worrying. Wireless networks are protected by their own brand of security, called WEP (or Wired Equivalent Privacy). WEP encrypts your wireless transmissions and prevent others from getting into your network. Although super-hackers have cracked it, WEP is still the best possible system at present.
To link your laptop or desktop to a wireless network with WEP encryption, you enter a key code from the wireless access point. Just enter the code into your wireless card software on every computer that uses the network, and you should be able to link up.
You may get confused when you see the different types of wireless available. The following list provides the low-down on the variations:
802.11a: This wireless format works really well – fast with good connectivity. Unfortunately, this format is also very expensive. 802.11a is used when you have to connect a large group, such as at a convention centre or in a dormitory. The format delivers data at speeds as high as 54 Mbps (megabits per second). It runs at the 5 GHz band (hence its nickname WiFi5), so it doesn’t have any competition for bandwidth with wireless phones or microwave ovens.
802.11b: This wireless type is the most common, and is used on the most platforms. It travels over the 2.4 GHz band. The 802.11b version is slower than the 802.11a version, transferring data at only 11 Mbps. However, the 802.11b is a solid, low-cost solution when you have no more than 32 users per access point.
The lower frequency of 2.4 GHz drains less power from laptops and other portable devices, so laptop batteries will last longer. Also, 2.4 GHz signals travel farther and can work through walls and floors more effectively than 5 GHz signals.
802.11g: This format is the newest type based on the 2.4 GHz band. The 802.11g speeds data up to a possible 54 Mbps, and is backward compatible with 802.11b service.
Installing your wireless network isn’t a gut-wrenching experience either (although it can be if the signal doesn’t reach where you want it). You hook up your computer (a laptop works best) to the wireless access point (the gizmo with the antenna that broadcasts your signal throughout your home or office) to perform some set-up tasks such as choosing your channel and setting up your WEP code. (The wireless access point comes with its own instructions.)
After you complete the set-up and turn on your wireless access point, you have a WiFi hotspot in your home or office. Typically, a hotspot provides coverage for about 100 feet in all directions, although walls and floors cut down on the range.
Here are some simplified steps on configuring your network:
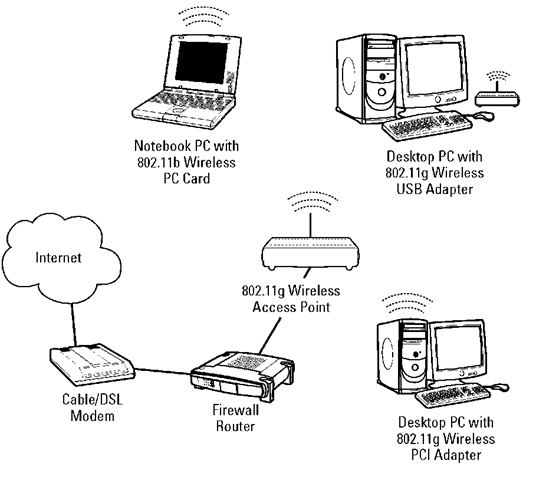
1. Run a cable from your cable connection or a phone cord from your DSL line to your modem.
2. Connect one Ethernet cable from your modem to your router.
3. Connect one Ethernet cable to your wireless access point.
Take a look at this network diagram from Netgear in Figure B-3.

Figure B-3:
A typical home wireless network.
Internet Security and Your Home Network
A dial-up connection exposes your computer to the Internet only when you dial up and get connected. Most broadband Internet connections are always on, which means your computer is always exposed. Shield your computer with a strong firewall and an antivirus program.
Firewall software
When you’re connected to the Internet, you’re exposed not only to hackers but also to threats such as Trojan horses, programs that can get into your computer when you innocently view an infected Web site. Once inside your computer, the Trojan horse, like ET, phones home. From there, an evil-deed-doer, now with a direct line to your computer, may be able to wreak havoc with your precious data.
If you’re technically inclined – and even if you’re not – visit the Web site for Gibson Research Corporation (www.grc.com). Gibson Research is the brainchild of an early PC pioneer, Steve Gibson, who’s renowned as a genius in the world of codes and programming. Steve is the expert when it comes to exposing the vulnerabilities of systems over the Internet. A few free diagnostic programs on this site will check your computer’s vulnerability to Internet threats.
Shields Up and LeakTest are programs that test your computer and terrify you with results that expose the vulnerability of your Internet connection. We learned about ZoneAlarm on Steve’s site. This free program has won every major award in the industry as the most secure software firewall. If your main concern is safety, visit www.zonelabs.com for a free download of ZoneAlarm.
Antivirus software
Even if you have a firewall, you still need antivirus software to protect you from the idiots who think sending destructive code through e-mail is fun. The leading programs in this area are Norton Antivirus and McAfee. One of the problems inherent in buying software is that you may be urged to load much more than you need onto your computer. If all you need is an antivirus software, purchase only an antivirus software. But don’t delay. Buy the software now and update the antivirus files each week so that you’re fully protected from the latest viruses.
